On the "Scheduler" screen, you can view the appointments of your own or appointments of other users, organizations, or facilities.
You can toggle the screens such as group day view and week view based on your purpose of use.
Appointment Format
View in Scheduler
Description
Group Day view
Group Week view
Appointments of organizations, users, and facilities per day or week are displayed for each group.
Groups that you can select
To view an appointment of a user:
My Group:
This is a group created by a user. Only users who have created My Groups can use them.
For details, refer to My Group Settings.
All facilities:
They may not be displayed depending on the system administrator settings.
For details, refer to Showing All Facilities.
Facility Group:
This group consists of multiple facilities. It is displayed when system administrators have configured the facility groups.
Day view
Appointments for the selected organizations, users, or facilities per day are displayed.
Week view
Appointments for the selected organizations, users, or facilities per week are displayed.
Month view
Appointments for the organizations, users, or facilities per month are displayed.
Year View
Your events in a year will be displayed.
Type of Appointment
Type of Appointment
Description
Regular
Regular appointments. You can also add an appointment spanning multiple days.
A regular appointment without start time and end time is called a whole day appointment. An icon appears indicating that it is a whole day appointment at the beginning of the appointment title.
All day
An appointment with its start date and end date. An icon appears indicating that it is an all-day appointment at the beginning of the appointment title.
Repeating appointments
Appointments repeated on certain conditions. An icon appears indicating that it is a repeating appointment at the end of the appointment title.
Duplicated appointments
An icon appears indicating that there are duplicated appointments at the beginning of the appointment title.
Pending appointments
If you have not replied to an attendance request, an icon appears indicating that the request is pending.
Tentative appointments
Appointments with unfixed date and time. For tentative appointments, their titles are displayed as green links.
Private appointments
Only creators, attendees, and "Shared with" users can view, edit, or delete private appointments.
a): The logged-in user is a creator or set as an attendee or a "Shared with" user of this private appointment. The appointments without start/end time are marked as "whole day" on the appointment details page.
b): The logged-in user is not a creator, nor set as an attendee/"Shared with" user of this private appointment. If both the start time and end time are not specified, nothing is displayed.
Depending on your system administrator settings, the time nor the "private appointment" may not be displayed.
Shared appointments
You can share appointments in Garoon version 5.9.0 or later. The logged-in user is set as a "Shared with" user of appointments. They may not be displayed depending on the system administrator settings.
Shared appointments are displayed only in users' Scheduler screen.
However, if the total number of organizations and roles the users belong to is 51 or more, they cannot see the shared appointments on the Scheduler screen.
The shared appointments are displayed with "[Shared]" in their title. The "[Shared]" label is displayed only on the "Appointment details" screen.
Group Day View Screen
The group day view screen displays the appointments for organizations, users, and facilities for a day.
Description of the items
Number
Description
1
Item to toggle appointment view:
Click the Group day, Group week, Day, Week, Month, or Year button to switch the view.
2
Link to add an appointment:
"New appointment" screen appears.
Link to arrange an appointment:
You can set the conditions for an appointment and add an appointment that is suitable from the displayed candidates.
"Response request list" Link:
Appointments that you are requested to respond to attendance requests and appointments that you have created with attendance requests are displayed.
3
Items for Search:
Select "User/facility" from the dropdown list, enter search keywords and click the search icon to search users and facility appointments.
From the dropdown list, select "Scheduler", enter search keywords, and click the search icon to search your appointments including search keywords.
When you click "Advanced Search", the appointment search screen appears.
4
Item to toggle view:
Group showing appointments:
The name of the group displaying the appointment.
Icon:
Select the group for which you want to display appointments.
In Garoon version 5.15.0 and later, Create My group is displayed at the bottom of the drop-down list, from which you select targets to show their schedules. You can click Create My group to move to the "Add My group" screen. For details, refer to My Group Settings.
appointment is displayed:
Select the facility group for which you want to display appointments.
Icon:
The "User selection" screen appears. You can select users to view their appointments.
5
Date Toggle Link:
icon:
Displays the appointments in the previous week.
icon:
Displays the appointments in the previous day.
"Today" Link:
Displays the appointments of today.
icon:
Displays the next day's appointment.
icon:
Displays the appointments in the next week.
6
"Options" Link:
Show all titles:
Displays the omitted appointment titles, the user information icon, and links.
Apply the time zone for each user:
Adjust the displayed date and time to the timezone of each user.
An example of Mr. Kato's time zone is "(UTC + 09:00) Tokyo" and Mr. Kimura's time zone is "(UTC + 08:00) Beijing":
Showing the Uncompleted To-Dos:
Displays the To-Do tasks, both personal and shared, that are uncompleted on the due date.
7
User Name Link:
User details screen is displayed.
"Day" Link:
Switches to the Day view screen.
"Week" Link:
Switches to the Week view screen.
"Month" Link:
Switches to the Month view screen.
Phone Messages History Link:
The Phone Messages history screen appears.
Icon:
Indicates you have unread Phone Messages.
Adding Phone Messages Link:
The screen for adding Phone Messages appears. You can add Phone Messages to other users.
Icon:
Indicates the presence status of the user.
For details, refer to How to View the Screen for presence information.
Rokuyo:
This is only available for Japanese. To display it in the Scheduler, you need to configure it on both system administration and personal settings.
The icon of the weather forecast (region name):
This is only available for Japanese.
When you click the weather forecast link, the details screen of the weather information is displayed in a separate window.
To display it in the Scheduler, you need to configure it on both system administration and personal settings.
Shared appointments:
You can share appointments in Garoon version 5.9.0 or later.
You are registered in these appointments as "Shared with", not attendees.
icon:
"New appointment" screen appears.
Appointment Title Link:
Appointment details screen appears.
Group Week View screen
The group week view screen displays the appointments for organizations, users, and facilities for a week.
The description of other items which are also used in other screens are omitted.
Description of the items
Number
Description
1
"Options" Link:
Show all titles:
Displays the omitted appointment titles, the user information icon, and links.
Apply the time zone for each user:
Adjust the displayed date and time to the timezone of each user.
An example of Mr. Kato's time zone is "(UTC + 09:00) Tokyo" and Mr. Kimura's time zone is "(UTC + 08:00) Beijing":
a): Displayed only when the option for applying the time zone for each user is selected.
Showing the Uncompleted To-Dos:
Displays the To-Do tasks, both personal and shared, that are uncompleted on the due date.
Show overdue To-Dos:
The titles of the uncompleted private To-Dos and shared To-Dos are displayed in the field of today.
However, To-Dos passed the due dates for longer than 91 days are not displayed.
2
To-Do name links:
To-Do List details screen appears.
Anniversary icon:
This is an event that has been added to the My calendar as an anniversary.
Workday icon:
This is an event that is added as a work day by your system administrator in the calendar setting.
Holidays icon:
This is an event that is added as a holiday by your system administrator in the calendar setting.
Day View Screen
The day view screen displays the appointments for the selected organizations, users, or facilities for a day.
The description of other items which are also used in other screens are omitted.
Description of the items
Number
Description
1
Item to toggle view:
icons:
You can select or clear the checkboxes of all users, organizations, and facilities at once. If you clear the checkboxes, those appointments are no longer displayed.
Users, facilities, or organizations you are viewing:
Users, organizations, and facilities to be displayed in the day planner view. To hide the appointments, clear the checkbox next to its name.
icon:
Deletes users, organizations, and facilities that are displayed.
icon:
Adds a user, organization, or facility for which you want to view appointments. You can specify up to 20 users, organizations, and facilities.
2
"Options" Link:
Showing the Uncompleted To-Dos:
Displays the To-Do tasks, both personal and shared, that are uncompleted on the due date.
Show overdue To-Dos:
The titles of the uncompleted private To-Dos and shared To-Dos are displayed in the field of today.
However, To-Dos passed the due dates for longer than 91 days are not displayed.
3
Whole day appointment:
Whole day appointments of users, organizations, and facilities are respectively displayed by color codes.
Displays a number indicating how many users are included as attendees of the appointment.
4
All day appointment:
All day appointments of users, organizations, and facilities are displayed.
Displays a number indicating how many users are included as attendees of the appointment.
5
Regular appointments:
Appointments of the selected users, groups, organizations, and facilities are displayed. When any of the displayed users, organizations, or facilities have appointments, those slots are shaded.
The following functions are available:
Add a new appointment of the selected users, groups, organizations, and facilities by double clicking anywhere where you want to add it or dragging the time period. By dragging, you can adjust the time range of the appointment.
Change the date and time of an appointment by dragging and dropping the appointment or dragging the top or bottom of the appointment.
Week View Screen
The week view screen displays the appointments for the selected organizations, users, or facilities for a week.
The description of other items which are also used in other screens are omitted.
Description of the items
Number
Description
1
"Printable version" Link:
The print settings screen of the appointment is displayed.
2
"Options" Link:
Showing the Uncompleted To-Dos:
Displays the To-Do tasks, both personal and shared, that are uncompleted on the due date.
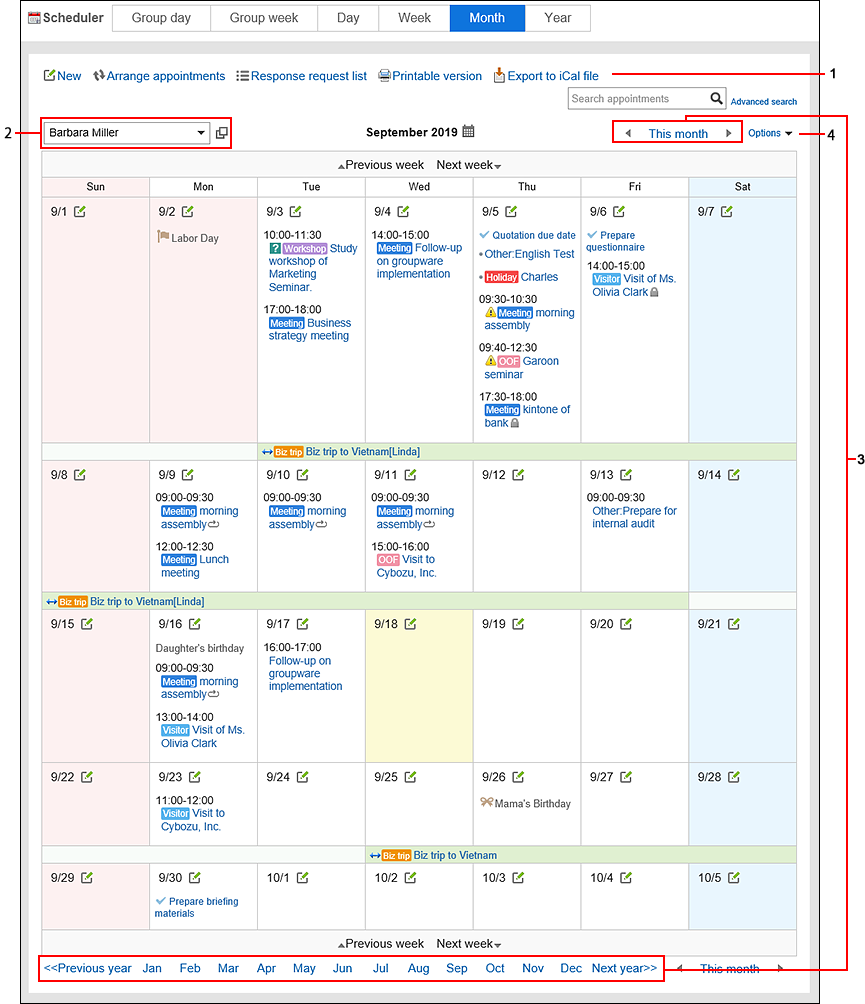
Month View Screen
The month view screen displays the appointments for the selected organizations, users, or facilities for a month.
The description of other items which are also used in other screens are omitted.
Description of the items
Number
Description
1
Link to "Export to iCal file":
Export the appointments for a month to the iCalendar file.
2
Item to toggle view:
User, organization, or facility whose appointments are currently displayed:
This is a name of a user, organization, or facility whose appointments are currently displayed. Users, organizations, or facilities you can select vary depending on the actions you have taken in the previous screen.
When you select a group in the screen other than the Month view screen, then move to the Month view screen:
You can select users, organizations, or facilities which have been selected in the previous screen. For details on groups, refer to "Groups that you can select" in Appointment Format.
When you directly access the Month view screen or do not select any groups in the previous screen:
You can select the login user only. For details on groups, refer to "Groups that you can select" in Appointment Format.
Icon:
The "User selection" screen appears. You can select a user to view their appointments.
3
Items for switching months:
icon:
Displays appointments for the previous month.
This month link:
Displays appointments for this month.
icon:
Displays appointments for the next month.
Links to switch months:
You can also move to the desired month by using the previous year link, links for each month, or next year link.
4
"Options" Link:
Show all titles:
Displays the omitted appointment titles, the user information icon, and links.
Showing the Uncompleted To-Dos:
Displays the To-Do tasks, both personal and shared, that are uncompleted on the due date.
Year View Screen
In the year view, your events in a year will be displayed.
By clicking the date link, you can check the appointment of the day you selected.
The description of other items which are also used in other screens are omitted.
Description of the items
Number
Description
1
Items for switching years:
icon:
Displays appointments for the previous year.
This year link:
Displays appointments for this year.
icon:
Displays appointments for next year.
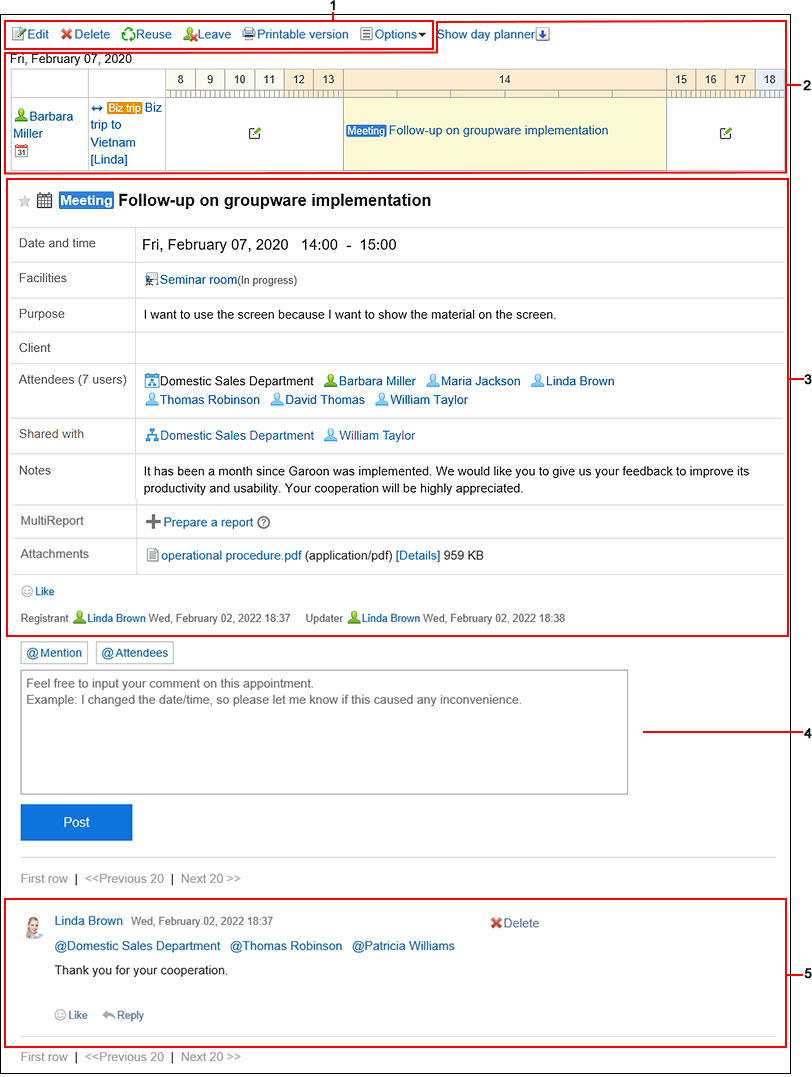
Appointment Details Screen
This section describes how to view the appointment details screen.
Description of the items
Number
Description
1
"Change" Link:
You can change the appointment.
"Delete" Link:
You can delete an appointment.
Reuse Link:
You can reuse an appointment to create a new appointment. The tentative appointment cannot be reused.
Leave this appointment link:
Leave the appointment. You cannot leave the tentative appointment.
"Printable version" Link:
The print settings screen of the appointment is displayed.
"Options" Link:
View planner of attendees / facilities:
Displays the planner of the attendees and facilities of the appointment. You can use group day view, group week view, day view and week view.
New Space: Create a space where the attendee of an appointment has been assigned as a member.
Associate with a report:
Associates a report created using MultiReport with an appointment. For details, refer to Associating existing reports with appointments.
In Garoon version 5.15.0 and later, they are displayed only in the appointment where you are participating. They may not be displayed depending on the system administrator settings.
In the earlier version of Garoon 5.15.0, they are displayed in the Reports link.
2
Items for day appointments:
Hide day appointments link:
Hides the day view screen items.
Show day appointments link:
Displays the day view screen items.
User Name Link:
User details screen is displayed.
Month appointment icon:
Switches to the Month view screen.
icon:
"New appointment" screen appears.
Appointment Title Link:
Appointment details screen appears.
3
Body of appointments:
Information about the appointment is displayed. The contents is different depending on the appointment you add.
MultiReport:
Click Prepare a report link to create a report in MultiReport which can be associated with an appointment. For details, refer to Create a Report Related to an Appointment.
It is displayed only in the appointment where you are participating. It may not be displayed depending on the system administrator settings.
MultiReport items are displayed in Garoon version 5.15.0 or later.
Attachment:
The file attached to the appointment.
"Respond" Link:
You can easily respond to the body of the schedule.
Depending on your system administrator settings, the links may not be displayed or the wording will be different.
4
Comment Field:
Enter a comment for the appointment.
Post button:
You can post comments.
5
"Delete" Link:
Deletes the comment. It is displayed only for the comments that the login user has written.
"Respond" Link:
You can quickly respond to comments.
Depending on your system administrator settings, the links may not be displayed or the wording will be different.
"Reply" Link:
You can reply to a comment. By clicking Reply, the sender of the original comment is displayed in the recipient area of your reply.
"Reply all" Link:
Send a reply to all recipients (except yourself) specified in the original comment. Appears when you hover the cursor over the comment.
By clicking Reply all, the sender of the original comment, and users (except yourself), departments, and roles specified as recipients in the original comment are displayed in the recipient area of your reply.
Permalink:
Displays the URL of the comment. Appears when you hover the cursor over a comment.
Accessing Permalink allows you to directly access the designated comment.
For details, refer to Permalink.
 The shared appointments are displayed with "[Shared]" in their title. The "[Shared]" label is displayed only on the "Appointment details" screen.
!["[Shared]" is displayed in the title in the Appointment details screen](/g5/img-en/user_application_scheduler_view_16.gif)