General settings for Scheduler
On the "General Settings" page of scheduler, you can set basic scheduler functions.
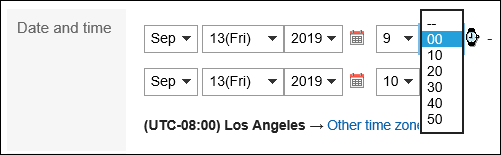
Setting up Units of Time to Select When Adding Appointments
Select the units of time in which you can add appointments and reserve facilities.
-
Click the administration menu icon (gear icon) in the header.
-
Click System settings.
-
Select "Application settings" tab.
-
Click Scheduler.
-
Click General settings.
-
In the field for setting the units for appointments on "General settings" screen, select time as the unit.
The following time units can be set:
- 5 minutes
- 10 minutes
- 15 minutes
- 30 minutes
-
Confirm your settings and click Save.
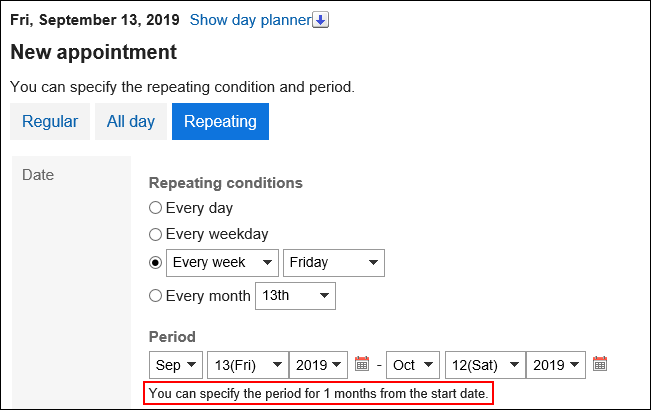
Setting up Repeating Appointment Periods
Set the period in which you can add repeating appointments.
An example of setting the period for repeating appointments "one month":
-
Click the administration menu icon (gear icon) in the header.
-
Click System settings.
-
Select "Application settings" tab.
-
Click Scheduler.
-
Click General settings.
-
In the field to set the period for repeating appointments in "General Settings" screen, select the period.
The following period can be set:
- 1 month
- 2 months
- 3 months
- 4 months
- 5 months
- 6 months
- 1 year
-
Confirm your settings and click Save.
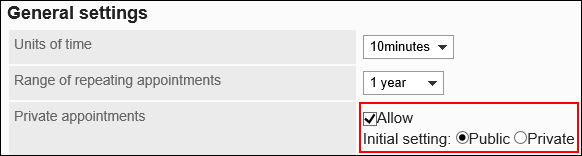
Allowing Users to Add Private Appointments
Select whether to allow users to add private appointments.
If you allow users to add private appointments, you must also set the default value for visibility of appointments.
Only creators, attendees, and "Shared with" users can view, edit, or delete private appointments. Other users cannot view the details of private appointments.
If you allow users to add private appointments in general settings, they can add private appointments.
If you do not allow users to add private appointment, the field does not appear on the appointment screen for users. All appointments will be Public.
-
Click the administration menu icon (gear icon) in the header.
-
Click System settings.
-
Select "Application settings" tab.
-
Click Scheduler.
-
Click General settings.
-
In the "Private appointments" field on "General Settings" screen, select "Allow" checkbox.
-
Select the default visibility value for appointments.
The default visibility of appointments can be set only if you allow users to add private appointments.
The default values that can be set are as follows:- Public
- Private
-
Confirm your settings and click Save.
Hiding Private Appointments Completely
You can set how private appointments are displayed to users other than creators, attendees, and "Shared with" users.
You can select whether to display the existence of private appointments or hide them completely.
-
When the logged-in user is a creator, or set as an attendee/"Shared with" user
A private icon appears next to the appointment subject.
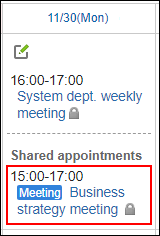
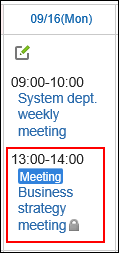 If the logged-in user is set as a "Shared with" user of a private appointment, the appointment is displayed in the Shared appointment area.
-
When the logged-in user is not a creator, nor set as an attendee/"Shared with" user
"Private appointment" is displayed at the time of the appointment. The appointment details are not displayed.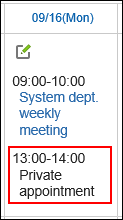
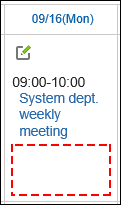
If you enable the "Hide private appointments completely" setting, the information about private appointments is completely hidden. Other users cannot see anything about private appointments.
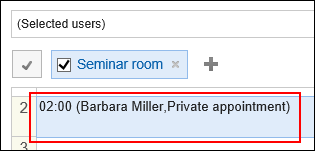
If you plan to use a facility, the timeframe for use and the creator of the appointment will be displayed on the facility appointment.
-
Click the administration menu icon (gear icon) in the header.
-
Click System settings.
-
Select "Application settings" tab.
-
Click Scheduler.
-
Click General settings.
-
In "Visibility of private appointments" field on "General settings" screen, select "Hide private appointments completely" checkbox.
-
Confirm your settings and click Save.
Allowing Users to Specify Organizations/Roles as "Shared with"
You can select whether to allow users to specify organizations or roles for "Shared with" users of appointments.
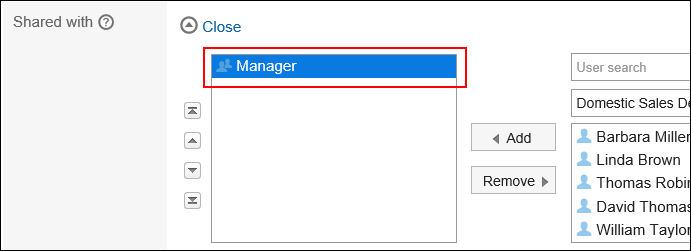
To allow users to specify roles for "Shared with", you also need to allow users to use roles.
For details, refer to Role Permissions.
-
Click the administration menu icon (gear icon) in the header.
-
Click System settings.
-
Select "Application settings" tab.
-
Click Scheduler.
-
Click General settings.
-
In "Specify organizations/roles for the "Shared with" users" field on "General Settings" screen, select "Allow" checkbox.
-
Confirm your settings and click Save.
Setting up Notifications to "Shared with" Users
Select whether to send update notifications of an appointment (in which "Shared with" users are specified) to users who are not attendees of the appointment.
-
Click the administration menu icon (gear icon) in the header.
-
Click System settings.
-
Select "Application settings" tab.
-
Click Scheduler.
-
Click General settings.
-
In "Notifications to the "Shared with" users" field on "General Settings" screen, select "Do not send notifications to the "Shared with" users" checkbox.
When the "Do not send notifications to the "Shared with" users" checkbox is selected, the update notifications will be sent to only attendees. The update notifications will not be sent to the users who are listed in the "Shared with" field. -
Confirm your settings and click Save.
Displaying Shared Appointments
Select whether to display shared appointments in the Scheduler screen.
Shared appointments are displayed only in users' Scheduler screen.
If you set to display shared appointments in the Scheduler screen, we recommend you to set notifications to the "Shared with" users.
- To display shared appointments in the Scheduler screen:
Shared appointments are displayed in the logged-in user's Scheduler screen.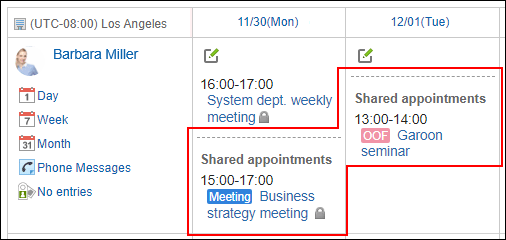
- Not to display shared appointments in the Scheduler screen:
Shared appointments are not displayed in the logged-in user's Scheduler screen.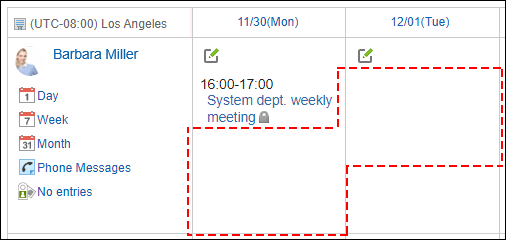
-
Click the administration menu icon (gear icon) in the header.
-
Click System settings.
-
Select "Application settings" tab.
-
Click Scheduler.
-
Click General settings.
-
In the "Shared appointments" field on the "General settings" screen, select the "Show in the Scheduler screen" checkbox.
-
Confirm your settings and click Save.
Adding Default "Shared with" Automatically
Configure whether to automatically populate the "Shared with" field with the default value of the "shared with" users when you add an appointment.
For the default values of the "shared with" users, refer to Setting Up Default Shared with Users in Appointments.

-
Click the administration menu icon (gear icon) in the header.
-
Click System settings.
-
Select "Application settings" tab.
-
Click Scheduler.
-
Click General settings.
-
In the "Auto-adding default "Shared with"" option on the "General settings" screen, select the "Add default "Shared with" users automatically when adding an appointment" checkbox.
-
Confirm your settings and click Save.
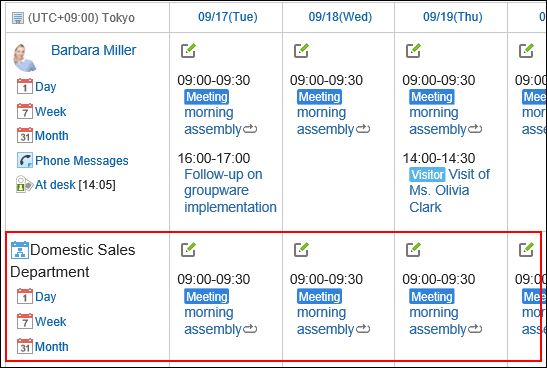
Displaying Organization's Appointments
If you make the organization's appointments visible, you can select the organization as an attendee.
 Appointments selected and registered with organizations as their attendees can be displayed as those organizations' appointments in the Scheduler screen.
-
Click the administration menu icon (gear icon) in the header.
-
Click System settings.
-
Select "Application settings" tab.
-
Click Scheduler.
-
Click General settings.
-
On the "General Settings" page, select "Show" checkbox for showing appointments of the department.
-
Confirm your settings and click Save.
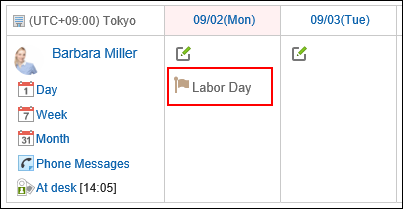
Showing Holidays
Select whether to display holidays in the scheduler.
-
Click the administration menu icon (gear icon) in the header.
-
Click System settings.
-
Select "Application settings" tab.
-
Click Scheduler.
-
Click General settings.
-
In the "Holidays" item on "General settings" screen, select "Show" checkbox.
-
Confirm your settings and click Save.
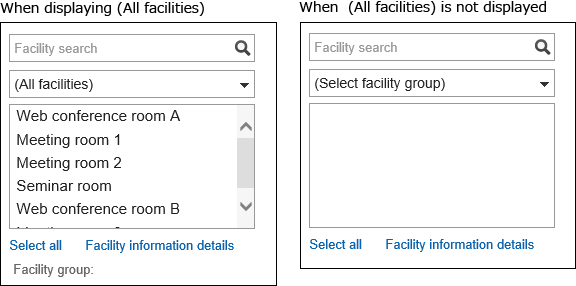
Showing All Facilities
Set whether to show "All facilities" as a selection in the dropdown list where users select facilities.
-
Click the administration menu icon (gear icon) in the header.
-
Click System settings.
-
Select "Application settings" tab.
-
Click Scheduler.
-
Click General settings.
-
On "General settings" screen, select "Show" checkbox to show "Visibility of "All facilities"".
-
Confirm your settings and click Save.
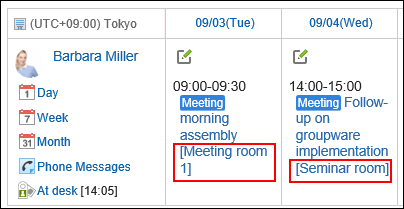
Showing Facility Names
Set whether to show subjects of appointments with facility names.
-
Click the administration menu icon (gear icon) in the header.
-
Click System settings.
-
Select "Application settings" tab.
-
Click Scheduler.
-
Click General settings.
-
In the "Visibility of facility names" field on "General Settings" screen, select the "Show before/after the subject of appointments" checkbox.
-
Select the position for the facility name.
The available positions are as follows:
- Before the subject
- After the subject
-
Confirm your settings and click Save.
Allowing Drag and Drop to Move Appointments
Set whether to allow users to move appointments using drag and drop feature.
The screens and portlets support drag and drop for appointments are as follows:
- Day View Screen
- Week View Screen
- Scheduler (Day View) Portlet
- Scheduler (Week View) portlet
-
Click the administration menu icon (gear icon) in the header.
-
Click System settings.
-
Select "Application settings" tab.
-
Click Scheduler.
-
Click General settings.
-
On "General settings" screen, select "Allow" checkbox for the "Use drag and drop" field.
-
Confirm your settings and click Save.
If necessary, tell the users that now they can move appointments by dragging and dropping them.
If your system administrator allows you to use drag and drop, the "Display settings" screen in Scheduler on the Personal settings shows the "Drag and drop" field.
For details, refer to the topic to use dragging and dropping to move appointment.
Allowing to Attach Files to Appointments
Set whether to allow users to attach files to appointments. If you allow it, users can attach files to appointments on "New appointment" screen or the screen to modify appointments.
However, the following screens cannot be used to attach files:
- Repeating appointments
- Tentative appointments
- New appointment screen using appointment adjustment
If you change the setting for usage of file attachment function from allow to prohibit, attachments are hidden but the attached files remain unchanged.
When you restore the function, the attached file are displayed again.

-
Click the administration menu icon (gear icon) in the header.
-
Click System settings.
-
Select "Application settings" tab.
-
Click Scheduler.
-
Click General settings.
-
In the field to attach files on "General Settings" screen, select "Allow" checkbox.
-
Confirm your settings and click Save.
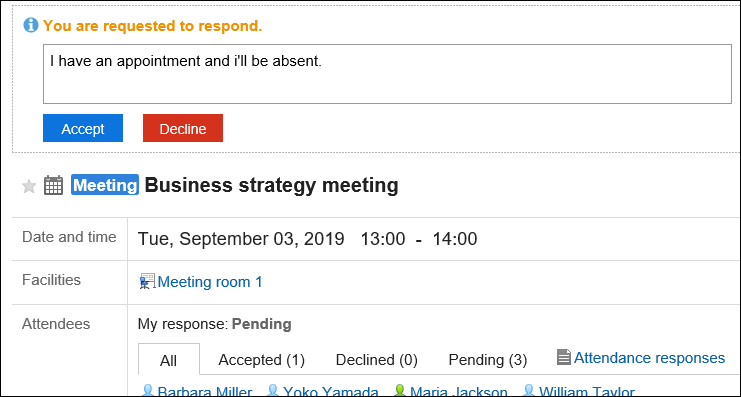
Allowing Users to Use the Attendance Feature
Select whether to allow users to use the attendance feature.
The response request feature allows users to check attendance of attendees of an appointment. It is available only for regular appointments.
When you allow users to use the attendance feature, "Request responses" checkbox appears on "New appointment" screen or the "Edit appointment" screen. By selecting the checkbox, you can ask the attendees to response for the appointment whether to accept it or not.
Users can check their appointments with response requests that they are invited as attendees, and the response status for the appointments with response requests they have created in a list form.
-
Click the administration menu icon (gear icon) in the header.
-
Click System settings.
-
Select "Application settings" tab.
-
Click Scheduler.
-
Click General settings.
-
On "General Settings" screen, select "Allow" checkbox in "Attendance" field.
-
If you want to enable the initial setting for "Request responses" in "Attendance" field on "New appointment" screen, select the checkbox for "Request responses".
-
Confirm your settings and click "Save".