How to View the Screen
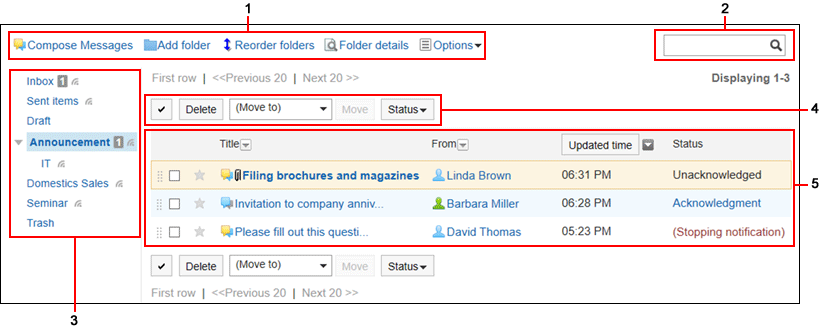
This section describes icons and buttons that are displayed on the "Messages" screen.
"Messages" Screen
Displays a list of messages saved in the folder.

| Number |
Description |
| 1 |
- Compose Messages link:
You can create messages.
- "Add folder" Link:
You can add folders.
- Link for reordering folders:
You can reorder subfolders.
- Folder Details Link:
The folder details screen appears.
- "Options" Link:
The following menus are displayed.
- Link of messages list to be confirmed:
You can check a list of the unconfirmed acknowledgment status messages.
If you click the item for confirmation on the "Messages details" screen, it will no longer appear in the list.
- Link for deleting all data in a folder:
Deletes all messages in the selected folder.
|
| 2 |
Items for Search:
Searches messages using keywords. |
| 3 |
Folder:
The folder in the Message screen.
 : :
Indicates the folders for which update notifications are set. |
| 4 |
- Button for selecting checkboxes:
Click to select all checkboxes. The checkboxes are cleared when you click it again.
- "Delete" Button:
Deletes the selected messages.
- "Move" Button:
Moves the selected messages to the specified folder.
- Status dropdown list:
Change selected read messages back as unread.
|
| 5 |
Messages list:
- "Subject" Link:
The message details screen appears.
- "Updated time" button:
Click to toggle the button text to Created time, so that you can sort messages based on the created date/time.
- Notes:
Information displayed in Notes is as follows.
- Unconfirmed:
The messages whose view status is unacknowledged.
- Acknowledgment status link:
When clicked, the status screen is displayed. You can check whether the recipient has viewed the message.
- (Unsubscribed):
Messages configured not to receive the update notifications. For details on how to receive the update notifications again, refer to Stop Receiving Update Notifications of Messages.
- nn KB:
The size of the file attached to the draft message.
|
| Icon |
Description |
 |
Received messages |
 |
Sent Messages |
 |
Changed messages |
 |
Messages with files attached |
Message Details Screen
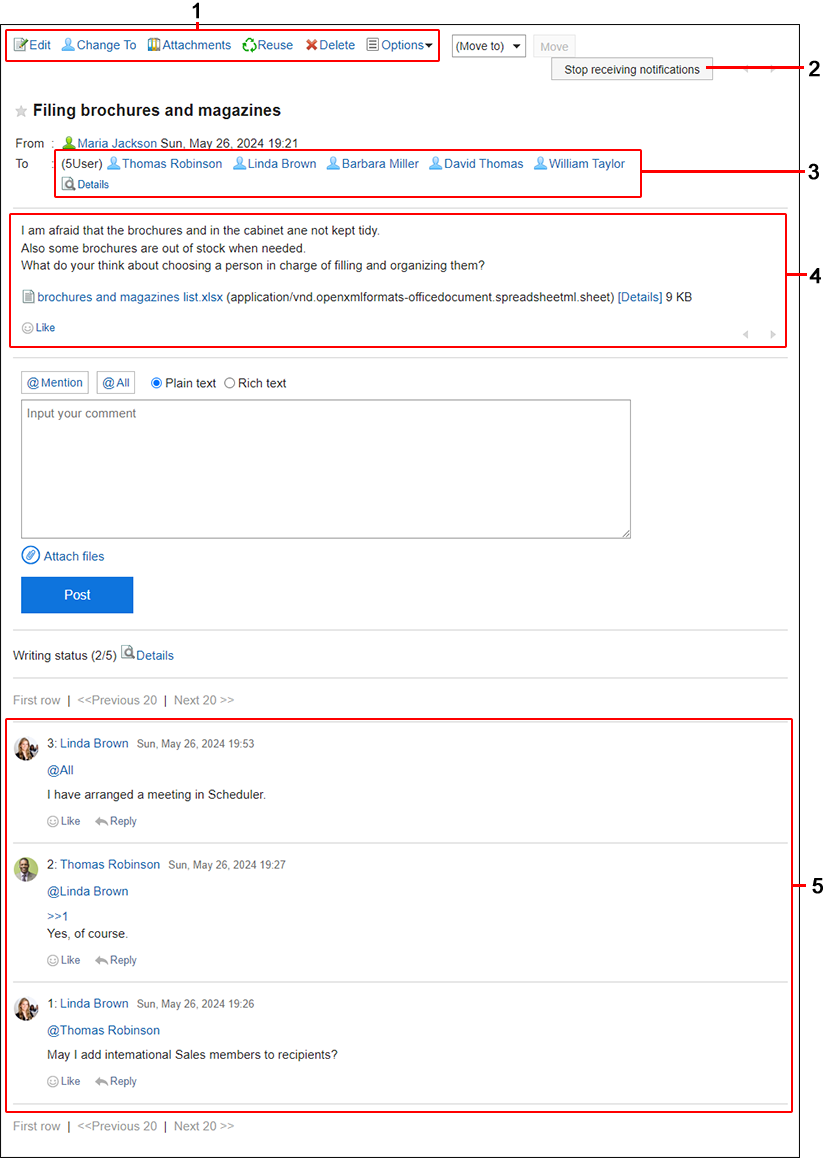
This section describes how to view the "Message details" screen.

| Number |
Description |
| 1 |
- "Change" Link1:
You can update the body of the message.
- "Change To" Link1:
You can change the recipients of the message.
- Attachment List Link:
All files attached to the body and comment are displayed.
- Reuse Link:
Reuse the message body and recipients to create another message.
The draft message cannot be reused.
- "Delete" Link:
You can delete messages.
- "Options" Link:
The following menus are displayed.
- New Space link:
Adds a new space by setting the recipients of the current message to space members.
The system administrator can choose not to display this link.
- Compose more messages link:
Compose a new message reusing only the recipients and users who can edit the current message.
- Forward by e-mail Links::
Compose a new e-mail using the title, body, and attachments of the current message.
The e-mail addresses of the users who are set as recipients of the message are automatically entered in the "To" field of the new e-mail. The body of the message in HTML format is stripped to plain text.
This link does not appear in the following cases.
- The e-mail account has not been set.
- The e-mail account has been inactivated.
- E-mail function is disabled by your system administrator.
For details on how to work with e-mails, refer to Sending E-Mails.
- "Save as file" Link:
Saves the message as a text file.
The draft messages cannot be exported to a file.
|
| 2 |
Stop receiving notifications button:
Stop receiving update notifications of messages. Click "Edit notifications" if you want to configure the update notifications. |
| 3 |
Address field:
Includes the number of recipients and recipients details. To display hidden recipients, click "(Show)".
When you click "Details" in the recipient field, the recipient's details screen is displayed. |
| 4 |
- Body:
The body of the message.
- Attachment:
Click "Details" to view the details of files attached to the message.
- "Respond" Link:
You can easily respond to the message body using "Like".
Depending on your system administrator settings, the links may not be displayed or the wording will be different.
|
| 5 |
- Comment Field:
Enter your comment to post in the message.
For the messages with acknowledgement status, clicking the item for confirmation will allow you to add comments.
 For details, refer to Acknowledgment Status.
- Attachments Link:
Select the file you want to attach to the comment.
- Post button:
You can post comments to the topics.
|
| 6 |
- "Delete" Link:
You can delete comments. It is displayed when you hover the mouse cursor over the comment.
It is displayed only for the comments that you have written.
- "Respond" Link:
You can quickly respond to comments.
Depending on your system administrator settings, the links may not be displayed or the wording will be different.
- "Reply" Link:
You can reply to a comment. An anchor link that consists of ">>" and the comment number is automatically set in the reply-all comment.
By clicking "Reply", the sender of the original comment is displayed in the recipient area of your reply.
- "Reply all" Link:
Send a reply to all recipients (except yourself) specified in the original comment. Appears when you hover the cursor over the comment.
An anchor link that consists of ">>" and the comment number is automatically set in the reply-all comment.
By clicking Reply all, the sender of the original comment, and users (except yourself), organizations, and roles specified as recipients in the original comment are displayed in the recipient area of your reply.
- Permalink:
Displays the URL of the comment. Appears when you hover the cursor over a comment.
Pasting permalinks is useful for referring to this comment from other discussions or memos. For details, refer to Permalink.
|
1: This item is displayed only for the users who are selected as users who can edit/delete the message.


 For details, refer to