Notifications Portlets
You can find the following types of portlets in Notifications.
- "Notifications" Portlet
- Read Notifications Portlet
"Notifications" Portlet
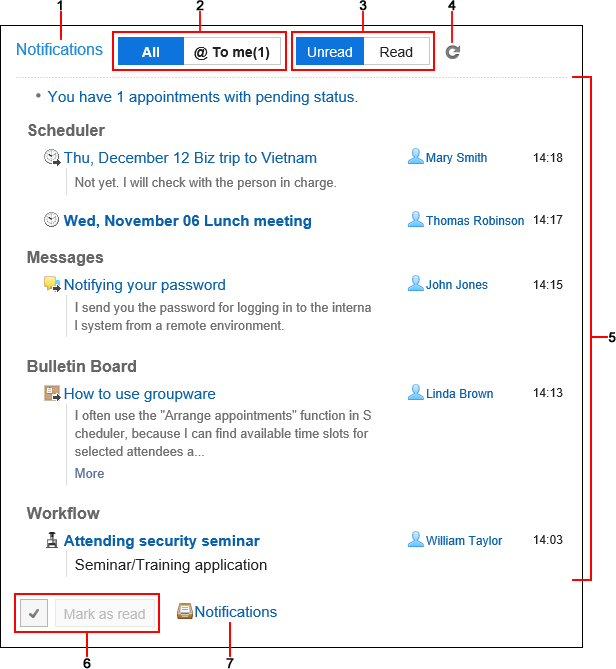
Notifications for each application are displayed in the list.
Not only notifications are categorized by unread and read, but also All and @ To me buttons can be used to filter notifications in the list.
Buttons to display "All" unread notifications are selected by default.
All notifications received prior to version 4.10.0 can be found in "All".

Description of the items
| Number | Description |
|---|---|
| 1 | Portlet: When the name of the portlet is set in the portlet settings, the set portlet name is displayed. When you click a portlet name, the "Notifications" screen appears. |
| 2 |
|
| 3 |
|
| 4 | Refresh button: Refresh the screen to check the up-to-date notifications. For example, when "@ To me" is selected to show unread notifications, clicking this button refreshes the information on unread notifications addressed to you. |
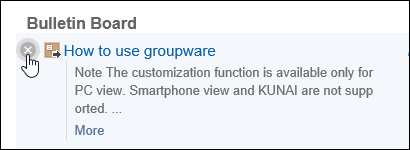
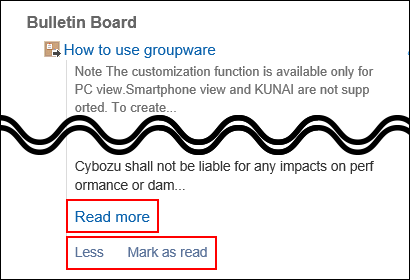
| 5 | Update history: It shows information updates on each application. When you click the subject of a notification, you will be navigated to its details screen. Then, the status on the information becomes "Read". You can change the status to be "Read" without moving to the details screen if you move the pointer to the notification and click "Mark as read" on the left.  When you click "More", you can expand the notification to check its details or make its status "Read" without moving to the details screen.
The expanded notification can be collapsed by clicking "Less". If the content of the notification is too long to show, "Read more" is displayed at the end of the expanded text. When you click it, you will be navigated to its details screen. Then, the status on the information becomes "Read". 
|
| 6 |
|
| 7 | "Notifications" link: "Notifications" screen appears. |
Notifications for the following applications are displayed.
- Space
- Scheduler
- Messages
- Bulletin Board
- Cabinet
- Phone Messages
- Workflow
- MultiReport
- External notifications:
It shows notifications from external systems that your system administrator has configured.
After you read notifications, their statuses will become "Read" and no longer shown under "Unread".
However, the notifications on workflows and phone messages will remain under "Unread" until you do either of the following:
- Workflow: Process requests
- Phone Messages: Check phone messages
Setting Options for Portlets

- Display order of applications:
You can configure the display order of applications to show their notifications on the portlet. - Common settings:
- Select design:
Select the display layout of notifications.
The following items can be selected:- Single-line layout:
Each notification is displayed in one line. - Multi-line layout:
Each notification is displayed in multiple lines.
- Single-line layout:
- Character Size:
Select the text size you want to use.
The following character sizes can be selected:- Small
- Standard
- Large
- Items:
Select the items to display in the portlet.
You cannot hide "Subject".
The following items can be selected:- Contents
- Name
- On
- Select design:
- Options for Each Application
- Format:
Select the format to show the data for each application.
The following items can be selected:- List:
A list of notification subjects is displayed. - Number of items:
The number of notifications is displayed. If you have 100 unread notifications or more, "99+" is displayed.
If you select this item, "Items" and "Number of items" settings are overridden.
- List:
- Number of items:
When you select "List" for "Format", you select the number of notifications to show on the portlet.
You can select up to 20 notifications.
- Format:
Read Notifications Portlet
Notifications you've already read are displayed.

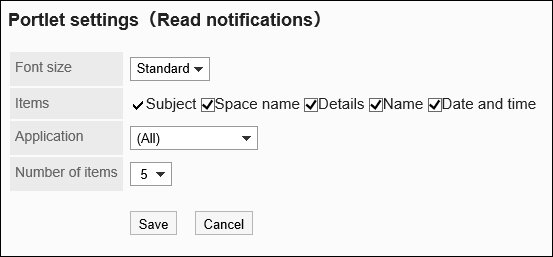
Setting Options for Portlets

- Character Size:
Select the text size you want to use.
The following character sizes can be selected:- Small
- Standard
- Large
- Items:
Select the items to display in the portlet.
You cannot hide "Subject".
The following items can be selected:- Space
- Contents
- Name
- On
- Application:
The portlet shows read notifications for the selected application.
You can select the following applications:- (All)
- Scheduler
- Messages
- Bulletin Board
- Cabinet
- Phone Messages
- Workflow
- MultiReport
- Number of items:
Select the number of read notifications that you want to display in the portlet.
You can select up to 20 notifications.
