Deleting Users
You can delete users.
Deleted users' personal data and user profile will be deleted from the server by the scheduling service.
User with the same login name cannot be added until the user data deletion for that login name is completed.
By deleting users, the number of required licenses decreases. Before deleting the user data, the number of required licenses is applied to the Garoon system.
Adding a user with the same login name does not associate the data before deletion.
-
Click the Administration menu icon (gear icon) in the header.
-
Click System settings.
-
Select "Basic system administration" tab.
-
Click Users.
-
Click Organization / user settings.
-
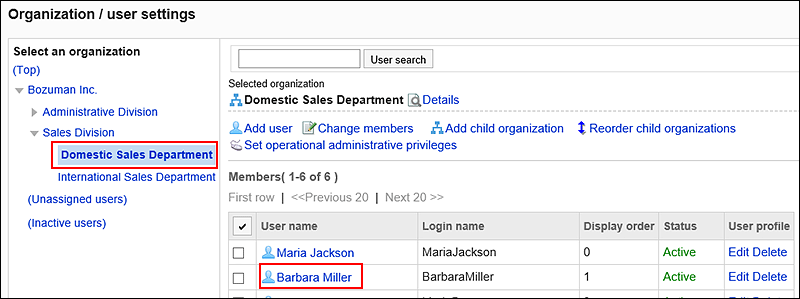
On the organization/user setting screen, select an organization, and then click the user name of the user you want to delete.
-
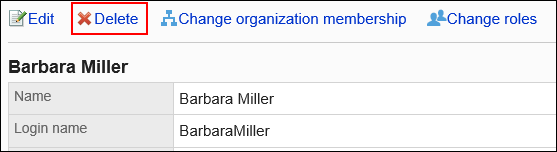
On the user details screen, click Delete.
-
Click Yes on the screen to delete users.
Handling of Deleted User Data
Data related to deleted users and data created by the users are handled as follows.
The following data will be deleted on the deletion time of the user data.
- Data related to users such as e-mails, timesheet, notes, and personal bookmarks
- Data that have not been shared with other users
Example: Messages sent only to themselves - Data that has not been published, such as a draft request or a report
The following user data will not be deleted.
- Data shared with other users
Example: Messages addressed to active Garoon users, submitted workflow, and so on - Public appointments or appointments in which "Shared with" users are specified
- Topics ready to publish or public topics
- Addresses added to shared address books
- Uploaded files
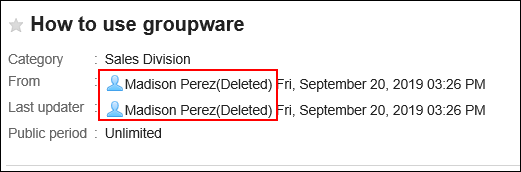
The "(Deleted user)" is displayed after the deleted user's name in the "From" field and "Updated By" field.
The name of the deleted user that is displayed is the default user name.
The following data created by deleted users can be viewed in the system administration screen until they will be deleted completely.
- Messages that have been sent to themselves by the deleted users
- Messages that all the recipients have been deleted
- Files attached to messages
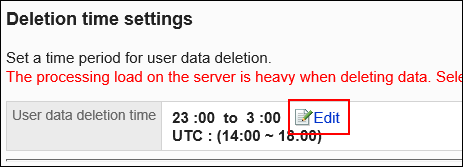
Setting the Deletion Time of User Data
You can set the time to automatically delete user data for deleted users.
By default, the time period for deleting data is set from 23:00 to 3:00 on the next day (UTC14:00 to UTC18:00).
During the deletion process of user data, the load on Garoon can be high, which may interfere with the business. Additionally, if other tasks are running, the process may not work.
We recommend that you set the time period for deleting user data to avoid the following time.
- When a user uses Garoon
- Time periods when backing up of Garoon data will be performed
- Time periods when tasks of the scheduling service to delete data will be performed
For details on the time period, see cleanup.csp.
-
Click the Administration menu icon (gear icon) in the header.
-
Click System settings.
-
Select "Basic system administration" tab.
-
Click Users.
-
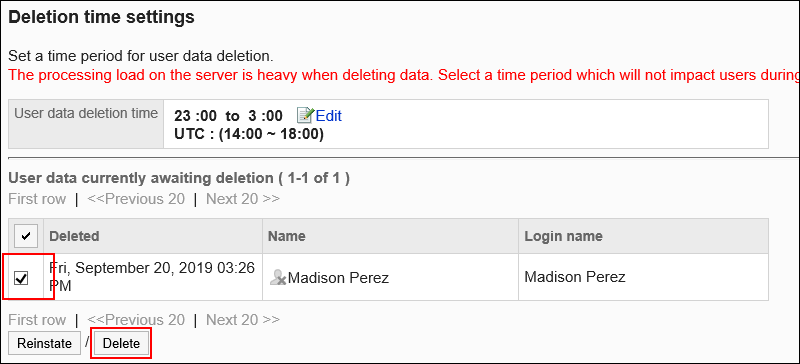
Click Deletion time settings.
-
Click Change on the screen for setting up the user data deletion time.
-
Set the time period in which you want to delete the user data, and then click Save.
When you select the Do Not Delete checkbox, the deletion time setting is disabled. No user data will be deleted.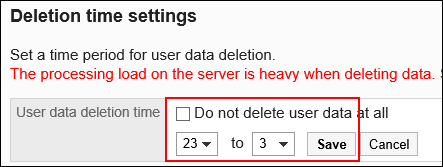
Deleting Users Immediately
You can select users and delete them and their user data immediately.
-
Click the Administration menu icon (gear icon) in the header.
-
Click System settings.
-
Select "Basic system administration" tab.
-
Click Users.
-
Click Deletion time settings.
-
On the screen to set the user data deletion time, select the checkboxes of users you want to delete, and then click Delete.
-
Click Yes on the Delete All Users screen.
Cancelling the Removal of Users
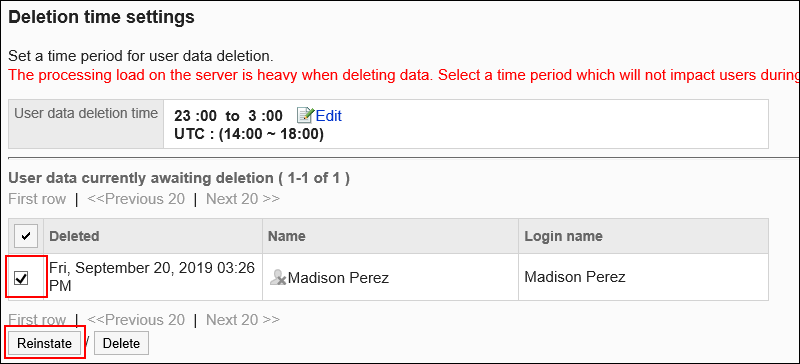
Recover users and user data before they are permanently deleted.
-
Click the Administration menu icon (gear icon) in the header.
-
Click System settings.
-
Select "Basic system administration" tab.
-
Click Users.
-
Click Deletion time settings.
-
On the screen to set the user data deletion time, select the check boxes of users you want to cancel deletion, and click Recover.
-
Click Yes on the screen to recover users in bulk.