General Settings of E-mails
On "General Settings" screen of e-mails, you can set the basic functions of e-mail.
Common Settings
This section describes that the settings set on "Common Settings" in "General Settings" screen.
On the "Common Settings", you can set common settings for all users such as "Check incoming e-mails when logging in" and settings for receiving e-mails automatically.
Stopping E-Mail Client Function
If you do not use Garoon as an e-mail client, you can stop the client feature.
It is useful when stopping e-mail transmissions temporarily during maintenance on the mail server or the like.
You can view e-mails that were already received, even after the e-mail client function has been stopped.
If you stop the e-mail client feature, the following features are disabled:
- Sending and receiving e-mails
- Checking new e-mails
-
Click the administration menu icon (gear icon) in the header.
-
Click System settings.
-
Select "Application settings" tab.
-
Click E-mail.
-
Click General settings.
-
On "Common Settings" in "General Settings" screen, select "Set" to stop e-mail client functions.
-
Confirm your settings and click Save.
Setting to Check Incoming E-mails When Logging in
The Check incoming e-mails when logging In function is a feature to check the e-mail received by the mail server and display the number of incoming e-mails in the "E-mail" screen and the "New e-mail" portlet.
You can set whether or not to check the newly arrived e-mails when users log in to Garoon.
-
Click the administration menu icon (gear icon) in the header.
-
Click System settings.
-
Select "Application settings" tab.
-
Click E-mail.
-
Click General settings.
-
On "Common Settings" in "General Settings" screen, select "Set" in "Check incoming e-mails when logging in".
-
Confirm your settings and click Save.
Setting to Receive E-Mails Automatically
Receives e-mails automatically at a specified time or at a specified interval.
While receiving e-mails automatically, the load for Garoon increases. If you set the time for receiving e-mails automatically while Garoon has low loads such as midnight or early morning, you can avoid outbreaks of excessive load on the server during intensive access.
If you use multiple e-mail accounts, only e-mails of the account that is initially displayed on the "E-mail" screen can be received automatically.
Receiving E-Mails Automatically at The Specified Time
If you specify the time to automatically receive e-mails, they arrive automatically at the specified time of day.
-
Click the administration menu icon (gear icon) in the header.
-
Click System settings.
-
Select "Application settings" tab.
-
Click E-mail.
-
Click General settings.
-
On "Common Settings" in "General Settings" screen, select "Set" to automatically receive e-mails.
-
In the "Schedules to receive e-mails automatically" field, set the time to automatically receive e-mails.
You can add time to automatically receive e-mails to set multiple times.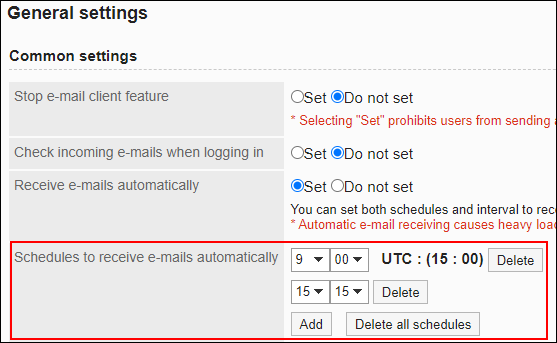
-
Confirm your settings and click Save.
Receiving E-Mails at Specified Interval
If you set an interval to receive incoming e-mails, they arrive automatically at the specified interval.
The date and time to automatically receive e-mails is calculated based on the date and time when you click Save in "General Settings" screen.
The date and time, which is the date and time used in the administrator's time zone, is saved as the UTC standard time.
When the time specified as the interval elapses from the date and time saved as the UTC standard time, incoming e-mails are automatically received for the first time.
For example, if Save is clicked on November 22 at 12:34 p.m. (JST), e-mails are automatically received at the following intervals.
- Settings
- Interval to receive e-mails automatically: 12 hours
- Date and time when Save is clicked: Nov 22, 12:34 p.m. (JST)
- Date and time saved in Garoon: Nov 22, 12:34 p.m. (UTC)
- Date and time when e-mails are automatically received
- 1st time: Nov 23, 12:34 a.m. (UTC) (Nov 22, 9:34 p.m. (JST))
- 2nd time: Nov 23, 12:34 p.m. (UTC) (Nov 23, 9:34 a.m. (JST))
- 3rd time and after: 12 hours after the last time e-mails are received
-
Click the administration menu icon (gear icon) in the header.
-
Click System settings.
-
Select "Application settings" tab.
-
Click E-mail.
-
Click General settings.
-
On "Common Settings" in "General Settings" screen, select "Set" to automatically receive e-mails.
In the "Interval to receive e-mails automatically" field, set the interval to receive.
The following intervals can be set for this field:- (None)
If you stop automatically receiving e-mails in an interval, select "(None)". - 1 hour
- 3 hours
- 6 hours
- 12 hours
- 24 hours

- (None)
-
Confirm your settings and click Save.
Using Incremental Search
Sets whether to use the incremental search for e-mail addresses.
Incremental search is a feature that allows you to quickly find search targets matching characters one by one while entering them.
The default value is set to Enable.
For details on Incremental search, refer to Incremental search specification.
-
Click the administration menu icon (gear icon) in the header.
-
Click System settings.
-
Select "Application settings" tab.
-
Click E-mail.
-
In the "Incremental Search" field on "Common Settings" in "General Settings" screen, select "Enable".
-
Confirm your settings and click Save.
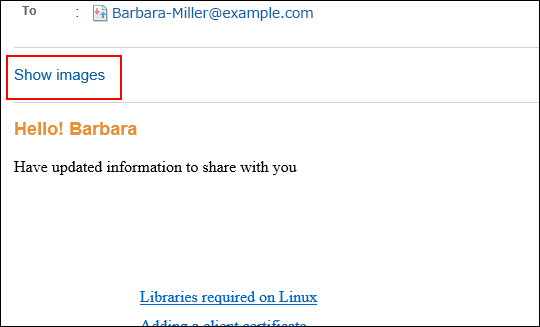
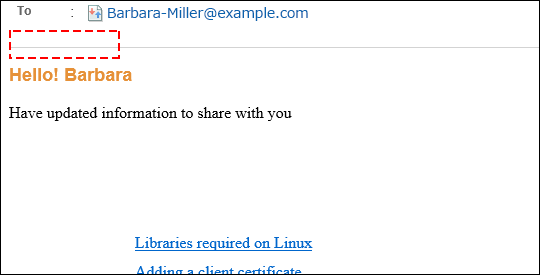
Allowing to Display Images in HTML E-Mail
Set whether to allow to access linked images when HTML e-mails have them.
If you do not allow to access the images, the "Show images" does not appear on the "E-mail details" screen.
Example of a screen showing when accessing linked image is allowed:
Example of a screen showing when accessing linked image is not allowed:
-
Click the administration menu icon (gear icon) in the header.
-
Click System settings.
-
Select "Application settings" tab.
-
Click E-mail.
-
Click General settings.
-
On "Common Settings" in "General Settings" screen, select "Allow" in the "Display images in HTML e-mail" field.
-
Confirm your settings and click Save.
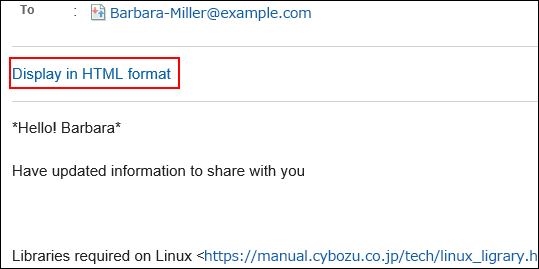
Displaying HTML E-Mail as Plain Text by Default
You can set whether to allow viewing e-mails in HTML format or text format only when users access "E-mail details" screen.
If you select "Text only", the "Display in HTML format" link appears on "E-mail details" screen for users. When this link is clicked, the email is displayed in HTML format in a new window.
When the HTML e-mail has an attachment, the attachment is displayed in the new window.
-
Click the administration menu icon (gear icon) in the header.
-
Click System settings.
-
Select "Application settings" tab.
-
Click E-mail.
-
Click General settings.
-
On "Common Settings" in "General Settings" screen, select the checkbox for "Text only" in "Default view of HTML e-mail".
-
Confirm your settings and click Save.
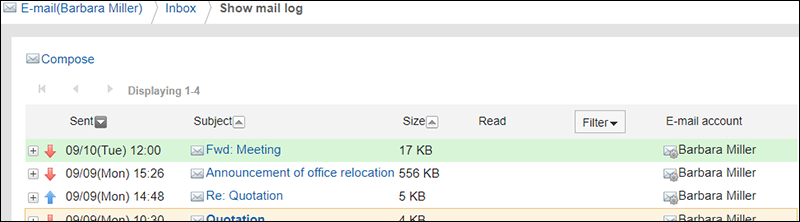
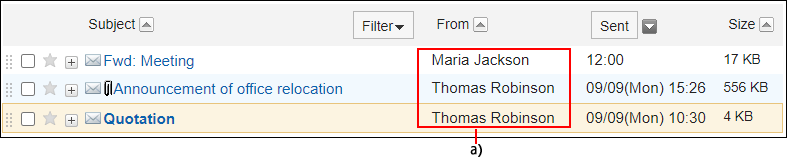
Allowing to Enable Logs of Sending/Receiving E-Mails
Specify whether to allow enabling logs of sending/receiving e-mails. Showing mail logs is a feature to confirm the history of specific e-mail address.
If you allow users to use the log functionality, they can check e-mails sent or received by each sender on "Show mail log" screen.

-
Click the administration menu icon (gear icon) in the header.
-
Click System settings.
-
Select "Application settings" tab.
-
Click E-mail.
-
Click General settings.
-
On "Common Settings" in "General Settings" screen, select "Allow" in the Enable logs of sending/receiving e-mails feature.
-
Confirm your settings and click Save.
User-Editable Settings
This section describes on the settings you can set in "User-editable settings" on "General settings" screen.
The "User-editable settings" option allows users to change whether or not to use the new e-mail check feature and whether to Forward e-mails automatically.
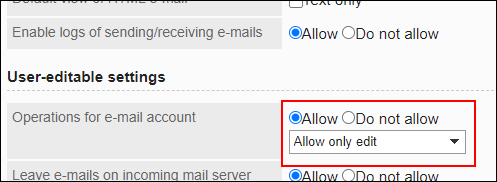
Allowing Operations for E-Mail Account
Select whether to allow users to add, edit, and delete their e-mail accounts.
If you allow them, users can add, edit, and delete their e-mail accounts in their "Personal settings" screen.
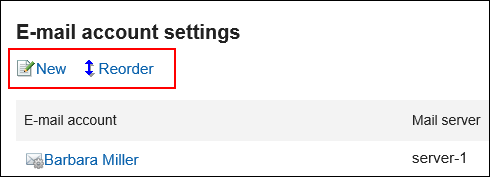
Example when users are allowed to add, change, or delete e-mail accounts:
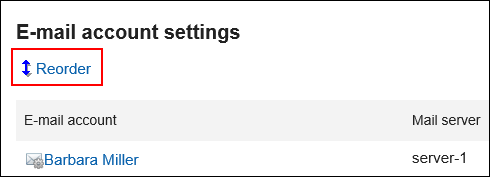
Example when users are allowed only to change e-mail accounts:
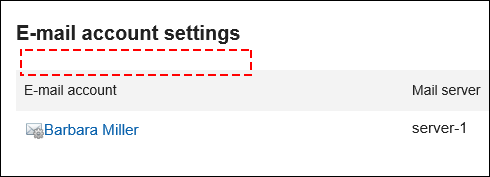
Example when users are prohibited to add, change, or delete e-mail accounts:
-
Click the administration menu icon (gear icon) in the header.
-
Click System settings.
-
Select "Application settings" tab.
-
Click E-mail.
-
Click General settings.
-
In the "General settings" screen, select "Allow" for "Operations for e-mail account" to set operations which are allowed for users.
-
Confirm your settings and click Save.
Leaving E-mails on Incoming Mail Server
Select whether to allow users to leave e-mails on incoming mail server.
If you allow users to change this setting, users can set whether or not to leave e-mails on incoming e-mail server in their personal setting.
-
Click the administration menu icon (gear icon) in the header.
-
Click System settings.
-
Select "Application settings" tab.
-
Click E-mail.
-
Click General settings.
-
On the "General Settings" screen, select "Allow" in the "Leave e-mails on incoming mail server" field.
-
Confirm your settings and click Save.
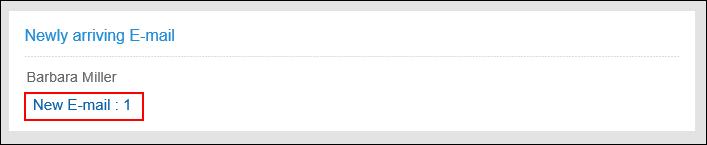
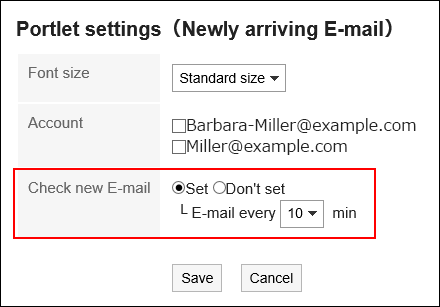
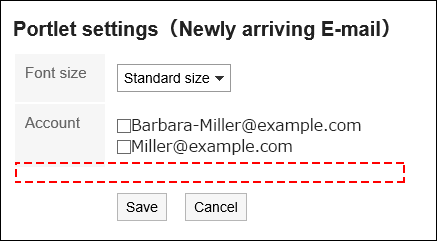
Allowing to Check New E-Mail Function
Select whether to allow users to use to check new e-mail feature.
If you allow the setting, users can change the frequency of checking the number of newly arrived e-mails in the new arriving e-mail portlet in their personal settings.
Example screen if you are allowed to use the new e-mail check feature:
Example screen if you are not allowed to use the new e-mail check feature:
-
Click the administration menu icon (gear icon) in the header.
-
Click System settings.
-
Select "Application settings" tab.
-
Click E-mail.
-
Click General settings.
-
On "General Settings" screen, select "Allow" in the "Check for incoming e-mail" field.
-
Confirm your settings and click Save.
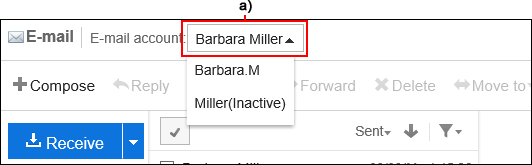
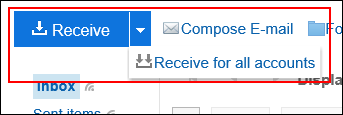
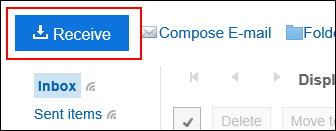
Setting to Receive E-Mails in Bulk
Set whether to allow users to receive e-mails for all accounts when the users have more than one e-mail accounts.
Example when receiving e-mails for all accounts allowed:
"Receive for all accounts" appears on the user's e-mail screen.
When the user clicks "Receive for all accounts", e-mails of all active e-mail accounts are received.
Example when receiving e-mails for all accounts is not allowed:
-
Click the administration menu icon (gear icon) in the header.
-
Click System settings.
-
Select "Application settings" tab.
-
Click E-mail.
-
Click General settings.
-
On the receiving e-mails in bulk field in "General Settings" screen, select "Allow".
-
Confirm your settings and click Save.
Allowing Users to Create HTML E-Mails
Set whether to allow users to use sending e-mails in HTML format.
If you allows users to use this function, users can create and send HTML e-mails using form editor.
-
Click the administration menu icon (gear icon) in the header.
-
Click System settings.
-
Select "Application settings" tab.
-
Click E-mail.
-
Click General settings.
-
On the "Send HTML e-mail" field in "General Settings" screen, select "Allow".
-
Confirm your settings and click Save.
Allowing Users to Forward E-Mails Automatically
Select whether to allow users to forward e-mails automatically.
Forwarding e-mails automatically lets users automatically forward incoming e-mails received in Garoon to the e-mail addresses to forward.
The forwarding e-mail address can be specified in the user's "Personal settings" screens.
-
Click the administration menu icon (gear icon) in the header.
-
Click System settings.
-
Select "Application settings" tab.
-
Click E-mail.
-
Click General settings.
-
On "Forward e-mails automatically" field in "General Settings" screen, select "Allow".
-
Confirm your settings and click Save.
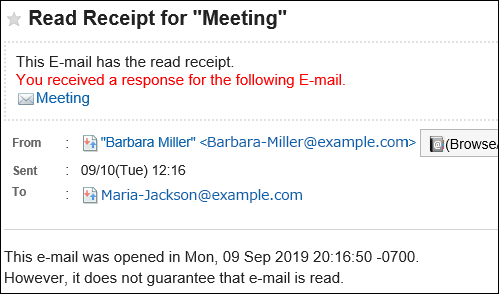
Allowing Users to Use Read Receipts
Set whether to allow users to use the read receipts.
Read receipt is a function to automatically notify senders by e-mail that the recipients have opened e-mails.
By using the read receipts, senders can check whether the recipients read the e-mails.
However, the read receipt e-mails will not be sent if the recipient does not accept the read receipt notification.
Example of a read receipt the sender received:
-
Click the administration menu icon (gear icon) in the header.
-
Click System settings.
-
Select "Application settings" tab.
-
Click E-mail.
-
Click General settings.
-
On "Use read receipts" field in "General Settings" screen, select "Allow".
-
Confirm your settings and click Save.
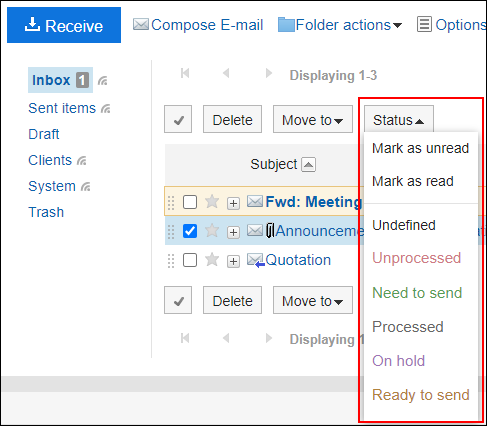
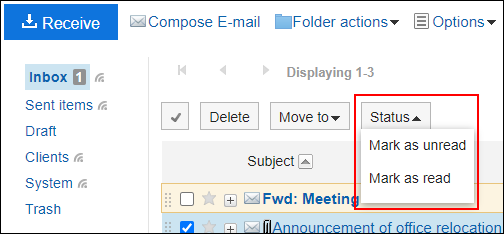
Allowing Users to Manage Status
Select whether to allow users to use Manage e-mails by status.
The Manage e-mails by status feature allows users to set statuses to e-mails and manage the statuses of e-mails.
If you allow users to use Manage e-mails by status, users can set the following statuses:
- Not set
- Unprocessed
- Need to send
- Processed
- On hold
- Ready to send
Example screen when 'Manage e-mails by status' is allowed:
Example screen when Manage e-mails by status is not allowed:
-
Click the administration menu icon (gear icon) in the header.
-
Click System settings.
-
Select "Application settings" tab.
-
Click E-mail.
-
Click General settings.
-
On "Manage e-mails by status" field in "General Settings" screen, select "Allow".
-
Confirm your settings and click Save.
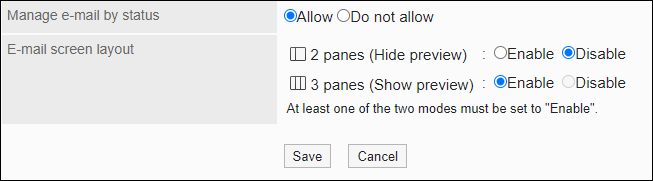
Setting to Allow Users to Use E-Mail Preview
Select the settings to allow users to use on the "E-mail" screen.
When you select to use both 2 panes and 3 panes screen, users can select to show or hide the preview in "Options" field on "E-mail" screen.
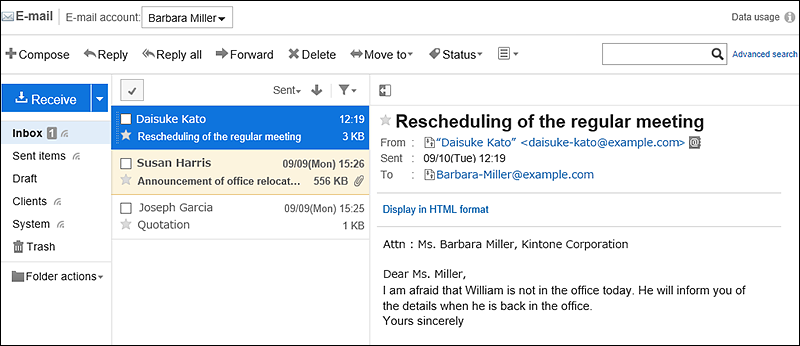
The "E-mail" screen displays folders and a list of e-mails in the folder.
When you click the "+" icon next to the e-mail subject, the body of the e-mail is displayed.
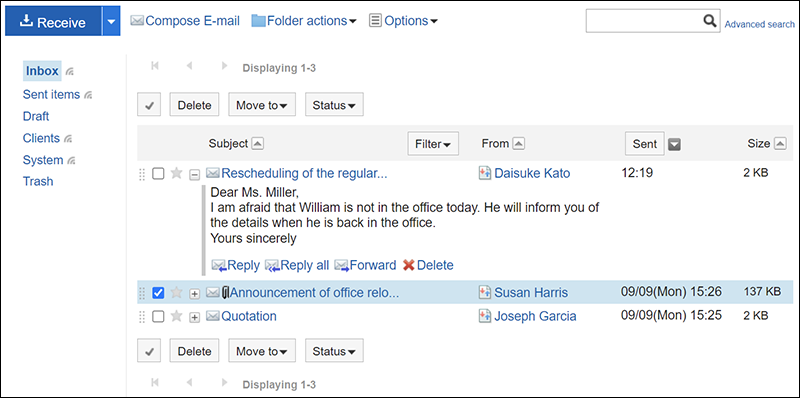
The user's "E-mail" screen displays folders, a list of e-mails in the folder, and a preview for the selected e-mail.
-
Click the administration menu icon (gear icon) in the header.
-
Click System settings.
-
Select "Application settings" tab.
-
Click E-mail.
-
Click General settings.
-
In the e-mail page setting field on "General settings" screen, select the settings for the "E-mail" screen.
-
Confirm your settings and click Save.