Request & Approval Numbering
Set sequential number to be applied to request data.
You can select from two types: the request number and the approval number. You can also grant both numbers.
- Request Number:
The number to be granted to the request data submitted by the user. Sequential numbers are given in the order in which they are submitted. - Approval number:
The number to be granted to the request data approved by the last approver. Sequential numbers are given in the order in which they are last approved.
For each request form, you can set the number format and format, giving the request data a unique number.
Numbers can also be used to search request data and to compile data by fiscal year.
-
Click the Administration menu icon (gear icon) in the header.
-
Click System settings.
-
Select "Application settings" tab.
-
Click Workflow.
-
Click Request forms.
-
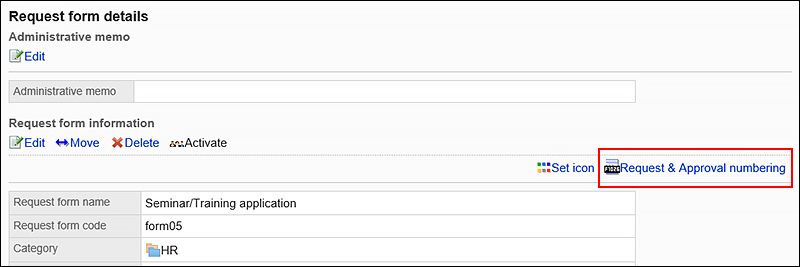
On the "Request Form" list screen, select a category, and then click the Request form name of the request form to set the request number and the approval number.
-
On the screen for request form details, click "Request & Approval numbering" in the request form information.
-
In "Request numbering" field on "Request & Approval numbering" screen, select one of the following:
- Use a common request number in all request forms:
Regardless of the request form, a sequential number is given in the order in which the user submits the request data. - Use the request number for each form of a request:
Each request form is numbered sequentially in the order in which the user submits the request data. - None
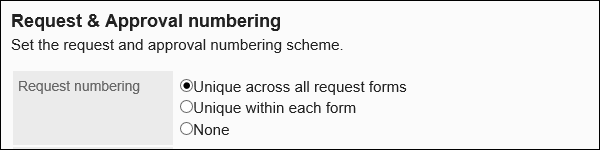
- Use a common request number in all request forms:
-
Enter the "Request Number format" field.
Set when "request number is used for each request form" is selected.
If blank, "%SN%" is applied. For details, refer to format of the request and approval numbers.
If you select "Use a common request number in all forms", the format is not applied.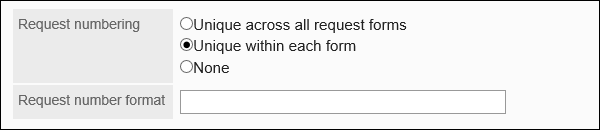
-
In the "Approval number format" field, select one of the following
- Unique within each form:
Each request form has a sequential number in the order in which the final approver approves the request data. - None

- Unique within each form:
-
Enter the "Approval number format" field.
If you have selected "Use the approval number for each request form", set it.
If blank, "%AN%" is applied. For details, refer to format of the request and approval numbers.
-
Confirm your settings and click Save.
Request/Approval Number Format
Use keywords to format the request number and the approval number. Use only single-byte alphanumeric characters for the keywords.
If you want to set up symbols or text, enter them before and after the keywords.
| Keyword | Description | Example |
|---|---|---|
| %SN% | Includes a sequential number of the request number. | If you set "A-%SN%": A-1, A-2, A-3... |
| %AN% | Includes a sequential number of the approval number. | If you set "B-%AN%": B-1, B-2, B-3... |
| %YYYY% | Includes the year with four digits. | If you set "%YYYY%-%SN%": 2019-1, 2019-2, 2019-3... |
| %YY% | Set the year in the following two digits | If you set "%YY%-%SN%": 19-1, 19-2, 19-3... |
| %MM% | Includes the month. | If you set "%YY%-%MM%-%SN%": 19-10-1, 19-10-2, 19-10-3... |
| %DD% | Includes the date. | If you set "%YY%%MM%%DD%-%SN%": 191015-1, 191015-2, 191015-3... |
If you want to specify the number of digits for the request or approval number, arrange "0" for the digits of the format you would like to use. Up to 10 characters can be specified.
An example of how to specify the number of digits for a request No.
| Number of Digits | Format | Screen view |
|---|---|---|
| Do not specify | %SN% | 1 |
| 1 Digit | %0SN% | 1 |
| Two digits | %00SN% | 01 |
| Three digits | %000SN% | 001 |
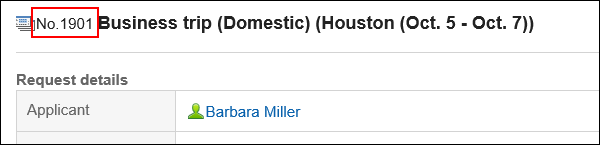
When a user submits the request data, only the request number is granted. When the request data is last approved, the approval number is followed by the request number.
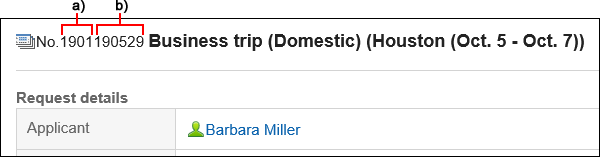
A): Request number
B): Approval number
You can differentiate the request number from the approval number by setting a symbol or text in the approval number format.
- How to delimit numbers
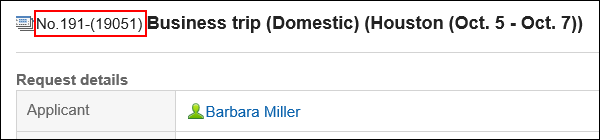 The format settings in this case are as follows
Request number format: %YY%%SN%
Approval number format: -(%YY%%MM%%AN%) - How to delimit numbers by string
 The format settings in this case are as follows
Request number format: %YY%%SN%
Approval number format: approved (%YY%%MM%%AN%)
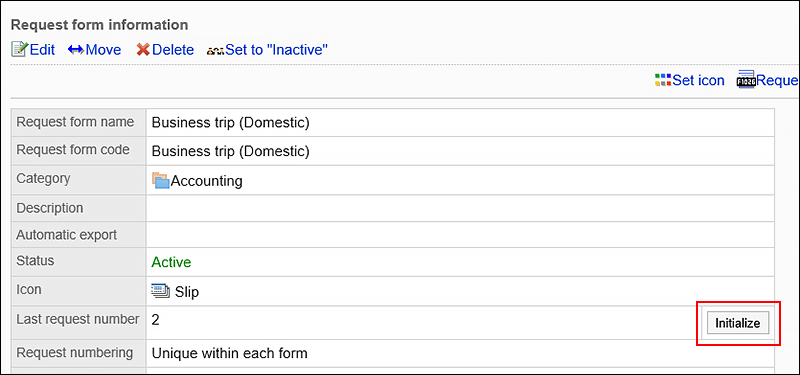
Initializing Request Numbers
If you have set the request number to "Use request numbers per request Form", you can initialize the request number.
When you initialize, you can specify the initial value of the request number.
-
Click the administration menu icon (gear icon) in the header.
-
Click System settings.
-
Select "Application settings" tab.
-
Click Workflow.
-
Click Request forms.
-
On the "Request Form" screen, select a category, and then click the request form name of the request form to initialize the request number.
-
On the screen for request form details, click "Initialize" in "Last request number" field in the request form information.
-
On the "Request number initialization - Step 1/2" screen, enter the default value for the new request number and click Initialize.
The initial request number that is added after the initialization is added to the default value of 1.
For example, if a new request number is set to "100", the request number of the initial request data submitted is "101".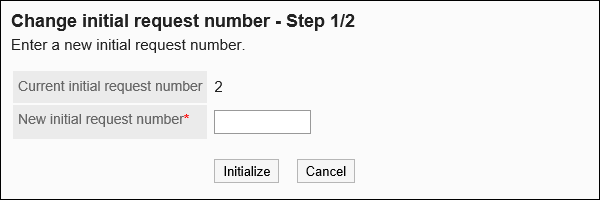
-
On the "Request number initialization - Step 2/2" screen, click Yes.
Initializing Approval Numbers
Initialize the approval number.
When initializing, you can specify the initial value of the approval number.
-
Click the administration menu icon (gear icon) in the header.
-
Click System settings.
-
Select "Application settings" tab.
-
Click Workflow.
-
Click Request forms.
-
On the "Request Form" screen, select a category, and then click the request form name of the request form to initialize the approval number.
-
On the screen for request form details, click "Initialize" in "Last approval number" field in the request form information.
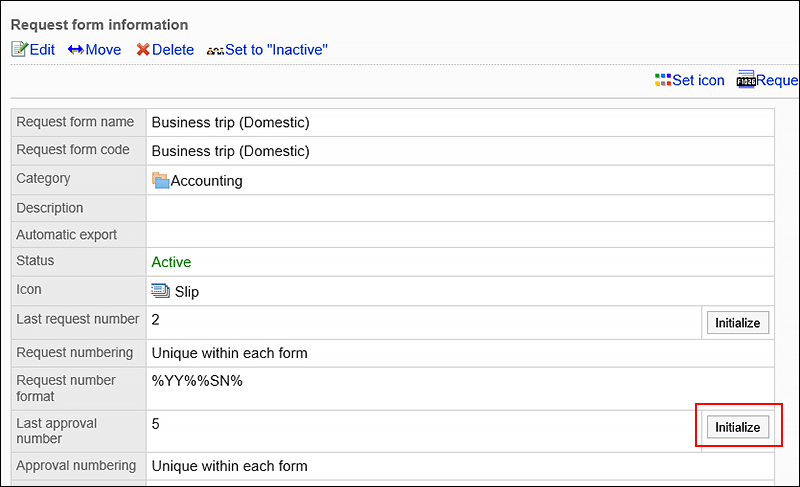
-
On the "Approval number initialization - Step 1/2" screen, enter the default value for the new approval number and click Initialize.
The initial approval number that is added after the initialization is added to the default value of 1.
For example, if you have a new approval number of "100", the initial approval number of the first approved request data will be "101".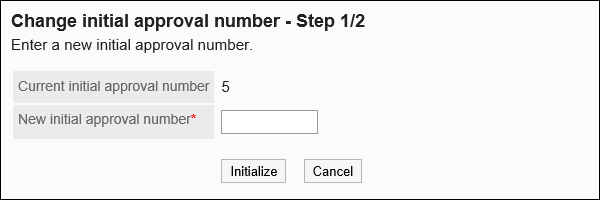
-
On the "Approval number initialization - Step 2/2" screen, click Yes.