Setting up Appointment Type Links
Appointment type link is a feature linking Appointment types selected while adding or changing appointments to preset texts or images and showing them in "Appointment details" screen.
If you select an appointment type with appointment type link, the appointment type name field appears on the appointment details screen.
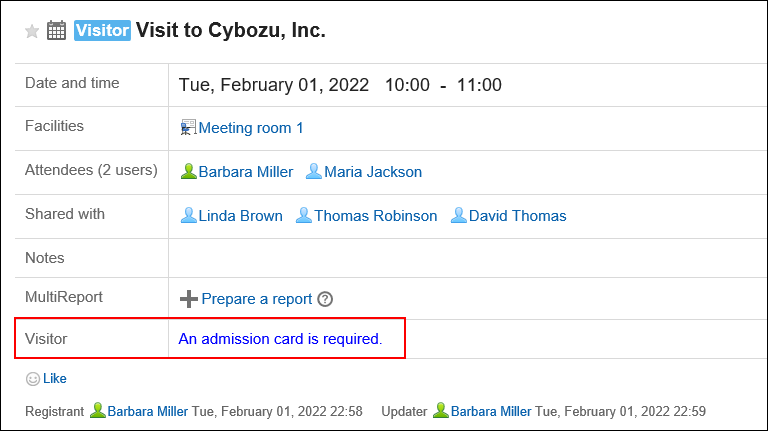
For example, if you preset the usage of a conference room or car numbers for company cars, you can show them to users automatically while they use the appointment details screen.
Before setting up appointment type links, you must add appointment types.
If you have set up multiple appointment type links in one appointment type, the appointment type link that you added first will be applied.
-
Click the Administration menu icon (gear icon) in the header.
The gear-shaped icon appears only on the screen for the users with administrative privileges. -
Click Garoon System Administration.
-
Select "Application settings" tab.
-
Click Scheduler.
-
Click Appointment types, and check that the Appointment type link has been added in the "Appointment types" screen.
If you do not have the appointment type you want, add it. For details, refer to Adding Appointment Types. -
Click the item to link appointment types.
-
On the screen for appointment type links, click the item to add appointment type links.
-
On the screen to add appointment type links, set the appointment type field name.
You should set appointment type names for appoint type links.
Select the appointment type from the dropdown list.
-
Set "Portlet" field.
Enter the texts or link URLs to display on the "Appointment details" screen.
You can also customize the content to display using the following features.- Description using HTML:
Make sure you read Disclaimer before writing HTML.
Additionally, refer to Notes on HTML Tags to write HTML tags, for the appointment type links to work properly. - Keywords description:
You can create a description using keywords to display user information.
If you select "Comment" from the dropdown list in "Portlet" field, the default HTML tags and sample texts are entered.
<font color="blue">You can add comments here.</font>
- Description using HTML:
-
Confirm your settings and click Add.
To ensure that the appointment type link works correctly, note the following when you write tags:
HTML tags are written in lowercase letters.
You should write start tags and end tags in pairs. The HTML tags without ending tags can cause some issues, including the Appointment details screen not displayed properly.
You also should note that not to cross nested tag pairs when you write HTML tags.
Example:
You do not need to use "html", "head", or "body" tags.
When you write scripts in JavaScript, read Secure Cording Guidelines carefully.
Avoid Using Cross-Site Scripting and CSS Injection
You can use keywords to display user information.
Usable Keywords are as follows:
| Keyword | Description |
|---|---|
| %Name% | User name |
| %ID% | User ID used in Garoon system |
| %Account% | Login name |
| %Mail% | E-mail added to the user information |
| %Tel% | Contact information added in the user information |
| %URL% | URL added in the user information |
| %grn.common.login.login.extension.Code of custom item in user profile% | User information items configured in Users & System Administration Example: %grn.common.login.login.extension.item_01% |
Change settings for appointment type links.
Changing settings for appointment type links updates the contents displayed in the appointments that are added before the change.
-
Click the Administration menu icon (gear icon) in the header.
The gear-shaped icon appears only on the screen for the users with administrative privileges. -
Click Garoon System Administration.
-
Select "Application settings" tab.
-
Click Scheduler.
-
Click the item to link appointment types.
-
On the screen for appointment type links, click the appointment type name to change the appointment type link.
-
On the screen for appointment type link details, click Edit.
-
On the screen to change appointment type links, change the settings as necessary.
-
Confirm your settings and click Save.
Change the order of appointment type links displayed on the appointment type link screen in system administration.
The order of appointment type links does not affect user screens.
-
Click the Administration menu icon (gear icon) in the header.
The gear-shaped icon appears only on the screen for the users with administrative privileges. -
Click Garoon System Administration.
-
Select "Application settings" tab.
-
Click Scheduler.
-
Click the item to link appointment types.
-
On the screen for appointment type links, click to reorder appointment type links.
-
On the screen to reorder appointment type links, you can reorder appointment type links.
-
Confirm your settings and click Save.
Delete added appointment type links.
Delete appointment type links one by one.
-
Click the Administration menu icon (gear icon) in the header.
The gear-shaped icon appears only on the screen for the users with administrative privileges. -
Click Garoon System Administration.
-
Select "Application settings" tab.
-
Click Scheduler.
-
Click the item to link appointment types.
-
On the screen for appointment type links, click the appointment type name of the appointment type link to delete.
-
On the screen for appointment type link details, click Delete.
-
Click Yes on "Delete" screen.
Delete multiple appointment type links at once.
-
Click the Administration menu icon (gear icon) in the header.
The gear-shaped icon appears only on the screen for the users with administrative privileges. -
Click Garoon System Administration.
-
Select "Application settings" tab.
-
Click Scheduler.
-
Click the item to link appointment types.
-
On the screen for appointment type links, select the checkbox of the appointment type to delete, and then click Delete.
-
Click Yes on the screen to delete all appointment type links at once.
Delete all appointment type links.
-
Click the Administration menu icon (gear icon) in the header.
The gear-shaped icon appears only on the screen for the users with administrative privileges. -
Click Garoon System Administration.
-
Select "Application settings" tab.
-
Click Scheduler.
-
Click the item to link appointment types.
-
On the screen for appointment type links, click the item to delete all appointment type links.
-
Click Yes on the screen to delete all appointment type links.