Remote access rule
You can limit which applications are available to users when they remotely access Garoon.
If user attempts to remotely access an application that is not allowed to use, that application will not be displayed and the user cannot use that application.
Here we describe the way to limit remotely accessible applications.
After setting the "Remote access rule", you can set applications to allow remote access.
-
Click the administration menu icon (gear icon) in the header.
-
Click System settings.
-
Select "Basic system administration" tab.
-
Click Applications.
-
Click Application users.
-
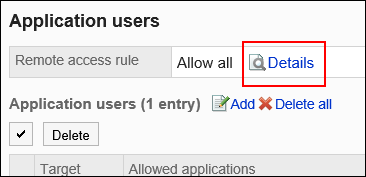
On the "Application users" screen, click Details in "Remote access rule".
-
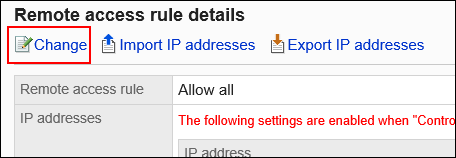
On the "Remote access rule details" screen, click Change.
-
On the "Change remote access rule" screen, set whether to restrict remote access.
The setting fields are as follows:
- Allow all:
The default value is "Allow all". Select this option if you do not want to limit remote access to applications. - Restrict access via Remote Service:
Select this option if accesses via remote service are considered as remote accesses and the available applications are limited. - Control with IP address:
Select this option if accesses from IP addresses that are not registered in Garoon are considered as remote accesses and the available applications are limited.
For example, accesses from IP addresses that are listed here are considered as accesses within the office.
A maximum of 500 IP addresses of IPv4 can be added.
Supports both IPv4 and IPv6 addresses.
To specify a range of IP addresses, use the CIDR notation.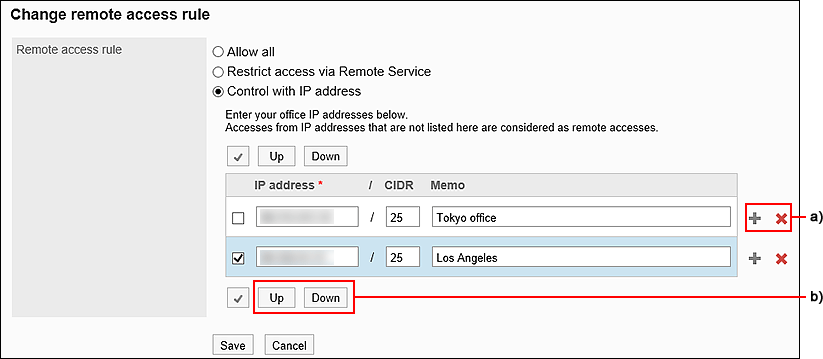
A): To add multiple IP addresses, click "+" to increase the input field.b): Select the check box and click Up or Down to reorder them. - Allow all:
-
Confirm your settings and click Save.
Then, set applications for which remote access is allowed. -
Click Application users to set applications for which remote access is allowed.
- If you want to add a target:
- On the "Application users" screen, click Add.
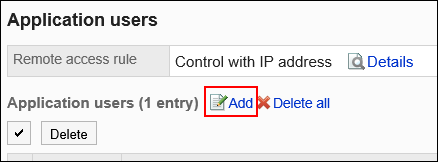
- On the "Add Target" screen, select the organization, user, or role you want to add, and click Add.
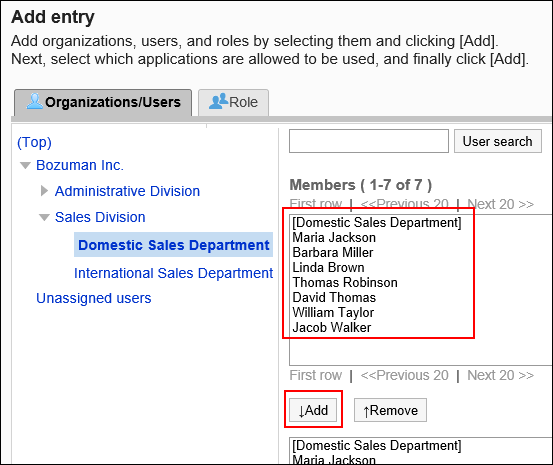
- In the "Allow to remote access" field, select the checkboxes of the applications you want to allow remote access.
Applications that do not have their checkboxes selected in the "Allow to use" field cannot be selected.
- Confirm your settings and click Add.
- If you want to change the existing target settings:
- On the "Application users" screen, click Change for the target you want to change its setting.
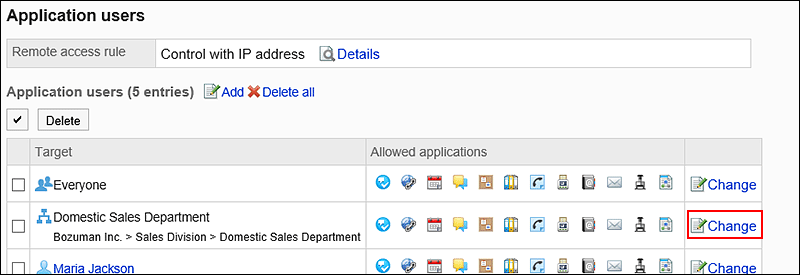
- On the "Change allowed applications" screen, in the "Allow to remote access" field, select the checkboxes of the applications you want to allow remote access.
Applications that do not have their checkboxes selected in the "Allow to use" field cannot be selected.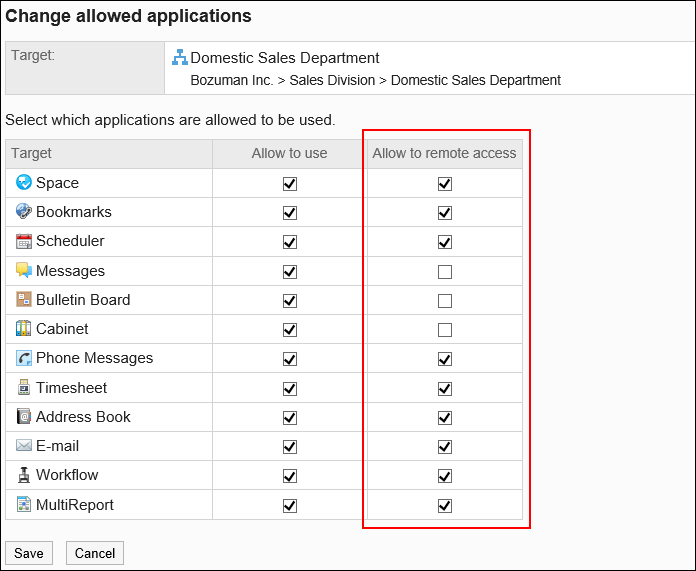
- Confirm your settings and click Save.
-
On the "Application users" screen, confirm that your settings are displayed in the "Application users" list.
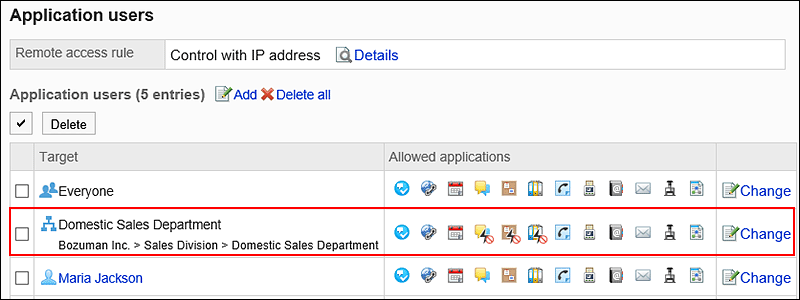 The icons of applications that are not allowed to remote access are displayed as follows:
Space Example:
Managing IP Addresses Using CSV Files
IP addresses to be used to control remote access are managed in a CSV file.
Importing Data from a CSV File
You can import IP addresses to be used to control remote access from the CSV file.
If any error occurs while attempting to import a CSV file, the import will stop, and the imported contents will not be applied.
-
Create a CSV file to import data.
For information on items that can be managed in CSV files, refer to the "IP Addresses to Be Used to Control Remote Access" section. -
Click the administration menu icon (gear icon) in the header.
-
Click System settings.
-
Select "Basic system administration" tab.
-
Click Applications.
-
Click Application users.
-
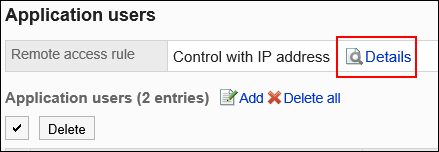
On the "Application users" screen, click Details in "Remote access rule".
-
On the "Remote access rule details" screen, click Import IP addresses.
-
On the "Import IP addresses - Step 1/2" screen, select the CSV file that you created in step 1.
-
Set the data to import, and click Next.
You can import up to 500 items.
Options are as follows.- Character encoding:
Encodes data from a CSV file with the selected character code.
The following character encoding can be selected:- Unicode (UTF-8)
- Japanese (Shift-JIS)
- ASCII
- English (Latin1)
- Simplified Chinese (GBK/GB2312)
- Thai (TIS-620)
- Skip the first row:
If the header row contains information other than data such as an item name and a comment, select "Yes".
- Character encoding:
-
On the "Import IP addresses - Step 2/2" screen, check the contents of the CSV file, and click Import.
Exporting Data to a CSV File
You can export IP addresses to be used to control remote access to the CSV file.
-
Click the administration menu icon (gear icon) in the header.
-
Click System settings.
-
Select "Basic system administration" tab.
-
Click Applications.
-
Click Application users.
-
On the "Application users" screen, click Details in "Remote access rule".

-
On the "Remote access rule details" screen, click Export IP addresses.
-
On the "Export IP addresses" screen, set the required items for the data to be exported.
The setting fields are as follows:
- Character encoding:
Select the character code that you want to use for encoding.
The following character codes can be selected.- Unicode (UTF-8)
You can select with BOM as required. - Japanese (Shift-JIS)
- ASCII
- English (Latin1)
- Simplified Chinese (GBK/GB2312)
- Thai (TIS-620)
- Unicode (UTF-8)
- Include header row:
To export an item name to the header row of a CSV file, select "Yes".
- Character encoding:
-
Confirm your settings and click Export.
-
Save the file with a function provided by your Web browser.