General Settings for files
On the "General Settings" page of a file, you can set files that are common to each application.
Setting File Size Limitations
Limit the size per file to allow uploading to garoon.
Applies to the following applications and functions
- Space
- Scheduler
- Messages
- Bulletin Board
- Cabinet
- Memo
- Address Book
- Workflow
- MultiReport
- Application Menu:
This size limit is also applied to the image file used for the icon in the Application menu.
For details, refer to Application Menu settings. - User profile
-
Click the Administration menu icon (gear icon) in the header.
-
Click System settings.
-
Select "Basic system administration" tab.
-
Click "File".
-
Click General settings.
-
In the "File size limit" field on the "General Settings" screen, select a limit for the size per file.
The available file size limits are as follows
- 512KB
- 1MB
- 3MB
- 5MB
- 10MB
- 50MB
- 100MB
- 1024MB
-
Confirm your settings and click Save.
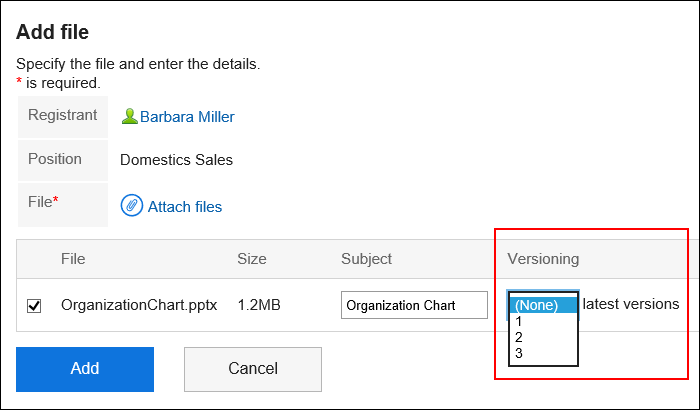
Setting the Maximum Value for Versioning
Set the maximum number of generations for which you want to version a file.
Applies to the following applications.
- Scheduler
- Space
- Bulletin Board
- Cabinet
- Messages
- MultiReport
- Memo
Versioning is a feature to hold updated files from the current point of time.
If an updated file is corrupted, or if you update the file incorrectly, you can replace the file with the earlier version you want.
The files to be kept in version control are set in generational increments. The number of generations to be set is set when each user registers a file.
For example, if you have two generations of versioning, you can keep the updated files from "current/current to one before/from the current time".
When a new file is updated, older files that are larger than the specified generation will be deleted.
- Download files that you have stored in the past
- Update retained files as up-to-date files
-
Click the Administration menu icon (gear icon) in the header.
-
Click System settings.
-
Select "Basic system administration" tab.
-
Click "File".
-
Click General settings.
-
On the "General settings" screen, in the "Upper limit for versioning" field, select the number of generations to be versioned.
The number of generations you can select is as follows
- Not
- 1 - 10
- Unlimited
-
Confirm your settings and click Save.
Enabling the Locking Feature
Select whether to enable the locking feature.
Applies to the following applications.
- Bulletin Board
- Cabinet
- MultiReport
The lock feature is a feature that temporarily restricts editing permissions to only the file editor, so that other users cannot edit the file at the same time.
When other users view the file under editing, a message "This file is being edited by (user name)." is displayed on the screen.
Other users cannot do the following until the lock is released
- Changing File Information
- Updating, moving, and deleting files
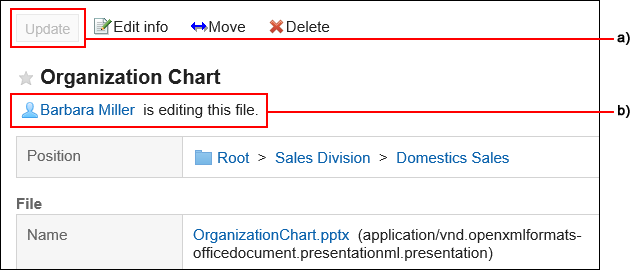
a): The "Update Files" field is grayed out and cannot be clicked during the lock.
b): Displays the name of the user who is editing the file.
-
Click the Administration menu icon (gear icon) in the header.
-
Click System settings.
-
Select "Basic system administration" tab.
-
Click "File".
-
Click General settings.
-
On the "General settings" screen, on the "File locking" field, select the "Active" checkbox.
-
Confirm your settings and click Save.
Setting the Period for Locking
Set the period for which you want to lock the file you are editing. This setting is applied when the locking feature is enabled.
After the period of locking is applied, the lock is automatically unlocked.
Applies to the following applications.
- Bulletin Board
- Cabinet
- Messages
- MultiReport
-
Click the Administration menu icon (gear icon) in the header.
-
Click System settings.
-
Select "Basic system administration" tab.
-
Click "File".
-
Click General settings.
-
In the "Locking period" field on the "General Settings" screen, select the period for which you want to lock the file you are editing.
The available periods are as follows
- 30 minutes
- 1 hour
- 3 hours
- 5 hours
- One day
- Unlimited
-
Confirm your settings and click Save.