Configuring HTML Portlets
HTML Portlets are portlets that you can create using HTML tags.
You can write tags in HTML portlets to show systems or WEB sites outside of Garoon.
Notes on HTML Tags
To ensure that the HTML portlet works correctly, be noted the following when you write tags:
HTML tags are written in lowercase letters.
You should write start tags and end tags in pairs. If you place a portlet that does not have proper HTML tag pairs in a portal, it can cause problems such as a portal editing page incorrectly appears or a portal that can not be moved.
You also should note that not to cross nested tag pairs when you write HTML tags.
Example:
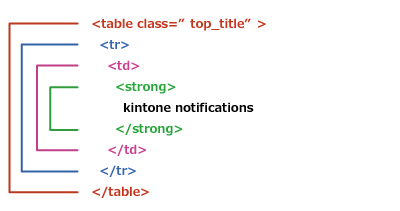
You do not need to describe html, head, or body tags in HTML portlets.
When you write scripts in JavaScript, read the following sections carefully in the Secure Cording Guidelines:
Avoid Using Cross-Site Scripting
Avoid Using Cross-Site Request Forgery
Adding HTML Portlets
Create HTML portlets. If the system administrator grants the users permissions to use portlets in My Portals, users can use them in their My Portals.
-
Click the administration menu icon (gear icon) in the header.
-
Click System settings.
-
Select "Application settings" tab.
-
Click Portal.
-
Click HTML portlet.
-
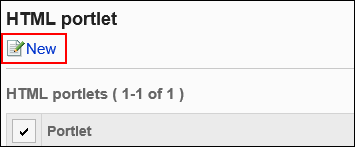
On "HTML portlet" screen, click New.
-
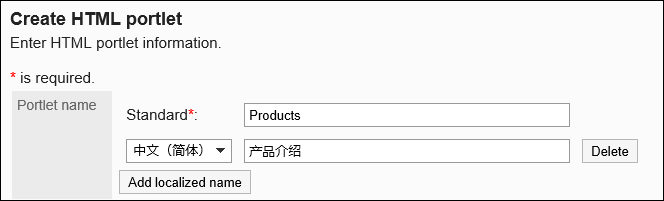
On the screen to add HTML portlets, enter the "Portlet" field.
You should set the default portlet name.
Clicking Add localized name allows you to set portlet names in multiple languages.
If you do not set the portlet name in the user preference language, the default portlet name is displayed.
The following languages can be set:- 日本語
- English
- 中文(简体)
- 中文(繁體)
Displayed in Traditional Chinese.
-
Set the "Groups" field.
Select the portlet group to include the portlet.
-
Set the "My Portal" field.
To allow users to use the added HTML portlets in their My Portals, select the "Allowed" checkbox for My Portal.
-
Set the contents of the portlet field.
Use HTML tags and formatting to write the contents of the portlet.
You can customize the HTML portlets using the following functions:
- Keywords description:
You can show information of users who use portlets by creating Usable Keywords.
- Keywords description:
-
Confirm your settings and click Add.
Available Keywords
By using keywords, you can display user information of users who use portlets in HTML portlets.
The keyword replaces the user information of users who use the portlet.
Usable Keywords are as follows:
| Keyword | Meaning |
|---|---|
| %Name% | User name |
| %ID% | User ID used in Garoon system |
| %Account% | Login name |
| %Mail% | E-mail added to the user information |
| %Password% | password |
| %session_password% | Password used by the logged-in user and stored in the session |
| %Tel% | Contact information added in the user information |
| %URL% | URL added in the user information |
Changing HTML Portlets
Change HTML portlets.
-
Click the administration menu icon (gear icon) in the header.
-
Click System settings.
-
Select "Application settings" tab.
-
Click Portal.
-
Click HTML portlet.
-
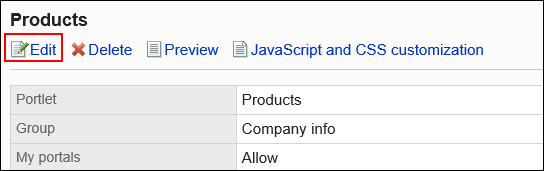
On "HTML portlet" screen, select the portlet name of the HTML portlet to change.
-
On the screen for HTML portlet details, click Save.
-
On the screen to edit HTML portlets, change the settings as necessary.
-
Confirm your settings and click Save.
Customizing HTML Portlets Using JavaScript/CSS
You can customize the appearance of HTML portlet screens using JavaScript files and CSS files.
For details, refer to Portal Customization.
Checking the Appearance of HTML Portlets
Before making the HTML portlets public, you can preview the appearance of the portlets on user screens.
-
Click the administration menu icon (gear icon) in the header.
-
Click System settings.
-
Select "Application settings" tab.
-
Click Portal.
-
Click HTML portlet.
-
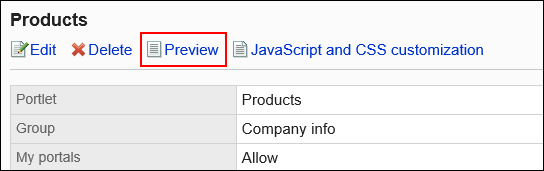
On the "HTML portlet" screen, select the HTML portlet to show the preview.
-
On the screen for HTML portlet details, click Preview.
Deleting HTML Portlets
Delete HTML portlets.
Deleting HTML Portlets One by One
Delete each HTML portlet.
-
Click the administration menu icon (gear icon) in the header.
-
Click System settings.
-
Select "Application settings" tab.
-
Click Portal.
-
Click HTML portlet.
-
On the "HTML portlet" screen, select the portlet name of the HTML portlet to delete.
-
On the screen for HTML portlet details, click Delete.
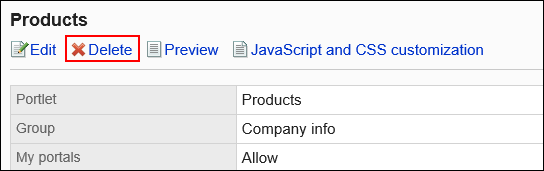
-
Click Yes on the deleting HTML portlet screen.
Deleting Multiple HTML Portlets in Bulk
Delete multiple HTML portlets at once.
-
Click the administration menu icon (gear icon) in the header.
-
Click System settings.
-
Select "Application settings" tab.
-
Click Portal.
-
Click HTML portlet.
-
On the "HTML portlet" screen, select the checkboxes of the portlets to delete, and then click Delete.
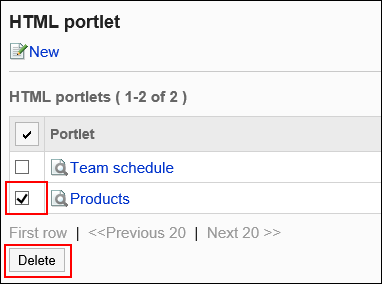
-
Click Yes on the deleting all HTML portlets screen.