General settings for Timesheet
On the "General settings" screen of Timesheet, you can set the basic functions of Timesheet.
Using Auto Stamping
The start and end times are automatically recorded by using the auto punch function.
The time that Auto Punch and Manual Punch use to punch the timesheets differs depending on which you use.
- Auto Punch
- Start
The time that is specified in the "Time to date" field is set to the time when the Garoon is first accessed in punch. - End
The last time you accessed Garoon is punch until the time that is set to "time to date is changed".
This "End" time may not be accurate as the system checks and records the access time every five minutes.
- Start
- Manual Punch
- Start
The time you click "Start" on the timesheet will be punch. - End
The time you click "End" on the timesheet will be punch.
- Start
The following actions are considered as accessing Garoon
- Clicking "Start" or "End"
- Clicking "Receive" or "Receive for all accounts"
- Displaying the Garoon application screen
Example: Displaying Bulletin Board - Reloading the Garoon screen
-
Click the administration menu icon (gear icon) in the header.
-
Click System settings.
-
Select "Application settings" tab.
-
Click Timesheet.
-
Click General settings.
-
In "Auto punch" field on "General settings" screen, select the Enable checkbox.
If you do not use the Auto Punch of timesheets, clear the Enable checkbox. -
Confirm your settings and click Save.
Setting the Start Date of the Aggregation
The day starts the month aggregation.
The start date that you set is displayed at the top on the "Timesheet" screen.
An example of the start date of the aggregation is 15th:
-
Click the administration menu icon (gear icon) in the header.
-
Click System settings.
-
Select "Application settings" tab.
-
Click Timesheet.
-
Click General settings.
-
On the "General settings" screen, on the "Start Summary" field, select the date you want to start the aggregation.
-
Confirm your settings and click Save.
Setting Month View
Displays the month of the aggregation.
The month of the specified value is added to the month of the start date of aggregation.
An example of the start date of the aggregation is February and the Month view is "1":

-
Click the administration menu icon (gear icon) in the header.
-
Click System settings.
-
Select "Application settings" tab.
-
Click Timesheet.
-
Click General settings.
-
In the "Month View" field on the "General Settings" screen, select a value to add to the month of the start date of the aggregation.
The available values are 0, 1, 2, and 3. -
Confirm your settings and click Save.
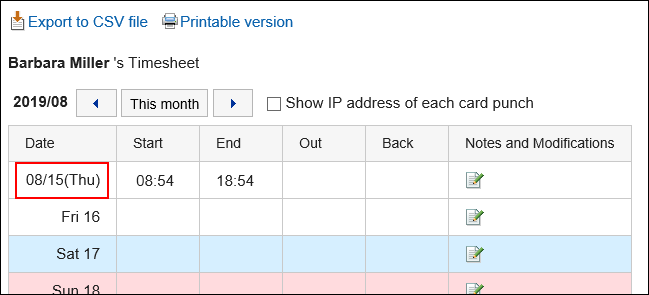
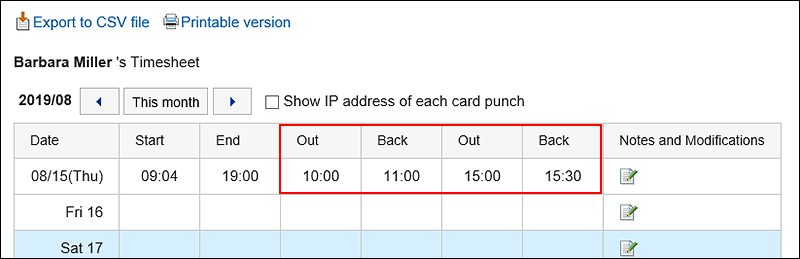
Setting the Maximum Number of Out-of-Office/Return
You can set whether to allow an out-of-date, or back, time recording.
When the number of "out-of-date" is specified in number of times, the "Out" and "Back" settings are displayed on the "Timesheet" screen of users according to the number of times specified.
The time when the user clicks out or back is recorded as out-of-office time or the back time.
Example of the maximum number of times:
-
Click the administration menu icon (gear icon) in the header.
-
Click System settings.
-
Select "Application settings" tab.
-
Click Timesheet.
-
Click General settings.
-
On the "General Settings" screen, select the maximum number of outings and restorations in the "Out of Office" field.
You can select the number from one to six. You can also select "Disable". -
Confirm your settings and click Save.
Setting the Time When the Date Is Changed
After the time has been set, the timesheet automatically moves to the next day.
-
Click the administration menu icon (gear icon) in the header.
-
Click System settings.
-
Select "Application settings" tab.
-
Click Timesheet.
-
Click General settings.
-
On the "General Settings" screen, select a time in the "Time to date" field.
-
Confirm your settings and click Save.
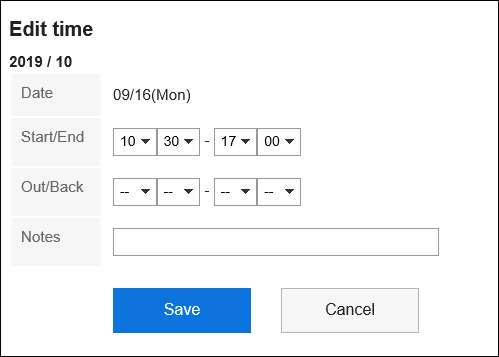
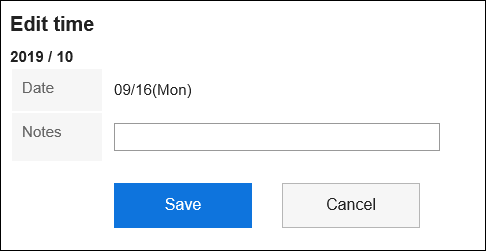
Allowing Users to Change the Time
Select whether to allow users to modify the time that is punch to the timesheet.
The system administrator or application administrator can modify the time of the user's timesheet, regardless of whether or not the user is allowed to modify the time.
If you do not want to allow users to change the time, the following items are not displayed on the "Modify time" screen of the user.
- Work/Work
- Out/back
For example, if you want to allow users to modify the time:
For example, if you do not allow users to modify the time:
-
Click the administration menu icon (gear icon) in the header.
-
Click System settings.
-
Select "Application settings" tab.
-
Click Timesheet.
-
Click General settings.
-
On the "General settings" screen, on the "Allow users to change the time" field, select the "Allow" checkbox.
If you do not want to allow the time to be modified, clear the "Allow" checkbox. -
Confirm your settings and click Save.