Workflow Customization
This section describes how to customize workflows.
The customization is applied to request data created after you apply the customization.
Request data created prior to applying the customization will not be applied.
For the screens that allow customization to be applied, refer to For Workflows.
Allowing Workflow Customization
You can set whether to allow customizations using JavaScript files and CSS files.
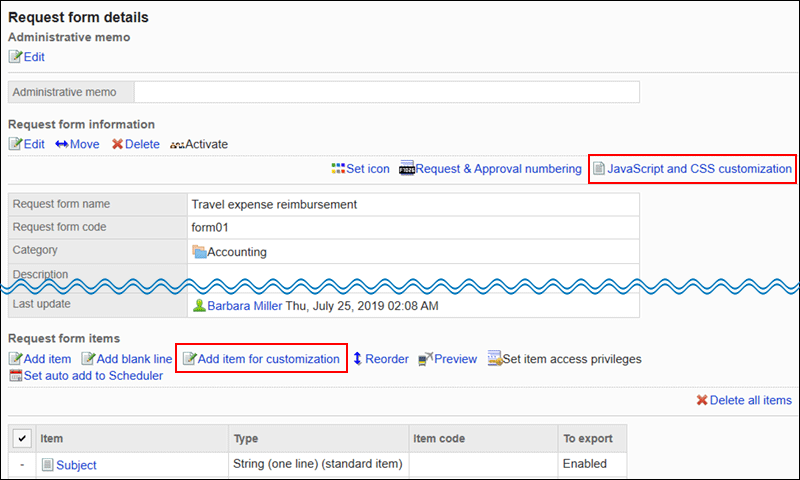
If you allow customization, the "Request form details" page appears with action links to apply JavaScript files or CSS files and an action link to add items for JavaScript customization.
-
Click the Administration menu icon (gear icon) in the header.
The gear-shaped icon appears only on the screen for the users with administrative privileges. -
Click Garoon System Administration.
-
Select "Application settings" tab.
-
Click Workflow.
-
Click General Settings.
-
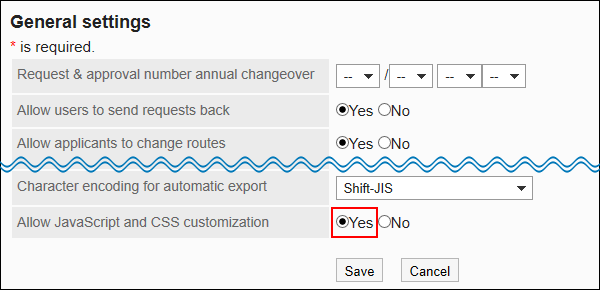
On the "General Settings" screen, in "Allow JavaScript and CSS customization" field, select "Allow".
-
Confirm your settings and click Apply.
Setting Items for JavaScript Customization
This section describes how to add, change, and delete items for JavaScript customization.
Use the items for JavaScript customization if you want use spaces for the purpose of changing the design in a request form in workflow customizations. The items defined in JavaScript and CSS are placed where the items for customization are placed.
The items for JavaScript customization is used for JavaScript customizations. You don't need to use them if you don't customize the request form.
For details on customization, refer to the page in cybozu developer network.
Adding Items for JavaScript Customization
Add items for JavaScript customization to request forms.
To add an item for JavaScript customization, you must be allowed to customize the workflow.
-
Click the Administration menu icon (gear icon) in the header.
The gear-shaped icon appears only on the screen for the users with administrative privileges. -
Click Garoon System Administration.
-
Select "Application settings" tab.
-
Click Workflow.
-
Click Request forms.
-
On the "Request forms" list screen, select a category, then click the name of the request form to which you add items for JavaScript customization.
-
On "Request form details" screen, click Add item for customization in the items list of the Request Form.

-
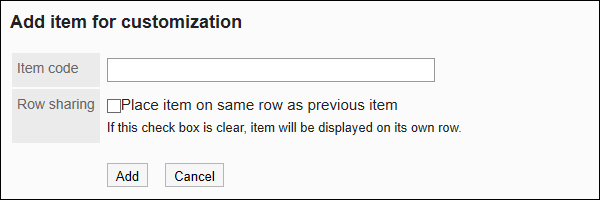
On the "Add item for customization" screen, set the required items.
- Item Code:
An item code is a unique code to identify items for JavaScript customization. You can enter codes in up to 100 characters.
You can use single-byte alphanumeric characters, hyphens, and _ (underscores).
If an item code is duplicated in one request form, an error occurs. - Place the item on the right:
If you select "Place item on same row as previous item" checkbox, the item is placed next to the previous item.
- Item Code:
-
Confirm your settings and click Add.
Added items are displayed at the bottom of the items list of the Request Form.
Changing Items for JavaScript Customization
Change the settings for the items for JavaScript customization.
-
Click the Administration menu icon (gear icon) in the header.
The gear-shaped icon appears only on the screen for the users with administrative privileges. -
Click Garoon System Administration.
-
Select "Application settings" tab.
-
Click Workflow.
-
Click Request forms.
-
On the "Request forms" list screen, select a category, then click the name of the request form in which you modify items for JavaScript customization.
-
On the items list of the Request Form in the "Request form details" screen, click the item name of the items for JavaScript customization to change.
-
On the "Item for customization details" screen, click Edit.

-
On the "Edit item for customization" screen, set the required items.
-
Confirm your settings and click Save.
-
If you have changed the placement, check the request form on the preview screen.
For details, refer to Previewing Request Forms.
Reordering Items for JavaScript Customization
Reorder the items for JavaScript customization.
The steps to reorder are the same as changing the order of items and empty lines.
-
Click the Administration menu icon (gear icon) in the header.
The gear-shaped icon appears only on the screen for the users with administrative privileges. -
Click Garoon System Administration.
-
Select "Application settings" tab.
-
Click Workflow.
-
Click Request forms.
-
On the "Request forms" list screen, select a category, then click the name of the request form in which you reorder items for JavaScript customization.
-
On the items list of the Request Form in "Request form Details" screen, click "Reorder".

-
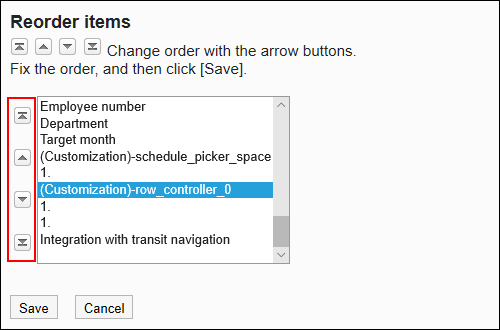
On the "Reorder" items screen, reorder the items for JavaScript customization.
-
Confirm your settings and click Save.
-
On the preview screen, check the request form.
For details, refer to Previewing Request Forms.
Deleting Items for JavaScript Customization
Delete the item for JavaScript customization.
The customization is applied to request data created after you apply the customization.
For this reason, if you delete the item for JavaScript customization, it is not applied to the request data that you created before the customization.
Deleting Items for JavaScript Customization One by One
Delete the item for JavaScript customization one by one.
-
Click the Administration menu icon (gear icon) in the header.
The gear-shaped icon appears only on the screen for the users with administrative privileges. -
Click Garoon System Administration.
-
Select "Application settings" tab.
-
Click Workflow.
-
Click Request forms.
-
On the "Request forms" list screen, select a category, then click the name of the request form in which you delete items for JavaScript customization.
-
On the items list of the Request Form in the "Request form details" screen, click the item name of the item for JavaScript customization to delete.
-
On the "Item for customization details" screen, click Delete.

-
Click Yes on "Delete item for customization" screen.
-
On the preview screen, check the request form.
For details, refer to Previewing Request Forms.
Deleting Multiple Items for JavaScript Customization in Bulk
Select the items for JavaScript customization to delete, then delete them in bulk.
-
Click the Administration menu icon (gear icon) in the header.
The gear-shaped icon appears only on the screen for the users with administrative privileges. -
Click Garoon System Administration.
-
Select "Application settings" tab.
-
Click Workflow.
-
Click Request forms.
-
On the "Request forms" list screen, select a category, then click the name of the request form in which you delete items for JavaScript customization.
-
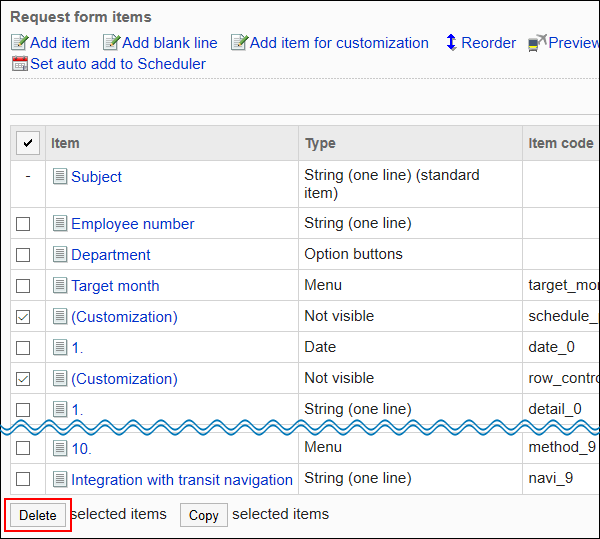
On the items list of the Request Form in the "Request form details" screen, click the items for JavaScript customization to delete, then click Delete.
-
Click Yes on the Delete all items screen.
-
On the preview screen, check the request form.
For details, refer to Previewing Request Forms.
Applying JavaScript/CSS Files
Apply JavaScript files or CSS files to request forms.
-
You can prepare JavaScript files and CSS files yourself.
-
Click the Administration menu icon (gear icon) in the header.
The gear-shaped icon appears only on the screen for the users with administrative privileges. -
Click Garoon System Administration.
-
Select "Application settings" tab.
-
Click Workflow.
-
Click Request forms.
-
On the "Request forms" list screen, select a category, then click the name of the request form to which you apply the JavaScript files or CSS files.
-
On the "Request form details" screen, click "JavaScript and CSS customization" in request form information.

-
In the "JavaScript customization" field on the "JavaScript and CSS customization" screen, set the JavaScript file to apply.
You can add up to 30 files or links.
- File:
Only files with an extension of ".js" can be added.
Up to 5 MB of files can be uploaded. - Link:
Specify a URL starting with "https://" in up to 512 characters.

- File:
-
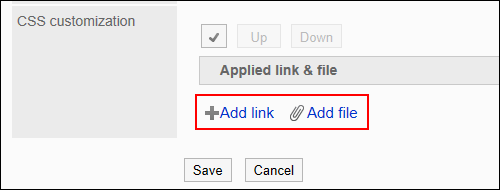
In the "CSS customization" field, set the CSS file you want to apply.
You can add up to 30 files or links.
- File:
Only files with an extension of ".css" can be added.
Up to 5 MB of files can be uploaded. - Link:
Specify a URL starting with "https://" in up to 512 characters.
- File:
-
You can change the order of the files and links as needed.
JavaScript files run from top to bottom.
Select the checkboxes for the files and links you want to reorder, and then click "Move Up" or "Move Down".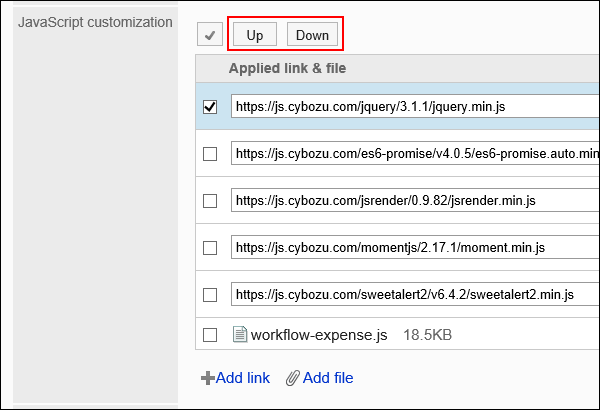
-
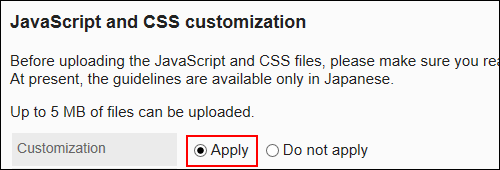
In the "Customization" field, select "Apply".
-
Confirm your settings and click Save.
-
On the screen where the customizations are applied, confirm that the design and item functions are fine.
-
Enable the request form.
For details, refer to Enabling Request Forms.