Settings for External Notifications through E-Mail
This section describes how to configure external notifications through e-mail.
This setting is necessary to process notification e-mails, which are sent from systems other than Garoon, as notifications.
This setting is for Garoon to ensure that notification e-mails, which are sent from systems other than Garoon, are sent from trusted systems.
When you receive notification e-mails, a "Received n external notifications" message is displayed on the screen.
Received notifications are displayed in "Notifications" portlet and "Notifications" screen. External notifications are not displayed in the "E-mail" screen.
Notification e-mails are processed as e-mails in the following cases:
- You have not configured external notifications through e-mail.
- Information configured for external notifications through e-mail and header information of notification e-mails do not match.
- Users have configured not to use external notifications.
Adding External Notifications through E-Mail
You can add external notifications through e-mail.
-
Click the Administration menu icon (gear icon) in the header.
The gear-shaped icon appears only on the screen for the users with administrative privileges. -
Click Garoon System Administration.
-
Select "Application settings" tab.
-
Click Notifications.
-
Click "External notifications".
-
In "External notifications" screen, click "New".
-
Select "E-mail" checkbox for "External notifications to allow" field in "Add external notification" screen.
-
Enter an item in "External notification Code" field.
This external notification code is mandatory.
This is a unique code for identifying external notifications.
This code must match the string specified in "X-Cybozu-Notify-App-Name" header of notification e-mails.
For details, refer to necessary headers to process external notifications through e-mail.
-
Input a display name of external notification in "Display name" field.
The name is mandatory. This display name is used as an application name displayed in "Notifications" portlet and "Notifications" screen.
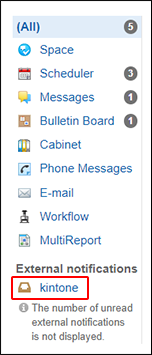
-
In "Permitted URLs" field, input link URLs for notifications.
You must input all URLs which you want to permit.
Enter each URL on a separate line. You can use a wildcard character "*".
This code must match the string specified in "X-Cybozu-Notify-App-URL" header of notification e-mails.
When you set a notification icon, enter the URL for the notification icon.
For details, refer to necessary headers to process external notifications through e-mail.
-
Select "Enabled" for "Status" field.
-
Confirm your settings and click Add.
Necessary Headers to Process External Notifications through E-Mail
In the case of external notifications through e-mail, information in notifications is displayed in "Notifications" screen and this is by design.
a): Subject
b): Contents
c): Sender name
d): Received date and time
| Header name | Short description | Description |
|---|---|---|
| X-Cybozu-Notify-App-Name | External notification code | Header to configure external notification codes. It is not necessary to distinguish single-byte and double-byte characters. |
| X-Cybozu-Notify-App-Ver | Production version | Header to configure product versions. Use this to control version information. |
| X-Cybozu-Notify-App-UniqueID | Identification (ID) of notifications | Header to configure identification (ID) of notifications. Identification (ID) of notifications is used to check duplicate notifications. If duplicate notifications are found, an older notification is overwritten with the latest one according to the sent date and time of e-mails (date/time of "X-Cybozu-Notify-Date" has precedence if it is set). If this header is omitted, the string set in "X-Cybozu-Notify-App-URL" (target link URL) is used as identification (ID). |
| X-Cybozu-Notify-App-URL | Target link URL | Header to configure target link URLs of notifications. If "X-Cybozu-Notify-App-UniqueID" is not set in notification e-mails, the string configure in this header is used as identification (ID). In that case, any string after "#" is ignored. |
| X-Cybozu-Notify-Date | Received date and time | Header to configure received date and time. This is used to compare notifications to determine the most recent one. If notifications with duplicate identification (ID) are already displayed as recent information, the most recent notification has precedence. If this header is omitted, "Date" in e-mail header is used as received date and time. |
| X-Cybozu-Notify-Name | Sender name | Header to configure sender names of notifications. If this header is omitted, "From" in e-mail header is used as sender names of notifications. |
| X-Cybozu-Notify-Subject | Subject | Header to configure subjects of notifications. If this header is omitted, "Subject" in e-mail header is used as subjects of notifications. |
| X-Cybozu-Notify-Abstract | Contents | Header to configure contents of notifications. If this header is omitted, e-mail body is used as contents of notifications. |
| X-Cybozu-Notify-Version | Version of notification e-mail | Header to configure versions of notifications. |
| X-Cybozu-Notify-Icon-URL | Icon URL | URL for the icons of notifications. If omitted, build-in globe icon If you create a new icon, it is recommended to use a "20x20" icon size. |
Format of Notification E-Mail
Use the following format to configure notification e-mails sent from systems other than Garoon.
| Item | Value |
|---|---|
| Content-Type | text/plain |
| charset | JIS (iso-2022-jp), us-ascii |
| Content-Transfer-Encoding | 7bit, base64, quote-printable |
Settings by Users
Users configure how to process external notifications through e-mail.
Notification e-mails sent from systems other than Garoon are processed as notifications by default.
If you want to process external notifications through e-mail as e-mails, ask users to edit their settings. For details, refer to Using external notifications.
Changing External Notifications through E-Mail
Editing settings of external notifications through e-mail.
-
Click the Administration menu icon (gear icon) in the header.
The gear-shaped icon appears only on the screen for the users with administrative privileges. -
Click Garoon System Administration.
-
Select "Application settings" tab.
-
Click Notifications.
-
Click "External notifications".
-
In "External notifications" screen, click the external notification (through e-mail) code which you want to edit.
-
In "External notification details" screen, click Edit.
-
In "Edit external notification" screen, configure necessary items.
-
Confirm your settings and click Save.
Deleting External Notifications through E-Mail
You can delete external notifications through e-mail.
Once you delete external notifications through e-mail, notification e-mails sent from systems other than Garoon are processed as e-mails.
Even if you delete the configuration of external notifications through e-mail, notifications which you have already received are not deleted. However, once you deleted, you cannot filter notifications in "Notifications" portlet and "Notifications" screen.
Deleting External Notifications through E-Mail One by One
You can delete external notifications through e-mail one by one.
-
Click the Administration menu icon (gear icon) in the header.
The gear-shaped icon appears only on the screen for the users with administrative privileges. -
Click Garoon System Administration.
-
Select "Application settings" tab.
-
Click Notifications.
-
Click "External notifications".
-
In "External notifications" screen, click the external notification (through e-mail) code which you want to delete.
-
In "External notification details" screen, click Delete.
-
Click Yes in the "Delete external notification" screen.
Deleting Multiple External Notifications through E-Mail in Bulk
You can select multiple external notifications through e-mail and delete them in bulk.
-
Click the Administration menu icon (gear icon) in the header.
The gear-shaped icon appears only on the screen for the users with administrative privileges. -
Click Garoon System Administration.
-
Select "Application settings" tab.
-
Click Notifications.
-
Click "External notifications".
-
In "External notifications" screen, select checkboxes of external notifications through E-Mail which you want to delete and click Delete.
-
Click Yes in the "Bulk deletion of external notifications" screen.