User Account Settings
User accounts mean accounts used to send and receive e-mails. Users use the user accounts set as their e-mail accounts.
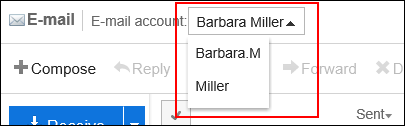
Users who have multiple accounts can select an e-mail account to send and receive e-mails.
You can also use a CSV file to manage user accounts in bulk.
For details, refer to Managing E-Mails Using CSV Files.
Adding User Accounts
Add an account for each user.
You can set up multiple user accounts for one user.
-
Click the Administration menu icon (gear icon) in the header.
The gear-shaped icon appears only on the screen for the users with administrative privileges. -
Click Garoon System Administration.
-
Select "Application settings" tab.
-
Click E-mail.
-
Click "User Accounts".
-
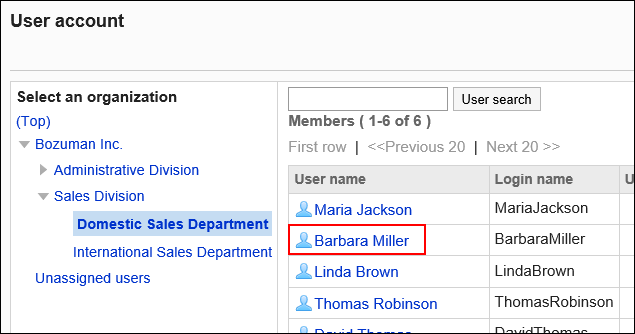
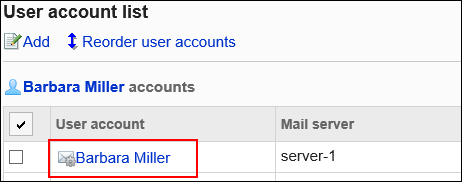
On the "User Accounts" screen, select a user.
-
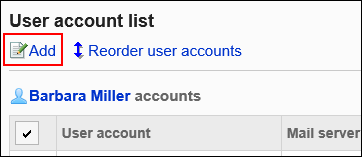
On the user account list screen, click "Create e-mail account".
-
On the "Create e-mail account" screen, enter a user account code.
You should set the user account code.
It is a unique code for identifying user accounts.
Even if you use the same user account name to multiple user accounts, they are recognized as a separate user account because their user account codes differ.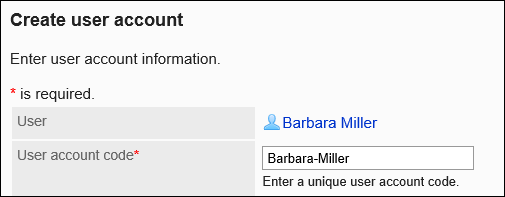
-
In "User account" field, enter a name of the user account.
If you left it blank, the address entered in the "E-mail" field is used as the user account name.
-
Set up an e-mail account.
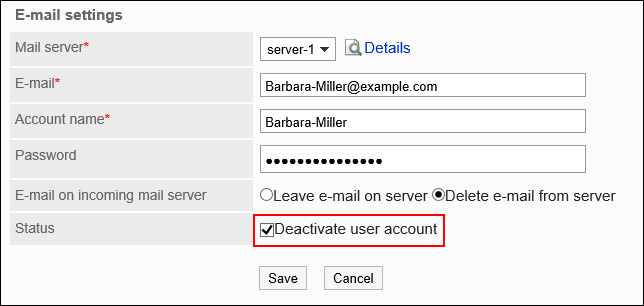
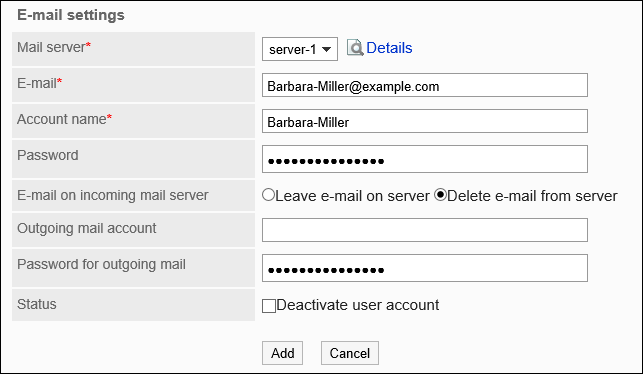 E-Mail Account Setting Fields
Mail Servers You must set up a mail server.
Before adding e-mail accounts, you must set up the mail server.
For details, refer to Adding Mail Servers.
Click Details to check the details of the mail server.E-mail Enter the e-mail address to be used with the selected mail server.
You must set the E-mail field.
You can use the following characters:- a to z
- A-Z
- 0 to 9
- Symbols:
- . ! # $ ' % & * + / = ? ^ _ ` { | } ~
Incoming e-mail account Enter the e-mail account to receive e-mails.
You should set the Incoming e-mail account name filed.Incoming e-mail password Enter the password for the incoming e-mail account. E-mail on incoming mail server Select whether to leave e-mails on the incoming mail server.
Select "Delete e-mail from server" if you do not want to leave e-mails on incoming e-mail servers.Outgoing e-mail account name If you select a mail server that has been configured for SMTP authentication in "Mail Servers" field, it is shown that the server sets an account and a password for sending.
Enter the e-mail account set for the outgoing mail server.Outgoing e-mail password If you select a mail server that has been configured for SMTP authentication in "Mail Servers" field, it is shown that the server sets an account and a password for sending.
Enter the password for the e-mail account set for the outgoing mail server.Status If you do not want the account to use the e-mail account shown, select the "Deactivate" checkbox. -
Confirm your settings and click Add.
If users use Gmail or Exchange Online accounts, users' authorization is required to send/receive e-mails.
Contact users to perform OAuth authorization in the "E-mail account details" screen in Personal settings.
Changing User Accounts
Change user account settings.
-
Click the Administration menu icon (gear icon) in the header.
The gear-shaped icon appears only on the screen for the users with administrative privileges. -
Click Garoon System Administration.
-
Select "Application settings" tab.
-
Click E-mail.
-
Click "User Accounts".
-
On the "User Accounts" screen, select a user.
-
On the user account list screen, click the user account to change.
-
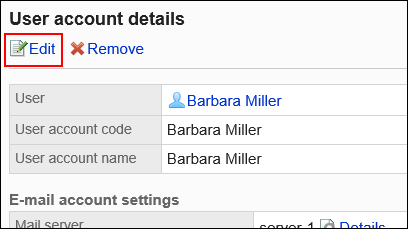
On the Details of User account screen, click Edit.
-
On "Editing E-mail Accounts" screen, change the fields as necessary.
For details on the settings, refer to Adding User Accounts. -
Confirm your settings and click Save.
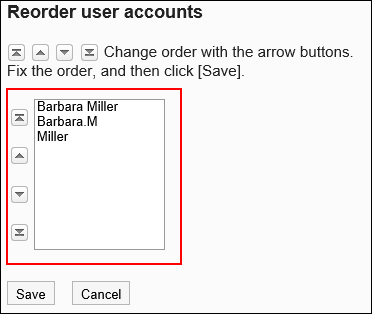
Reordering User Accounts
You can change the ordering of the user accounts shown on the user account list and in the "E-mail" screen for users.
The order set in this procedure is applied to the order in which the dropdown list to selects e-mail accounts on the "E-mail" screen.
The user account shown at the top is the default e-mail account.
-
Click the Administration menu icon (gear icon) in the header.
The gear-shaped icon appears only on the screen for the users with administrative privileges. -
Click Garoon System Administration.
-
Select "Application settings" tab.
-
Click E-mail.
-
Click "User Accounts".
-
On the "User Accounts" screen, select a user.
-
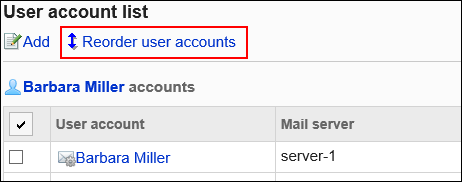
On the user account list screen, click "reorder user accounts".
-
On the reordering user accounts screen, reorder the user accounts.
-
Confirm your settings and click Save.
Deactivating User Accounts
To prevent users from using their e-mail without deleting their e-mail accounts, deactivate the user accounts.
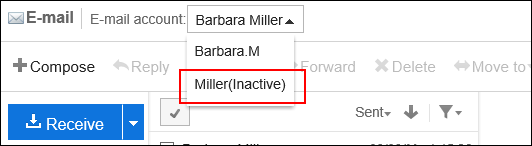
Example of a deactivated user account:
Once an e-mail account is deactivated, you can no longer send or receive e-mails with the deactivated account.
E-mails that were sent or received before the account is deactivated remain in Sent items, Inbox, or other folders.
Deactivating User Accounts One by One
Deactivate user accounts one by one.
-
Click the Administration menu icon (gear icon) in the header.
The gear-shaped icon appears only on the screen for the users with administrative privileges. -
Click Garoon System Administration.
-
Select "Application settings" tab.
-
Click E-mail.
-
Click "User Accounts".
-
On the "User Accounts" screen, select a user.
-
On the user account list screen, select the user account of the user to deactivate.
-
On the Details of User account screen, click Edit.
-
In "Status" field on "Editing E-mail Accounts" screen, select the "Deactivate e-mail account" checkbox.
-
Confirm your settings and click Save.
Deactivating Multiple User Accounts in Bulk
Select user accounts, and then deactivate them.
-
Click the Administration menu icon (gear icon) in the header.
The gear-shaped icon appears only on the screen for the users with administrative privileges. -
Click Garoon System Administration.
-
Select "Application settings" tab.
-
Click E-mail.
-
Click "User Accounts".
-
On the "User Accounts" screen, select a user.
-
On the user account list screen, select the checkbox of the user account to deactivate, and then click "Deactivate".

-
Click Yes on the deactivating all user accounts screen.
Inactive user accounts are grayed out on the user account list screen.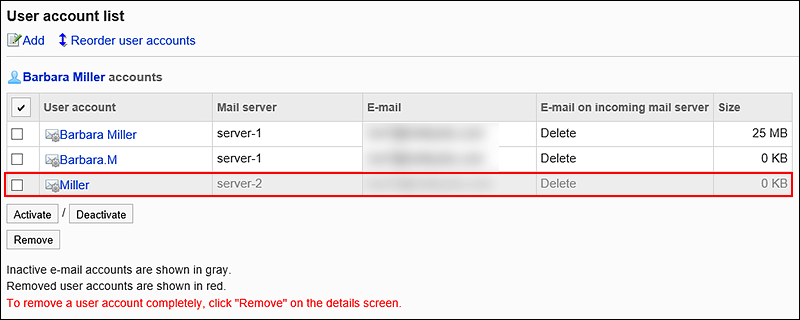
Deleting User Accounts
Delete a user account. After deleting user accounts, the accounts cannot send or receive e-mails.
When you delete a user account, you can also select whether to delete the e-mail data.
- If you delete both the user account and the e-mail data:
You can use the same user account code as the deleted user account to add a new user account. - If you delete only the user account:
You cannot use the same user account code as the deleted user account to add a new user account.
The user accounts with e-mail data remains, the data for the user accounts are shown in red characters on the user account list screen.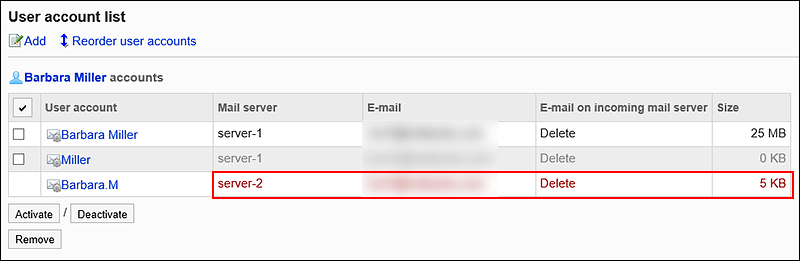
Deleting User Accounts One by One
Delete user accounts one by one.
-
Click the Administration menu icon (gear icon) in the header.
The gear-shaped icon appears only on the screen for the users with administrative privileges. -
Click Garoon System Administration.
-
Select "Application settings" tab.
-
Click E-mail.
-
Click "User Accounts".
-
On the "User Accounts" screen, select a user.
-
On the user account list screen, select the user account to delete.
-
On the Details of User account screen, click Delete.

-
Click Yes on the "Delete e-mail account" screen.
To delete e-mail data, select the "Delete all E-mails of this account" checkbox.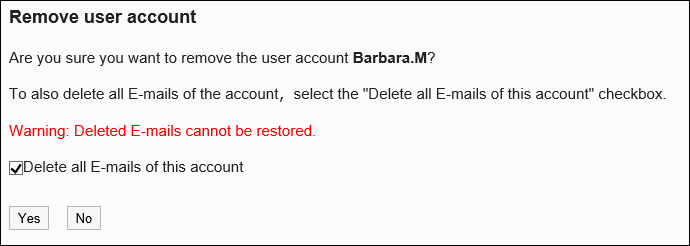
Deleting Multiple User Accounts in Bulk
Delete multiple user accounts at once.
-
Click the Administration menu icon (gear icon) in the header.
The gear-shaped icon appears only on the screen for the users with administrative privileges. -
Click Garoon System Administration.
-
Select "Application settings" tab.
-
Click E-mail.
-
Click "User Accounts".
-
On the "User Accounts" screen, select a user.
-
On the user account list screen, select the checkbox of the user account to delete, and then click Delete.
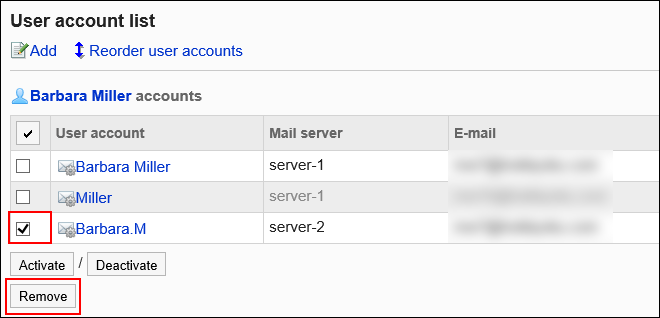
-
Click Yes on the deleting user accounts in bulk screen.
To delete e-mail data, select the "Delete all E-mails of this account" checkbox.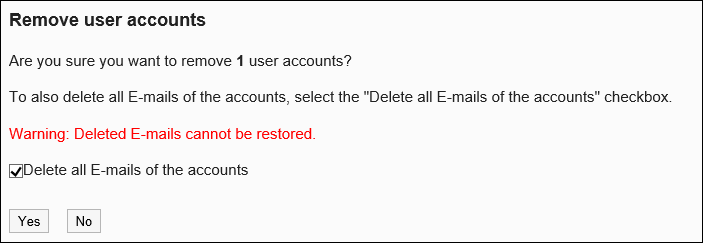
Deleting All User Accounts
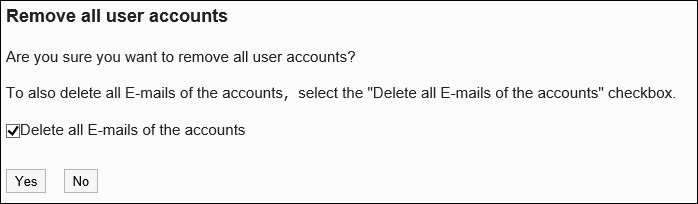
Delete all user accounts.
-
Click the Administration menu icon (gear icon) in the header.
The gear-shaped icon appears only on the screen for the users with administrative privileges. -
Click Garoon System Administration.
-
Select "Application settings" tab.
-
Click E-mail.
-
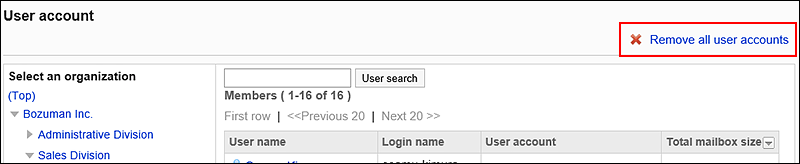
Click "User Accounts".
-
On the "User Accounts" screen, click to delete all user accounts.
-
Click Yes on the deleting all user accounts screen.
To delete e-mail data, select the "Delete all E-mails of this account" checkbox.