Limiting Application Users
You can limit which applications are available to users for each organization, user, or role.
If multiple targets are set for one user, that user can access applications allowed for one of the targets.
Applications that are not allowed to use are not displayed on the user screen. Users who are not allowed to use schedulers, messages, etc. cannot be specified as attendees or recipients.
- Space
- Bookmarks
- Scheduler
- Messages
- Bulletin Board
- Cabinet
- Phone Messages
- Timesheet
- Address Book:
The "User list" does not appear on the "Address Book" screen of users who are not allowed to use the application. However, when you select a user in applications such as Scheduler or Messages, user information for the user appears. - Workflow
- MultiReport
- Portal:
Portlets of applications that are not allowed to use are not displayed on the portal. - Memo
- To-Do List
- Cybozu Online Service:
To use Cybozu Online Service, you must set up the service.
For details, refer to the "Cybozu Online Service" section. - Presence indicators
- Favorite
- Notifications:
Notifications of applications that are not allowed to use are not displayed on the notification list. - Respond
- Image Assets
Adding Application Users
Add organizations, users, and roles and select which applications are available to the selected users.
Inactivated applications are not displayed. If you cannot find the application you want to make available, check whether the application is set to "Activate".
For details, refer to the "Using Applications" section.
In the example used in this section, "Remote access rule" is set to "Allow all".
-
Click the administration menu icon (gear icon) in the header.
-
Click "System settings".
-
Select "Basic system administration" tab.
-
Click Applications.
-
Click Application users.
-
On the "Application users" screen, click Add.

-
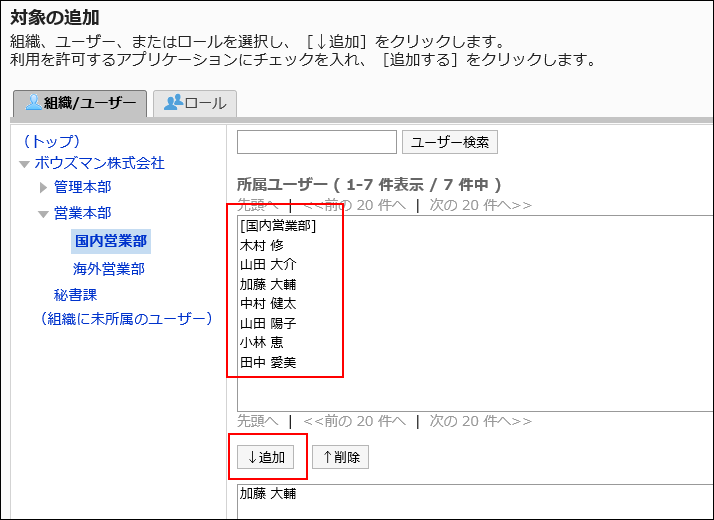
On the "Add Target" screen, select the organization, user, or role you want to add, and click Add.
-
Select the checkboxes of the applications you want to make available.
If "Remote access rule" is set to "Allow all", only the "Allow to use" field is displayed. The "Allow to remote access" field is not displayed.
-
Confirm your settings and click Add.
Changing Allowed Applications
To change applications available to users:
In the example used in this section, "Remote access rule" is set to "Allow all".
-
Click the administration menu icon (gear icon) in the header.
-
Click "System settings".
-
Select "Basic system administration" tab.
-
Click Applications.
-
Click Application users.
-
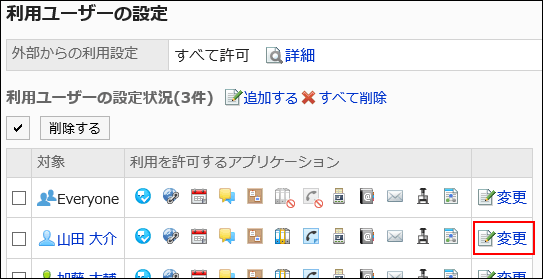
On the "Application users" screen, click Change for the user you want to change its setting.
-
On the "Change allowed applications" screen, change which applications are allowed to use.
If "Remote access rule" is set to "Allow all", only the "Allow to use" field is displayed. The "Allow to remote access" field is not displayed.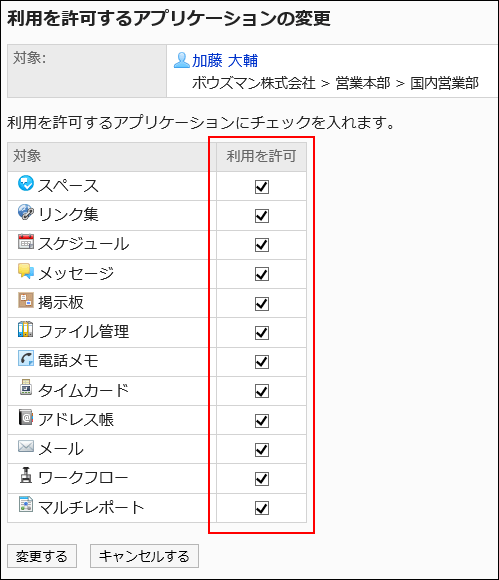
-
Confirm your settings, and then click Save.
Removing Application Users
Remove organizations, users, or roles that are set as application users.
Once targets are deleted, they cannot use applications allowed to use to the targets.
Removing Multiple Users Collectively
Select application users and remove them all together.
-
Click the administration menu icon (gear icon) in the header.
-
Click "System settings".
-
Select "Basic system administration" tab.
-
Click Applications.
-
Click Application users.
-
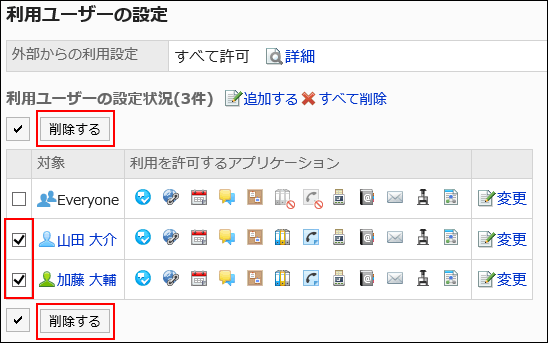
On the "Application users" screen, select the checkboxes of the organizations, users, or roles you want to remove, and then click Delete.
-
Click Yes on the "Delete target" screen.
Removing All Users
Remove all application users.
-
Click the administration menu icon (gear icon) in the header.
-
Click "System settings".
-
Select "Basic system administration" tab.
-
Click Applications.
-
Click Application users.
-
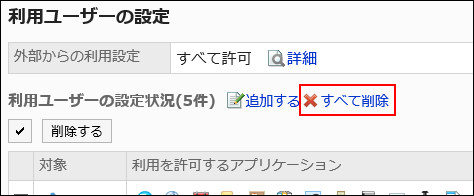
On the "Application users" screen, click Delete all.
-
On the "Delete all targets" screen, click Yes.