Managing Spaces
This section describes how to change, move, and delete spaces on the system administration screen.
Moving Spaces
Move spaces to another category.
-
Click the administration menu icon (gear icon) in the header.
-
Click System settings.
-
Select "Application settings" tab.
-
Click Space.
-
Click "Setting categories".
-
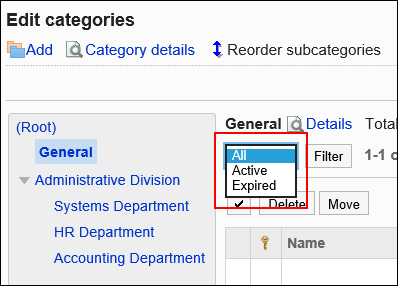
On "Setting categories" screen, select a category, then select a status for spaces from the dropdown list, and click "Filter".
The status of spaces displayed in the dropdown list is as follows:
- All
- Active
- Expired

-
Select the checkboxes of the spaces to move, and click "Move".
-
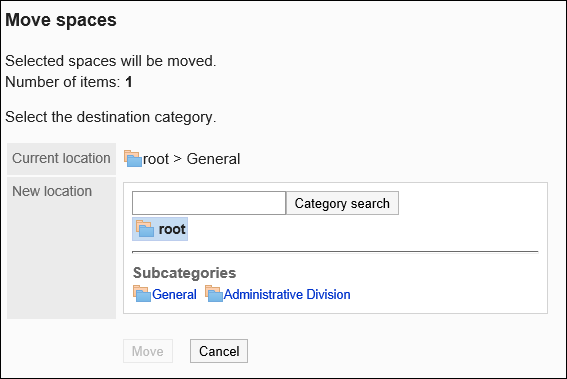
In the field specify the category to move into on the screen to move spaces in bulk, select a category.
Clicking "Move up" moves the category up one level.
Clicking on a category name moves you to the subcategory of the category you clicked.
You can search for categories to move categories into by entering keywords and clicking "Category search".
-
Confirm your settings and click "Move".
Deleting Spaces
Delete spaces.
Deleting spaces also deletes all data in the spaces such as discussions, to-dos, and attachments.
- If the space has any administrators:
The space can be deleted by the system administrators, the application administrators for the space, and the space administrators. - If the space does not have any administrators:
The space can be deleted by all members of the space, the system administrators, and the application administrators for the space.
This section describes how to delete spaces from the system administration screen. You can delete multiple spaces at once.
-
Click the administration menu icon (gear icon) in the header.
-
Click System settings.
-
Select "Application settings" tab.
-
Click Space.
-
Click "Setting categories".
-
On "Setting categories" screen, select a category, then select a status for spaces from the dropdown list, and click "Filter".
The status of spaces displayed in the dropdown list is as follows:
- All
- Active
- Expired

-
Select the check boxes for spaces to delete, and then click Delete.
-
Click Yes on "Deleting spaces in bulk" screen.
Deleting Expired Spaces in Bulk
This section describes how to delete expired spaces that expired before a date by specifying the expiration date in the system administration screen.
-
Click the administration menu icon (gear icon) in the header.
-
Click System settings.
-
Select "Application settings" tab.
-
Click Space.
-
Click "Setting categories".
-
On "Setting categories" screen, select a category, and then click "Delete expired spaces".

-
On "Delete expired spaces" screen, set the date to delete, and then click Delete.
Default date is one year before the date of the operation. -
Click Yes on "Delete expired spaces" screen.
Deleting Active Spaces Without Any Updates in Bulk
This section describes how to delete all expired spaces that have not been updated after a date by specifying the date in the system administration screen. Expired spaces will not be deleted in this operation.
-
Click the administration menu icon (gear icon) in the header.
-
Click System settings.
-
Select "Application settings" tab.
-
Click Space.
-
Click "Setting categories".
-
On "Setting categories" screen, select a category, and then click "Delete active spaces".

-
On "Delete active spaces" screen, set the day from which to delete spaces, and then click Delete.
Default date is one year before the date of the operation. -
Click Yes on "Delete active spaces" screen.