Notification Settings
This section describes category notifications.
Differences between Update Notifications and Forced Notifications
The two types of notifications which an administrator can set on Bulletin Board are update notifications and forced notifications. Set either for each category.
When a topic is created or updated within the categories for which update notifications or forced notifications are set, notifications will be sent to the specified recipients.
Since notifications received by users are displayed on the "Notifications" portlet, this prevents users from overlooking topics.
The difference between update notifications and forced notifications is as follows:
| Update notifications | Forced notifications | |
|---|---|---|
| Overview of functions | Notifications are sent to the specified recipients when a topic is created or updated. Users can stop receiving update notifications set by the administrator if notifications are not needed. Users can also set update notifications themselves. |
Notifications are sent to the specified recipients when a topic is created or updated. Users cannot stop receiving forced notifications set by the administrator. |
| When the administrator operates | Notifications can be set or stopped by category. Operation by topic is not available. |
Notifications can be set or stopped by category. Operation by topic is not available. |
| When the user operates | Notifications can be set or stopped by category. In categories where update notifications are set, notifications can be switched ON and OFF by topic. |
Cannot perform the requested action. |
Setting Update Notifications for Categories
This section describes how to set update notifications for categories.
Adding Notification Recipients
Set update notifications for the selected category.
-
Click the Administration menu icon (gear icon) in the header.
The gear-shaped icon appears only on the screen for the users with administrative privileges. -
Click Garoon System Administration.
-
Select "Application settings" tab.
-
Click Bulletin Board.
-
Click Notification settings.
-
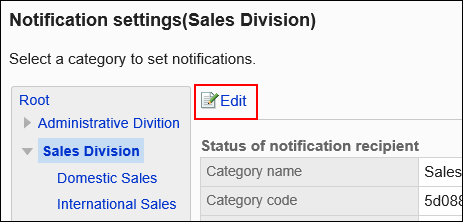
On the "Notification settings" screen, select a category and click Edit.
-
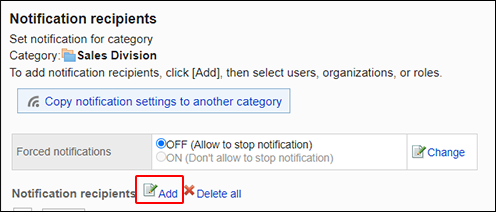
On the screen for notification recipients, check that the forced notification is OFF (allow to stop update notifications).
If the forced notification is ON (do not allow to stop update notifications), click "Change" and change it to OFF (allow to stop update notifications).
-
Click Add.
-
On the screen to add recipients, select the organization, user, or role to set notifications, and then click Add.
To select a role, switch the view to the "Roles" tab.
After you click "Add" then click the tab, the selected organizations, users, or roles before you switch tabs are cleared.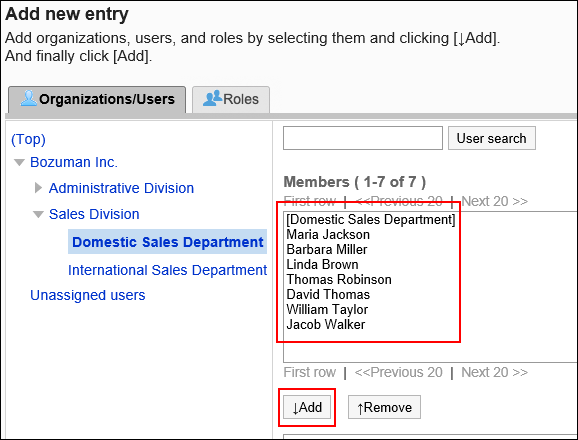
-
Click Add.

Deleting Notification Recipients
Delete notification recipients that are set for the category.
If you have applied notification settings of selected categories to other categories, deleting the recipients does not affect the target categories.
Selecting and Deleting Notification Recipients
Select notification recipients and delete them.
-
Click the Administration menu icon (gear icon) in the header.
The gear-shaped icon appears only on the screen for the users with administrative privileges. -
Click Garoon System Administration.
-
Select "Application settings" tab.
-
Click Bulletin Board.
-
Click Notification settings.
-
On the "Notification settings" screen, select a category and click Edit.

-
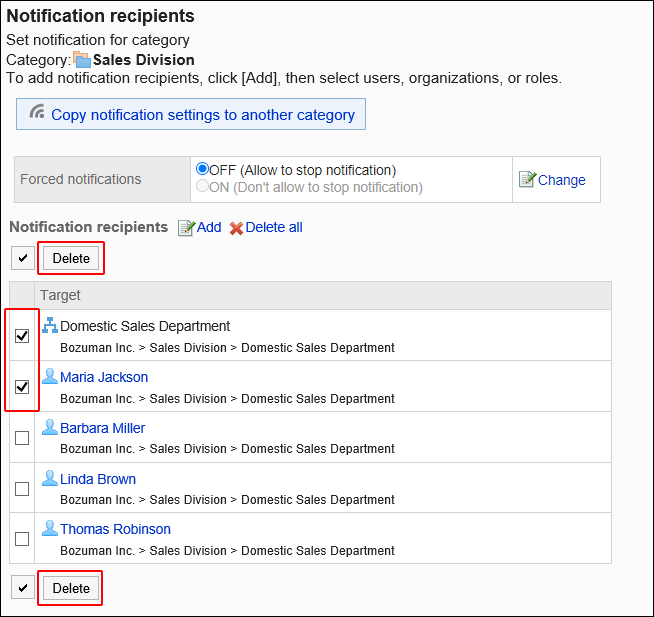
On the screen for notification recipients, select the checkboxes of the recipients to delete, and then click Delete.
-
Click Yes on the screen to delete all recipients.
Delete All Notification Recipients
Delete all notification recipients in the category.
-
Click the Administration menu icon (gear icon) in the header.
The gear-shaped icon appears only on the screen for the users with administrative privileges. -
Click Garoon System Administration.
-
Select "Application settings" tab.
-
Click Bulletin Board.
-
Click Notification settings.
-
On the "Notification settings" screen, select a category and click Edit.

-
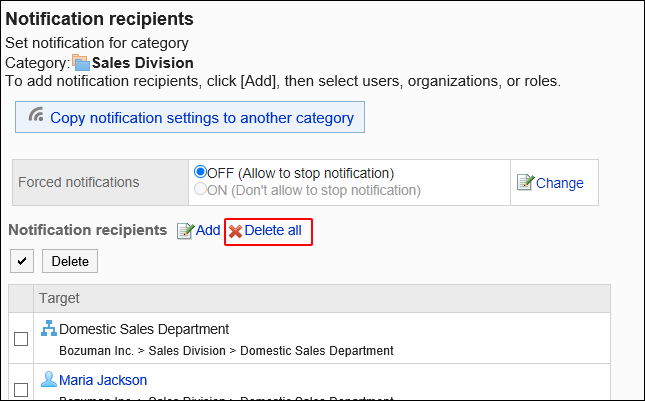
On the "Notification recipients" screen, click "Delete all".
-
Click Yes on the screen to delete all notification recipients.
Applying Notification Settings to Other Categories
Copy the notification settings of a category and apply them to other categories.
The notification settings in the destination category are overwritten by the source settings.
You cannot apply the notification settings of other categories to the "root" category.
If you change the settings in the source category after applying the notification settings to other categories, the change will not be applied to the destination categories.
-
Click the Administration menu icon (gear icon) in the header.
The gear-shaped icon appears only on the screen for the users with administrative privileges. -
Click Garoon System Administration.
-
Select "Application settings" tab.
-
Click Bulletin Board.
-
Click Notification settings.
-
On the "Notification settings" screen, select the category from which you want to copy the notification settings, and then click Edit.

-
On the "Notification recipients" screen, click "Copy notification settings to another category".

-
On the "Copy notification settings" screen, select one or more checkboxes for categories to apply the notification settings.
Click the "Root" category to clear all selections of categories.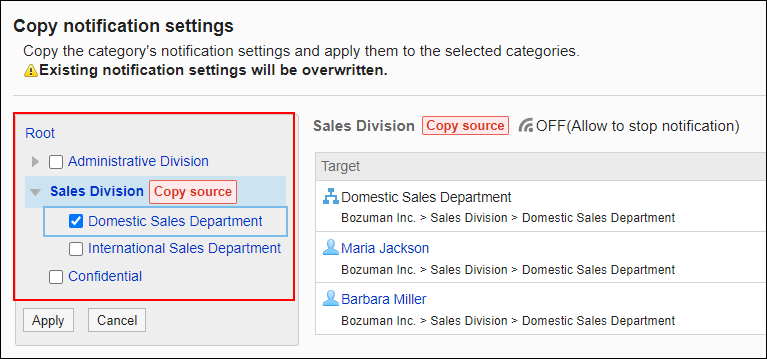
-
Confirm your settings and click Save.
-
Click Yes on the "Apply Notifications Settings" screen.
Setting Forced Notifications for Categories
This section describes how to set the category forced notifications.
If you set forced notifications for categories to ON, users cannot stop receiving notifications for that category.
It is useful to set the forced notifications to the categories containing topics that the target users must see.
By default, the forced notification is set to OFF (allow to stop update notifications).
-
Click the Administration menu icon (gear icon) in the header.
The gear-shaped icon appears only on the screen for the users with administrative privileges. -
Click Garoon System Administration.
-
Select "Application settings" tab.
-
Click Bulletin Board.
-
Click Notification settings.
-
On the "Notification settings" screen, select a category and click Edit.

-
On the screen for notification recipients, click "Change" for forced notifications.
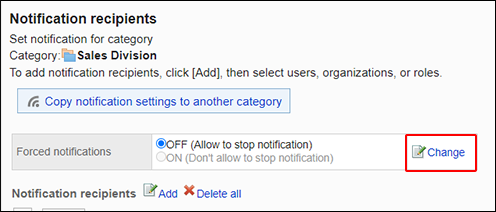
-
On the screen to edit forced notifications, select ON (do not allow to stop update notifications), and then click Save.
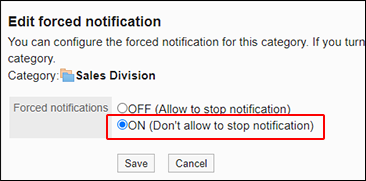 If you stop forced notifications, select OFF (allow to stop update notifications).
If you deactivate the forced notifications, they are handled as update notifications.
To stop update notifications, you must delete the targets of the update notifications.
For details, refer to Deleting Notification Recipients.