MIME Type Settings
Set the MIME type for each file extension.
The MIME type is a method that represents the format of data in "type name/subtype name" strings. This is used to determine how a Web browser processes files on Garoon.
The following MIME types are specified in default settings
| Extension | MIME Type |
|---|---|
| bmp | image/bmp |
| csv | text/csv |
| doc | application/msword |
| docm | application/vnd.ms-word.document.macroEnabled.12 |
| docx | application/vnd.openxmlformats-officedocument.wordprocessingml.document |
| exe | application/x-msdownload |
| gif | image/gif |
| htm | text/html |
| html | text/html |
| jpe | image/jpeg |
| jpeg | image/jpeg |
| jpg | image/jpeg |
| mid | audio/midi |
| mp3 | audio/mpeg |
| mpeg | video/mpeg |
| application/pdf | |
| png | image/png |
| ppt | application/vnd.ms-powerpoint |
| pptm | application/vnd.ms-powerpoint.presentation.macroEnabled.12 |
| pptx | application/vnd.openxmlformats-officedocument.presentationml.presentation |
| ram | audio/x-pn-realaudio |
| tif | image/tif |
| tiff | image/tiff |
| txt | text/plain |
| wav | audio/x-wav |
| xls | application/vnd.ms-excel |
| xlsm | application/vnd.ms-excel.sheet.macroEnabled.12 |
| xlsx | application/vnd.openxmlformats-officedocument.spreadsheetml.sheet |
| xml | text/xml |
| xsl | text/xml |
| zip | application/x-zip-compressed |
Adding MIME Types
Add MIME Type Association.
-
Click the Administration menu icon (gear icon) in the header.
-
Click "System settings".
-
Select "Basic system administration" tab.
-
Click "File".
-
Click MIME type.
-
On the "MIME type" screen, click "Add MIME Type".

-
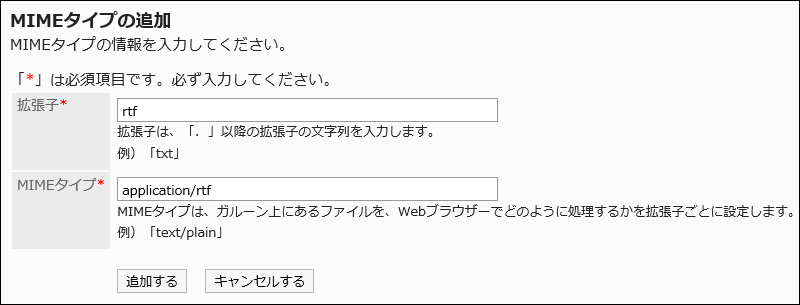
On the "Add MIME Type" screen, set the extension and MIME type.
The extension and MIME type must be set.
- Extension:
Enter the file extension associated with the MIME type.
「.」 (Dot) is not required. - MIME type
In the type name/subtype name string, specify the application that you want to associate with the MIME type.

- Extension:
-
Confirm your settings and click Add.
Changing MIME Types
Change the MIME type associated with the extension.
-
Click the Administration menu icon (gear icon) in the header.
-
Click "System settings".
-
Select "Basic system administration" tab.
-
Click "File".
-
Click MIME type.
-
On the "MIME type" screen, click the extension for the MIME type you want to change.
-
On the "MIME type Details" screen, click Edit.

-
On the "Change MIME type" screen, change the MIME type associated with the extension.
-
Confirm your settings and click Save.
Deleting MIME Types
Delete the MIME type.
Delete MIME Types One by One
Delete the MIME type by one.
-
Click the Administration menu icon (gear icon) in the header.
-
Click "System settings".
-
Select "Basic system administration" tab.
-
Click "File".
-
Click MIME type.
-
On the MIME type screen, click the extension for the MIME type you want to delete.
-
On the "MIME type Details" screen, click Delete.

-
Click Yes on the "delete MIME type" screen.
Deleting Multiple MIME Types in Bulk
Select the MIME type you want to delete, and delete it all together.
-
Click the Administration menu icon (gear icon) in the header.
-
Click "System settings".
-
Select "Basic system administration" tab.
-
Click "File".
-
Click MIME type.
-
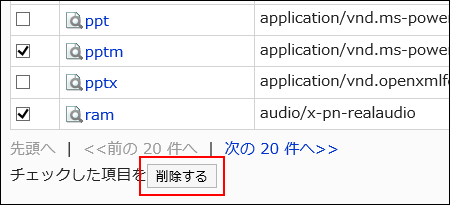
On the MIME type screen, select the checkbox for the MIME type you want to delete, and then click Delete.

-
Click Yes on the "delete all MIME types" screen.
Deleting All MIME Types
Delete all MIME types.
-
Click the Administration menu icon (gear icon) in the header.
-
Click "System settings".
-
Select "Basic system administration" tab.
-
Click "File".
-
Click MIME type.
-
On the MIME type screen, click Delete all MIME types.

-
Click Yes on the "delete all MIME types" screen.