Authentication Database Settings
You can set authentication databases.
When using an LDAP server, depending on the specifications, you must prevent users from logging in with an empty password,
For details, see the password restrictions.
Adding Authentication Databases
Add an LDAP server as a Garoon authentication database.
-
Click the Administration menu icon (gear icon) in the header.
-
Click "System settings".
-
Select "Basic system administration" tab.
-
Click "Authentication".
-
Click "Authentication Database".
-
Click "Add Authentication Database" on the "Authentication database" screen.

-
On the "Add Authentication Database - Step 1/2", confirm that "LDAP" is selected as the authentication database type and then click "Next".
-
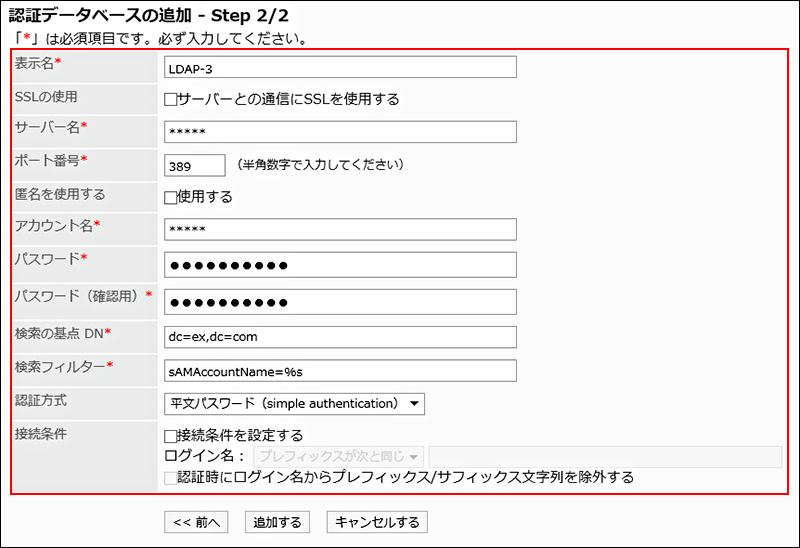
On the "Add Authentication Database - Step 2/2" screen, set the required items.
 For details on the setting items, see the "Authentication Database Setting Items" section.
 -
Confirm your settings and click Add.
Authentication Database Setting Items
Set following items for authentication database.
| Item | Description |
|---|---|
| Name | Enter a display name for the authentication database. The name is mandatory. |
| Use of SSL | Select the check box to encrypt the contents sent to the server using SSL. |
| Server name | Enter the server name of the authentication server you want to use. The server name must be one of the following.
|
| port number | Enter the port number that you want to use for authentication. This field is disabled if you are using SSL for communication with the server. This port number must be set. |
| Use Anonymous | Select the check box to use Anonymous user to communicate with the LDAP server. |
| Account name | Enter the user who communicates with the LDAP server, in the DN format or in the e-mail address format (UserPrincipalName). This field is disabled when using Anonymous. This account name must be set. |
| password | Enter the password for the account. This field is disabled when using Anonymous. This password must be set. |
| Confirm Password | Enter the password that you entered in the "Password" field. This field is disabled when using Anonymous. This confirmation password must be set. |
| Base DN for Search | Enter the base DN for search. Example: dc=cybozu, dc=sample, dc=com |
| Search Filter | Enter a search filter. Example: (sAMAccountName =% s) |
| Authentication type | Select an authentication type. The following authentication types are available.
|
| Connection conditions | Select "Set connection conditions" only when you want to set conditions for connecting to an LDAP server.
|
Changing Authentication Databases
Change the authentication database's display name, server name, and so on.
You cannot change settings for standard database.
-
Click the Administration menu icon (gear icon) in the header.
-
Click "System settings".
-
Select "Basic system administration" tab.
-
Click "Authentication".
-
Click "Authentication Database".
-
On the "Authentication database" screen, click the display name of the authentication database you want to change.
-
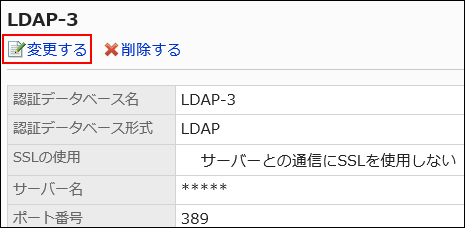
On the "Authentication Database Details" screen, click "Edit".

-
On the "Change Authentication Database" screen, change the settings as necessary.
-
Confirm your settings and click Save.
Reordering Authentication Databases
If multiple authentication databases have been added by the administrator, you can reorder them.
However, "standard database" cannot be reordered. It always appears at the top.
-
Click the Administration menu icon (gear icon) in the header.
-
Click "System settings".
-
Select "Basic system administration" tab.
-
Click "Authentication".
-
Click "Authentication Database".
-
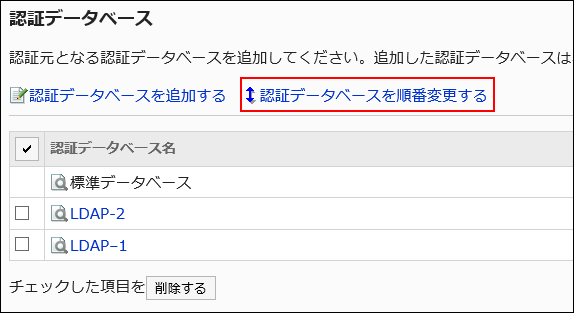
On the "Authentication Database" screen, click "Reorder Authentication Databases".

-
On the "Reorder Authentication Databases" screen, change the display order of authentication databases.
-
Confirm your settings and click Save.
Deleting Authentication Databases
You can delete the authentication database.
If you delete authentication database that is used for login authentication and session authentication, the authentication database that is used for authentication is automatically replaced by the standard database.
You cannot delete the standard database.
-
Click the Administration menu icon (gear icon) in the header.
-
Click "System settings".
-
Select "Basic system administration" tab.
-
Click "Authentication".
-
Click "Authentication Database".
-
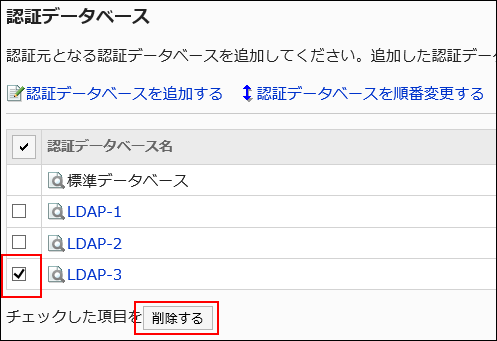
On the "Authentication Database" screen, select the check box for the authentication database you want to delete, and then click "Delete".

-
Click "Yes" on the "Delete all authentication databases" screen.