![]()
- Help Contents
- Scheduler
Scheduler
Introduction
Scheduler is an application that organizes the appointments of users and facilities.
The following functions are available in Scheduler of Garoon:
Displaying the user's time zone
Sharing appointments with multiple users
Adding a private appointment that is viewed only by the attendees
Adding a new appointment spanning several days (All day appointment)
Adding a repeating appointment with selected conditions (Repeating appointment)
Checking attendees or facility availability
Checking conflicted appointments
Checking the due date of a To-Do task that you created
Printing the planner and exporting the planner to iCalendar format
Display Overview
This section describes sample screenshots, buttons, and icons used in Scheduler.
The following appointment types are available in Scheduler:
Regular appointment: Appointments with set date and time
All day appointment: Appointments with selected time period.
Repeating appointment: Appointments that are repeated periodically
Tentative appointment: Appointments that are yet to be confirmed
Scheduler Screen
The following views are available in Scheduler:
Group day view: Daily planner of users in a group
Group week view: Weekly planner of users in a group
Day view: Daily planner of user or facility
Week view: Weekly planner of user or facility
Month view: Monthly planner of user or facility
Year view: Annual planner of user
The system administrator can choose to display the following contents.
Appointments of Organization:
You can view the week view of all facilities by selecting "Facilities" from the "App menu" drop-down list depending on the system administrator's settings.The name of the reserved facilities:
Displayed with the title of an appointment
Scheduler Icons
| Icon name | Description |
|---|---|
 |
Group day View |
 |
Group week View |
 |
Day view |
 |
Week view |
 |
Month view |
 |
Year view |
 |
Shows or hides calendar |
 |
Adding appointments |
 |
Repeating appointments |
 |
All day appointments |
 |
Undefined time appointments |
 |
Conflicted appointment |
| Blue Appointment | Regular, all day, and repeating appointments |
| Light Blue Appointment | Tentative appointments |
| Rokuyo1 | Rokuyo data received on the server |
| Weather Forecasts1 | Weather forecasts that are received on the server |
 |
Uncompleted To-Do tasks consist of your personal To-Dos and shared To-Dos assigned to you |
 |
Overdue and uncompleted To-Do tasks consist of your personal To-Do tasks and shared To-Do tasks assigned to you |
 |
National Holidays |
 |
Anniversaries |
 |
Office Days |
 |
User's Locale |
 |
New Appointments |
 |
Edited Appointments |
 |
Deleted Appointments |
 |
Confirmed Appointments |
 |
Appointments with Comments |
 |
Private Appointments: Only users set as viewers can view these appointments. |
| Private appointment | Private Appointments for Somebody Else: You cannot view these private appointments. |
| (Creator, Private appointment) | Private Appointments for the Facility: The user name of the creator of the appointment is displayed. You cannot view these private appointments. |
  |
Click these icons to display the "Phone Message history" screen. |
 |
Click this icon to display the "Phone Message history" screen. |
 |
Phone messages of users without access rights |
 |
Presence Information2 |
1: Available only in Japanese.
The system administrator can choose not to display Rokuyo and weather forecasts.
2: This icon is displayed in red if the user has not accessed Garoon since midnight (00:00) of the day.
| Menu | Displayed | ||||||
|---|---|---|---|---|---|---|---|
| Group day view |
Group week view |
Day view | Week view | Month view | Year view | ||
| Options |
Displays the option menu. | ✓ | ✓ | ✓ | ✓ | ✓ | |
| Show full subject | The subject of appointments that are omitted and the icon and link of the user information are displayed. | ✓ | ✓ | ✓ | |||
| Apply each time zone1 | Displays the time zone and dates according to each user's time zone on the "Scheduler" screen. | ✓ | ✓ | ||||
| Show uncompleted To-Dos2 | Displays the uncompleted To-Do tasks, both personal and shared, on the due date. |
✓ | ✓ | ✓ | ✓ | ✓ | |
| Show overdue To-Dos2 | The names of the overdue and uncompleted To-Do tasks, both personal and shared, are displayed in today's schedule. |
✓ | ✓ | ||||
✓: Displayed
1: This function is disabled by default.
2: Completed To-Dos are not displayed on the "Scheduler" screen. When you click the displayed title of To-Do task, the "To-Do details" screen is displayed.
Group Day View screen:
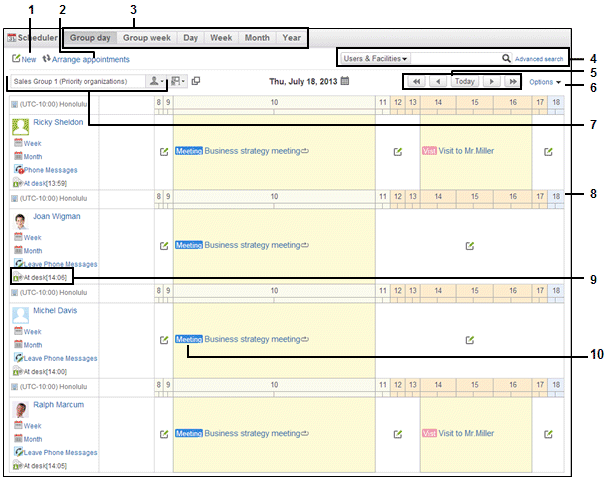
Parts
| No. | Part | Description |
|---|---|---|
| 1 | New | Adds a new appointment. |
| 2 | Arrange appointment | Adds tentative appointments. |
| 3 | Group day | Displays the group day view. |
| Group week | Displays the group week view. | |
| Day | Displays the daily planner of a user. | |
| Week | Displays the weekly planner of a user. | |
| Month | Displays the monthly planner of a user. | |
| Year | Displays the year planner of a user. | |
| 4 | Users & Facilities | You can display "Appointments" by clicking " |
| Appointments | You can display "Users & Facilities" by clicking " |
|
| Advanced search | Searches appointments with additional search options. | |
| 5 | << | Moves back 1 week. |
| < | Moves back 1 day. | |
| Today | Display today's planner. | |
| > | Moves 1 day forward. | |
| >> | Moves 1 week forward. | |
| 6 | Options |
Displays the option menu. For details on the menu, refer to "Option Functions". |
| 7 | Drop-down list for selecting planners of users or facilities. | Displays the corresponding planner when you click the user or facility icon. |
 |
Displays the "Select users" screen when clicked. | |
| 8 | Time zone bar | Indicates the time zone bar that corresponds to the login user's time zone at the initial setting. When you select the "Apply each time zone" check box, time zone bars according to each user’s time zone are displayed. |
| 9 | Present status [Time] |
Indicates user's status. You can edit the user status displayed with a link. |
| 10 | Appointment types | Indicates a type of appointment. The appointment types that have been set by the system administrator are distinguished by color. |
- Tip
- You can search for appointments up to three months ago.
Group Week View Screen:
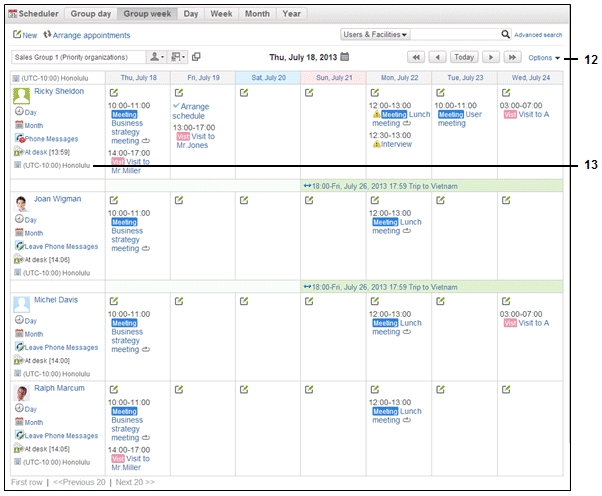
Parts
| No. | Part | Description |
|---|---|---|
| 12 | Options |
Displays the option menu. For details on the menu, refer to "Option Functions". |
| 13 | User's time zone | Indicates the user's time zone. These are displayed when the user selects the "Apply each time zone" check box on the top right of the screen. |
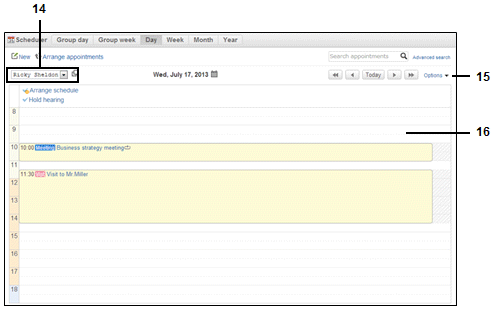
Parts
| No. | Part | Description |
|---|---|---|
| 14 | Drop-down list for selecting users | Displays the planner of the user that you selected. |
| Select users/facilities | Displays the "Select users/facilities" screen. | |
| 15 | Options |
Displays the option menu. For details on the menu, refer to "Option Functions". |
| 16 | Blank area | Click to display the "New appointment" screen. |
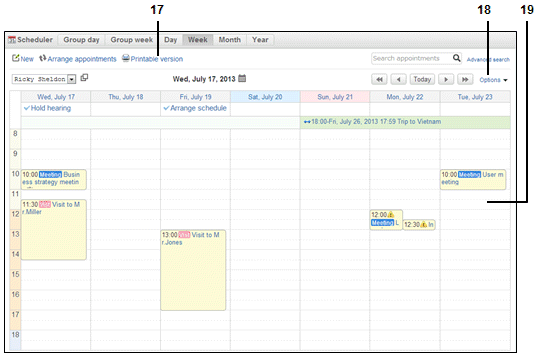
Parts
| No. | Part | Description |
|---|---|---|
| 17 | Printable version | Displays the "Print settings" screen and the preview screen. |
| 18 | Options |
Displays the option menu. For details on the menu, refer to "Option Functions". |
| 19 | Blank area | Double click to display the "New appointment" screen. |
Parts
| No. | Part | Description |
|---|---|---|
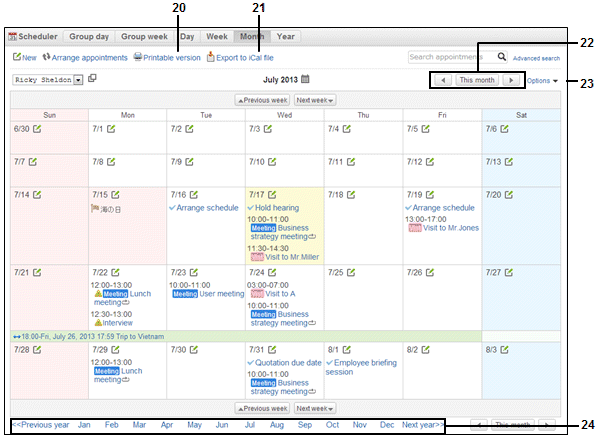
| 20 | Printable version | Displays the "Print settings" screen and a preview screen. |
| 21 | Export to iCal file | Export the Monthly planner to an iCalendar format file. |
| 22 | < | Displays the planner for the prior month. |
| This Month | Display the planner for this month. | |
| > | Displays the planner for the following month. | |
| 23 | Options |
Displays the option menu. For details on the menu, refer to "Option Functions". |
| 24 | Month Index | Click a month to display its planner. |
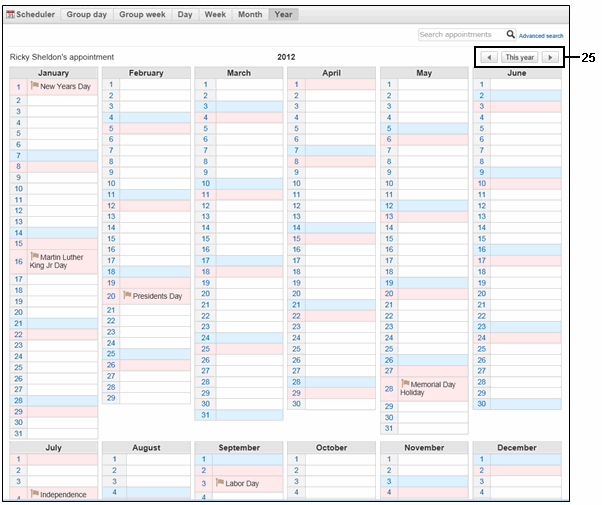
Parts
| No. | Part | Description |
|---|---|---|
| 25 | < | Displays the planner for the prior year. |
| This year | Displays the planner for this year. | |
| > | Displays the planner for the following year. |
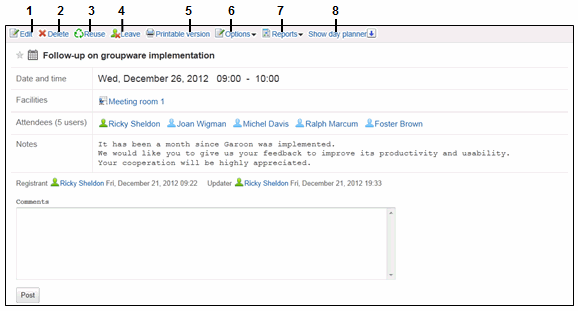
Appointment Details Screen
You can edit an appointment and add comments on this screen.
Appointment Details Screen for Regular Appointments:
- Tip
-
If the appointment is a repeating appointment, the set period is displayed on the "Appointment details" screen.
The following message is displayed with the last scheduled appointment of the repeating appointment:
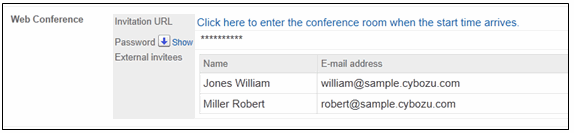
"This is the last appointment in the selected repeating period. "If the specified facility supports Web conference, Web conference options appear on the "Appointment details" screen.
Web conference options:
Parts
| No. | Part | Description |
|---|---|---|
| 1 | Edit | Edits the appointment. |
| 2 | Delete | Deletes the appointment. |
| 3 | Reuse | Creates a new appointment using the selected appointment. You cannot reuse the tentative appointments. |
| 4 | Leave | You can dismiss yourself from an appointment. However, you cannot dismiss yourself from tentative appointments. |
| 5 | Printable version | Displays the "Print settings" screen and a preview. |
| 6 | Options |
|
| 7 | Reports |
Displays the reports links to the appointment.
|
| 8 | Show day planner | Displays the day view of your planner. |
1: The system administrator can choose not to display these icons.
See the following for the operation:
"MultiReport"
New Appointment Screen
You can add an appointment by first selecting the type of an appointment.
New Appointment Screen for Regular Appointment
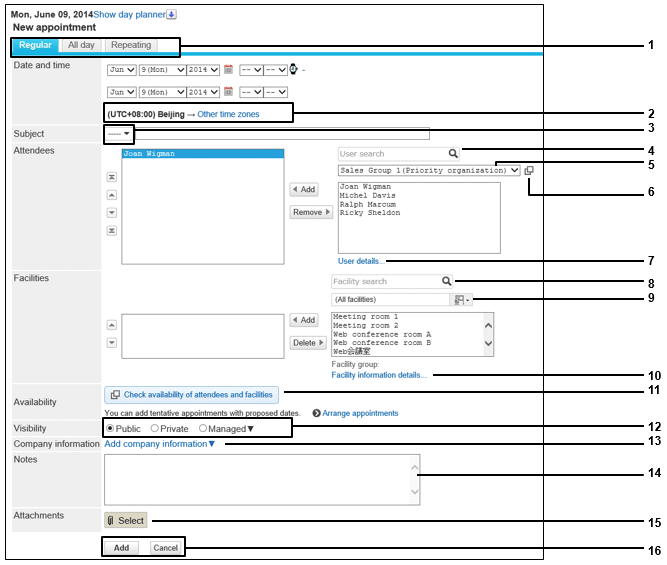
Parts
| No. | Part | Description |
|---|---|---|
| 1 | Regular appointments | This tab indicates you are adding a regular appointment. |
| All day appointments | Add an all day appointment. | |
| Repeating appointments | Add a Repeating appointment. | |
| 2 | Time zone1 | Indicates the time zone that you are using. |
| Other time zones | Applies a time zone other than your time zone for the appointment. | |
| 3 | Drop-down list of appointment types | Select the types of appointments, such as Out of office and Meeting from the types that have already been added. You can add appointment types on the"Personal settings" screen for Scheduler. |
| 4 | User search | Searches users using keywords. |
| 5 | Drop-down list for selecting users | Select the category of users to view users and organizations you can add to the appointment. |
| 6 | |
Select from all organizations:Displays the "Select users" screen when clicked. |
| 7 | User details... | Displays the "User profile" screen. |
| 8 | Facility search | Searches facilities using keywords. |
| 9 | Drop-down list for selecting facilities | Select the category of facilities to add to the appointment. |
| 10 | Facility information details... | Displays the facility information list. |
| 11 | Check availability of attendees and facilities | Displays the "Check available times" screen. |
| 12 | Public | All users can view public appointments. |
| Private | Only the users who are the attendees of the appointment can view the private appointments. | |
| Managed | Only the attendees and the users who are set under the "Public to" field for the appointments can view the managed appointments. | |
| 13 | Add company information2 | When you click this, the entry fields for the company information are displayed. |
| 14 | Notes | You can enter notes for the appointment. |
| 15 | Attachments | Attach a file to an appointment. Files can only be attached to regular appointments or all day appointments. The system administrator can choose to disable the attachment feature. |
| 16 | Add | Adds a new appointment. |
| Cancel | Cancels an appointment without adding it. |
1: When you change the time zone that is applied to the appointment, the selected time zone is displayed to the right of the appointment date column.
2: The following functions are available only in Japanese and searches only location within Japan:
Display company information: Searches company information from the Internet.
Postal code search: Searches addresses by postal codes using the Internet.
Map search: Searches map from the Internet.
Route search: Searches train route information available on the appointment date from the Internet.
To use Web conference:
Web conference is a Web browser-based conferencing system. Attendees of an appointment can join the scheduled conference by accessing a special website. Web conference is available even to the users who work in remote offices and the non-users of Garoon who are called "external invitees".
Web conference options appear on the screen where you add or edit a regular appointment, if you select a facility that supports Web conference.
Appointment with Web conference options:
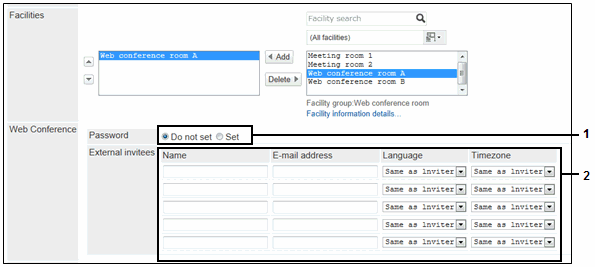
Parts
| No. | Part | Description |
|---|---|---|
| 1 | Do not set | Select this to allow participants to skip password authentication when entering the conference room. |
| Set | Select this to enable a password entry field. Enter the password required for entering the conference room. |
|
| 2 | Name3 | Enter the names of external invitees. |
| E-mail 3 | Enter the e-mail addresses of external invitees. Web conference invitation e-mails are sent to the entered addresses. | |
| Language3 | Select the external invitee's language. | |
| Time zone3 | Select the external invitee's time zone. |
3: The system administrator can choose not to display some items
- Tip
-
Web conference options appear only if Web conference connector is enabled by the system administrator. Contact your system administrator about whether Web conference connector is enabled.
The system administrator may have set the maximum number of users who can join Web conference. Contact your system administrator about the maximum number of participants per conference.
![]()
All brand names and product names appearing on this site are registered trademarks or trademarks of their respective holders. Copyright (C) Cybozu