![]()
- Help Contents
- Scheduler
- Using Scheduler
Using Scheduler
- Adding a New Appointment
- Attending Appointments
- Adding Comments
- Printing Appointments
- Searching Appointment
Adding a New Appointment
You can add an appointment for users or facilities.
The following appointments can be added:
Regular appointment: Appointments with set date and time
All day appointment: Appointments with selected time period.
Repeating appointment: Appointments that are repeated periodically
Tentative appointment: Appointments that are yet to be confirmed
You can add conflicting appointments or appointments that extend for several days in all of the above appointments.
- Tip
-
You cannot add facilities to the following appointments:
Conflicting appointments
All day appointments
Appointments that do not have start and end time
Regular appointments and all day appointments are the only types of appointments that you can attach files to.
The system administrator can prohibit users from adding facilities to repeating appointments.
You can create a new appointment as follows:
- 1
On the Scheduler screen, click "New" or
 .
.
You can also add a new appointment using one of the following two ways:On the "User details" screen of Scheduler: click "New".
- 2
On the "New appointment" screen, select the "Regular" tab.
- 3
Select the start and end times of the appointment.
When you click "Other time zones", you can apply a time zone other than the time zone that you are using.When applied to regular appointments:
You can apply different time zones on the start and end time.When applied to all day appointments:
You can only apply the same time zone to the start and end date of the appointment.When applied to repeating appointments:
You can only apply the same time zone to the start and end time of the appointment.
The duration of repeating appointment is displayed next to the time column.
- 4
Select a subject from the subject menu, or enter a customized name for the appointment.
- 5
Select attendees.
- 6
Select facilities.
You can select only facilities without selecting attendees.
When you click "Check availability of attendees and facilities", you can check the availability of users and facilities that are selected in the above step 5 and 6.- 7
Select visibility.
When you select either the "Private" and "Managed" check box, you can add a private appointment that can not be viewed by other users.
All day appointments cannot be private.- 8
Click "Add company information", and enter the company information.
The entered information is not registered in Address Book.- 9
Enter notes.
- 10
Click "Add".
When the added appointment conflicts other appointment, is displayed next to the name of attendees on the "Appointment details" screen.
- Tip
- The system administrator can set the contents to be displayed in the facility column.
What are Appointment Types?
Appointment types are labels for common appointments such as "Meeting" and "Business Trip" that can be added in Scheduler.
To add a new appointment, you can select from available appointment types.
You can set up your own appointment types in addition to those set by the system administrator.
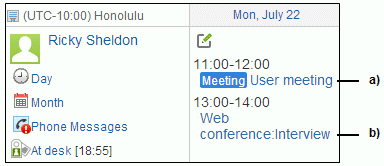
a): Appointment that is added by selecting an appointment type set by the system administrator.
It is distinguished by color.
b): Appointment that is added by selecting an appointment type set by yourself. It is not distinguished by color.
You can add appointment types in your Personal settings for Scheduler.
See the following topic for details: Setting Up Appointment Type
- Tip
- Any appointment types that were added before August 2013 will not be distinguished by color even after upgrading.
To distinguish the appointment that was added before upgrading by color, reselect the appointment in the "Edit appointment" screen and click "Save". - If appointments are imported using a CSV file in the "Import appointment data" under the Personal settings, they are not distinguished by color.
What are Private Appointments?
Private appointments are appointments that can be viewed, edited, or deleted by only the specified users.
Private appointments are displayed on the "Scheduler" screen as follows:

a): Indicates a private appointment that you are appointed as the viewer. If time is not set for the appointment, the appointment displays “All day” on the "Appointment details" screen.
b): Indicates a private appointment that you are not appointed as the viewer.
- Tip
- When the system administrator select the "Hide private appointments" check box, the private appointments are not displayed unless you are appointed as a viewer of the appointment.
Appointment attachments
You can click "Details" for the appointment attachment to update the file or change file information.
This feature is only available if you have editing privileges for the appointment.
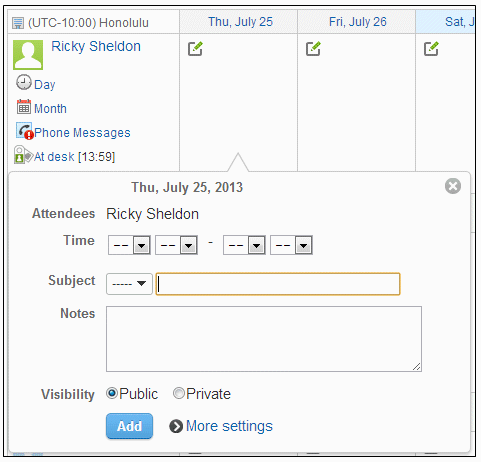
Quickly Adding Appointments
You can add a regular appointment by displaying the popup window on the Scheduler screen.
By entering a few items on the popup window, you can quickly add an appointment without displaying the "New appointment" screen.
You can set the following items on the popup window:
Start and end times of the appointment
Pubject
Notes
Visibility
To set other items such as attendees and facilities or to check availability of attendees and facilities, click "More settings" on the popup window.
You can display the popup window as follows:
On the "Group day view", the "Day view", and the "Week view" screens:
Double click the blank area on the selected time or the area where the time range is not displayed.On the "Group week view" and the "Month view" screens:
Double click the blank area on the selected day.
Popup Window:
- Tip
- This pop up window is not available to add appointments on smartphones and tablets.
Adding Repeating Appointments with Facilities:
You cannot add some facilities to repeating appointments depending on the settings by the system administrator.
In the facilities list on either the "New appointment" screen or the "Edit appointments" screen, only the facilities that can be added to repeating appointments are displayed.
When You Change Tabs from Regular to Repeating:
The message is displayed when the facility the you selected on the "Regular" tab cannot be selected on the "Repeating" tab as follows:
"Some facilities which you cannot select for repeating appointments are selected.
After clicking [Yes], only available facilities will be displayed. Do you want to continue?"
To use Web conference:
On the "New appointment" screen, select a facility that supports Web conference. You can specify only one Web conference facility per appointment.
The following e-mails will be sent out once you add a new Web conference appointment:
To external invitees: An invitation to Web conference
To the user who added the appointment: A notification that e-mails has been sent to the invitees
- Tip
- Web conference is available only for regular appointments.
Applying the Reserved Time to the Edit Appointment Screen
You can add an appointment after confirming the availability of the attendees and of facilities for the appointment.
- 1
Click Check availability of attendees and facilities on either the "New appointment" screen or the "Edit appointment" screen.
- 2
Confirm the availability of the attendees and facilities for the appointment on the "Check available times" screen.
Non-working hours of users are shown in gray.- 3
Select the confirmed available time using the drop-down list at the top left of the screen, then click "Use in appointment".
This reflects the selected time on the screen from the step 1 above.
Reusing Appointments
You cannot reuse tentative appointments.
You can create another appointment by clicking "Reuse" on the "appointment details" screen.
Arranging Appointments
You cannot set the time zone on the "Arrange appointments (Select users/facilities)" screen.
The time zone of a new appointment is set as the time zone that you are using.
- 1
On the Scheduler screen, click "Arrange appointments".
- 2
On the Arrange appointments (Select users/facilities) screen, select attendees and facilities, then click "Enter requirements >>".
Depending on the settings of the system administrator, you can select users and facilities for which you have only the right to view.- 3
On the "Arrange appointments (Enter requirements)" screen, click "Find available times >>".
The following options are available:Proposed date
Up to five proposed dates can be selected.Proposed time: Time range and hours that are required for the appointment
Facility requirements
- 4
On the "Search result" screen, select entries as desired, then click "Add".
The following entry fields are available:Proposed date and time
You cannot select the proposal date and time when the users or facilities for which you do not have appropriate access rights are included.Subject
Visibility: Public, Private, Managed
Adding methods
When you select the "Tentative appointment" check box, the appointment with the selected proposed dates and times are added as a tentative appointment.
The titles of tentative appointments are displayed in light blue.When you clear the "Tentative appointment" check box, selected proposed date and time are added to the appointment as a regular appointment.
Company information
Confirming Tentative Appointments
On the "Appointment details" screen of tentative appointments, click "Set" next to the Proposed date and time.
You cannot reset confirmed appointments.
When one attendee confirms the appointment, the confirmation is reflected on the appointments of all attendees.
Editing Appointments
On the "Edit appointments" screen, click "Edit" to edit an appointment.
- Tip
- Any changes in the appointment cannot be applied to Web conference once the start time has passed.
Rescheduling Appointments by Drag and Drop
On the "Day" view screen and the "Week" view screen, you can move appointments by drag and drop.

- Tip
- Depending on the settings by the system administrator, drag and drop moving of appointments may be disabled.
When a Facility is Conflicting with Another Appointment on a Rescheduling Date
When the facility is conflicting with another appointment in a desired time period on a rescheduling date, a list of available facilities will be displayed.
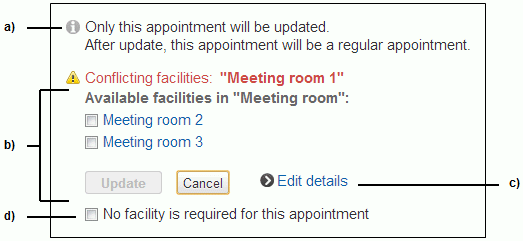
a): Appears only when rescheduling a repeating appointment.
b): Indicates facilities available in the time period. Facilities that belong to the same facility group are displayed. Selecting the facility and clicking "Update" adds the appointment with the changed facility.
c): Click this link to display the "Edit appointment" screen.
d): Select the check box when not using a facility for the appointment. Selecting the check box and clicking "Update" adds the appointment without facility for the desired time period.
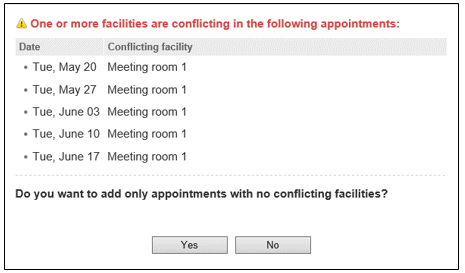
Editing Repeating Appointments
Click "Edit" on the "Appointment details" screen, then select a range.
The following entry fields are available:
This appointment only
Appointments on and after this appointment
All appointments
When you try to edit an appointment by selecting either "Appointment on and after Day, MMMM,DD,YYYY" or "All appointments", a message indicating that one or more facilities are conflicting in the appointments may appear.
Clicking "Yes" adds only appointments with no conflicting facilities.
Editing Tentative Appointments
The following options can be edited in tentative appointments:
Subject
Visibility
Company information
Notes
Deleting Appointments
You can delete the following appointments:
Appointments with only one attendee
Appointments with multiple attendees
Repeating appointments with only one attendee
Repeating appointments with multiple attendees
Tentative appointments
- Tip
-
No e-mail notifications are sent to external invitees even if a Web conference appointment is deleted.
If you delete a Web conference appointment, the Web conference reservation will also be deleted. Before deleting the appointment, make sure that there is no participant in the Web conference room.
Appointments with Only One Attendee
On the "Appointment details" screen, click "Delete".
Appointments with Multiple Attendees
On the "Appointment details" screen, click "Delete".
The following entry fields are available:
Delete this appointment from all attendees' schedules
Delete this appointment from your schedule
Repeating Appointments with Only One Attendee
On the "Appointment details" screen, click "Delete", then select the period of appointments to delete.
The following options are available:
This appointment only
Appointments on and after this appointment
All appointments
Repeating Appointments with Multiple Attendees
On the "Appointment details" screen, click "Delete", then select the attendees, and the range that you want to delete.
The following options are available:
Attendees:
Delete this appointment from all attendees' schedules
Delete this appointment from your schedule
Range:
This appointment only
Appointments on and after this appointment
All appointments
Tentative Appointments
On the "Appointment details" screen, click "Delete", then select the proposed date and time to delete.
Attending Appointments
You can attend an appointment in which you are not an attendee.
On the "Appointment details" screen, click "Attend" to attend the appointment.
You cannot attend tentative appointments.
Attending Repeating Appointments
On the "Appointment details" screen, click "Attend", then select the range that you want to attend the repeating appointment.
The following entry fields are available:
This appointment only
Appointments on and after this appointment
All appointments
Leaving Appointments
You can dismiss yourself from an appointment.
On the "Appointment details" screen, click "Leave".
You cannot dismiss yourself from tentative appointments.
Leaving Repeating Appointments
On the "Appointment" screen, click "Leave", then select the range that you want to leave.
The following options are available:
This appointment only
Appointments on and after this appointment
All appointments
Adding Comments
You can add comments in Scheduler. Comments are displayed in chronological order.
Only the user who added a comment can delete that comment.
The following actions are unavailable in Scheduler comments:
Attaching Files
Using the anchor link function
When you place >> (two greater than signs) next to an existing comment number with the enabled anchor link function, a link for the referenced comment is automatically generated.
- Tip
-
When you add a comment to a repeating appointment, the appointment with added comments is changed to a regular appointment.
When users from different offices add comments, the time that the comment is added is displayed according to the user's time zone.
Printing Appointments
You can print appointments in any of the following three ways:
Printing an appointment individually
Printing a week view
Printing a month view
You cannot print comments.
The following options are available on the "print settings" screen:
| Item | Appointment Details | Week View | MonthView | |
|---|---|---|---|---|
| Display width for week view or month view | Specify the width for printing. To submit the change, click "Change". | ✓ | ✓ | |
| Font size | Select the desired font size. | ✓ | ✓ | ✓ |
| Appointment subject | Select to print entire subject or print the specified number of characters of the subject | ✓ | ✓ | |
| Appointment time | Select to print only the start time or print both the start and end times of the appointment. | ✓ | ✓ | |
| Display settings | Select whether to print optional items such as appointment icons and anniversaries. | ✓ | ✓ | |
| Locale |
|
✓ | ✓ | |
✓ : Displayed
- Tip
- User's time zone is displayed at the lower part of the following screens:
The "Print settings" screen to print one month planner
The "Print settings" screen to print one week planner
Printing an Appointment Individually
On the "Appointment details" screen, click "Printable version" to print out the appointment displayed on the screen.
Printing a Week View
On the "Week view" screen, click "Printable version" to print out the weekly planner displayed on the "Printable version" screen.
Printing a Month View
On the "Month view" screen, click "Printable version" to printout the monthly planner displayed on the "Printable version" screen.
Searching Appointment
You can search both users or facilities, and appointments.
- Tip
- You cannot search appointment attachments.
Searching Users or Facilities
"Users/facilities search" is displayed only on the following screens:
Group day view screen
Group week view screen
You can search users or facilities by entering keywords in the search field.
You can search multiple users and facilities by using spaces between keywords.
When the search result contains both users and facilities, facilities are displayed after users.
You can search users by entering the following information:
User name, English spelling, login name, pronunciation, e-mail address, position, or items set by the system administrator.
User name, English spelling, login name, pronunciation, e-mail address, or position.
You can search facilities by entering the following information:
Facility name
Notes of the facility
Scheduler Search Screen
You can search appointments on the "scheduler" screen. The following search options are available:
Search text: Enter the keywords to search here.
Search in: Titles, company information, notes, comments
Search period
Search in: Select users
Repeating: Select the check box to search all repeating appointments
You cannot search private appointments that you do not attend.
![]()
All brand names and product names appearing on this site are registered trademarks or trademarks of their respective holders. Copyright (C) Cybozu