- Help Contents
- Space
- Using Spaces
Using Spaces
Adding Spaces
This topic describes how to add spaces through the "Space" screen.
- 1
On the "Space" screen, click "New space".
Alternatively, you can add spaces through the following screens:"Appointment details" screen of Scheduler
"Messages details" screen of Messages
- 2
Enter the space name.
To add names in multiple languages, click "Add localized name" in Name.- 3
Specify a category for the new space.
The default category is "General". To change the category, click "Change".- 4
Add members to the space.
When you add a space through the "Appointment details" screen, the attendees of the appointment are assigned as the space members.
When you add a space through the "Message details" screen, users entered in "To" of the message are assigned as the space members.- 5
Select whether to assign space administrators.
To assign space administrators, select the "Set space administrators" check box, and select and add the users you want to assign as the space administrators.
The space administrators can delete the space and discussions in the space, and change the space members.
Not selecting the check box sets all the space members as the space administrators.- 6
Select an icon.
This icon is displayed to the left of the space name in the list of spaces and notifications. It is useful for identifying the space.- 7
Select visibility.
Public: All users who are logged in to Garoon can view the space.
Private: Only space members can view the space.
- 8
Click "Add".
- Tip
-
Adding a new space will add a discussion with the space name as its default subject.
You can edit the subject to meet the space purpose.You cannot delete the default discussion that is added along with the space.
Who are Space Administrators?
Space administrators are the users who can do the following in their space:
Deleting the space
Editing the space information such as the space name and members
Editing notes
Deleting all discussions in the space
Duplicating Spaces
You can duplicate space information and discussions.
To add a new space using an existing space, click "Duplicate space" on the details page of the space.
The following information is automatically entered in the space created by the duplication:
Name
Category
Notes
Members
Subjects of selected discussions
Space administrators
Icon
Visibility
Editing Spaces
Click "Edit" on the "space details" screen, and edit the space name and members. Only the space members and the system administrator can edit spaces.
You can add notes to the space if required.
Deleting Spaces
To delete a space, click "Delete" on the "space details" screen.
When one or more space administrators exist, only the system administrator and the space administrators can delete the space.
Otherwise, the system administrator and all the space members can delete the space.
If you delete a space, all discussions, To-Dos, attachments, and other data in the space will also be deleted.
Space deletions are permanent.
Checking Space Members
You can check space members using either of the following procedures:
Click the members icon to the right of the tab to display a list of members.
"Display Overview"Display the space details screen to check the users who are assigned as the space members.
Using Respond Feature
You can make a quick response to a comment by clicking a link such as "Like" and "Acknowledged".
The respond feature is available in discussions, and body texts and comments in shared To-Dos.
- Tip:
-
The system administrator can deactivate the respond feature.
Making Responses by Respond Feature
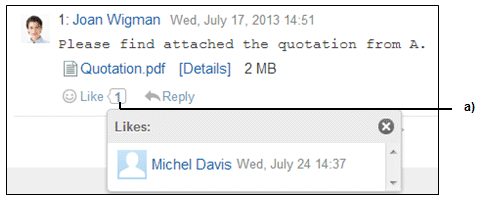
Under the body text or comment where you want to respond, click "Like".
The system administrator may use a word other than "Like".
To cancel your response, click "Not Like".

a): Clicking this icon displays a list of the "Like" responses to this comment.
Checking the "Like" Responses to Your Comments
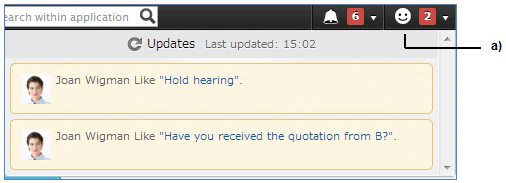
You can check the "Like" responses to your comments on the header.

a): Clicking this icon displays a list of the "Like" responses to your comments.