Scheduler Operations on Mobile View
This section describes the main operations for Scheduler on the mobile view.
Adding Appointments
Add an appointment for the user, organization, or facility.
Depending on your system administrator's settings, you may not be able to add appointments for organizations.
-
Tap the App menu icon.
-
Tap Scheduler.
-
On the "Personal week" screen, tap the add icon.
-
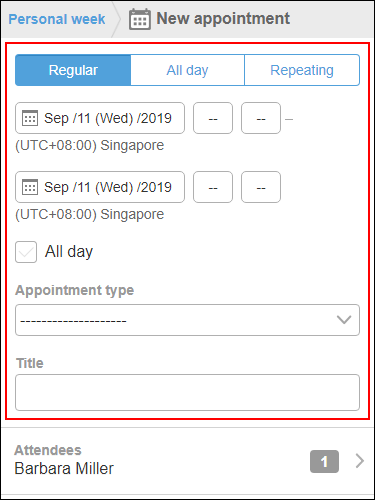
On the "New appointment" screen, select the appointment type and then enter the date/time and the title.
-
Tap "Attendees".
-
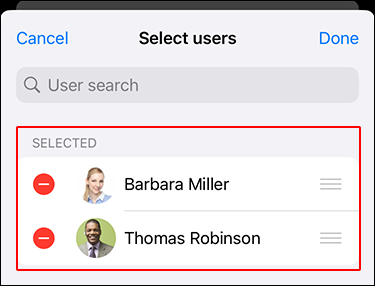
On the "Attendees" screen, add users to set as attendees to the screen showing the candidates.
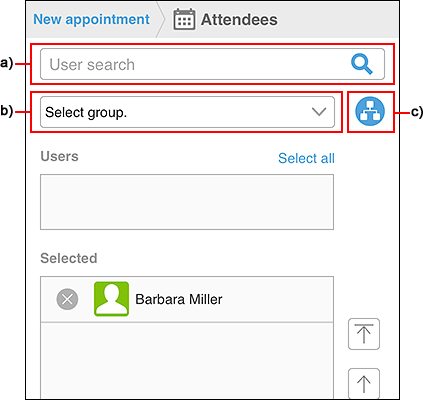 a): Enter keywords in the search box, then tap
 to search users. When you type characters in the search box, a list of suggested attendees is displayed.b): From the dropdown list, select the group to which the target user or organization belongs.c): Tap the
 , select the organization of the target user, and then tap "Apply".
 -
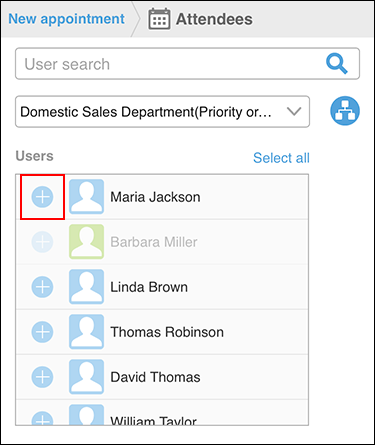
Tap the
 for the users and organizations you want to set as attendees of an appointment, among users who are displayed in the candidate field.
-
In the field to show selected attendees, confirm that all the desired users are listed, and then tap "Apply".
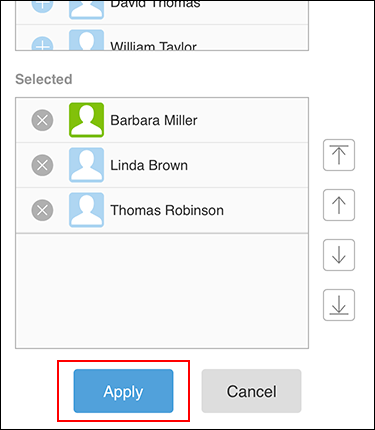 When you tap
 for users, you can cancel the selection.
To change the display order of users, tap the name of the user, and then tap the arrow to the right of the "Selected" field. -
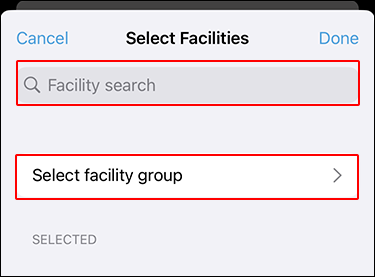
On the "New appointment" screen, tap "Facilities".
-
On the "Facilities" screen, use one of the following methods to display the facilities to the candidate screen.
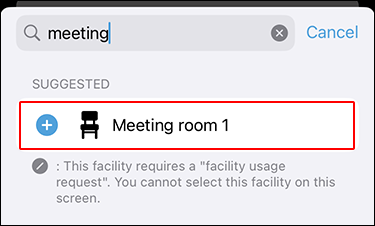
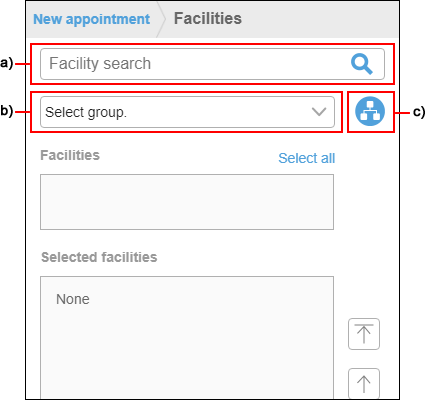 a): Enter keywords in the search box, then tap to search facilities. When you enter characters in the search box, a list of suggested facilities is displayed.b): From the dropdown list, select the facility group where the target facility belongs.c): Tap the, select the group of the target facility, and then tap "Apply".
 -
Among the facilities in the candidates, tap
for the target facility.

-
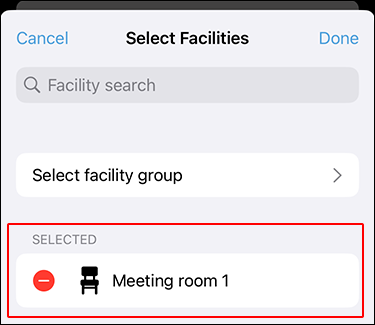
In the field to show the selected facilities, confirm that all the facilities you want to use are displayed, and then tap "Apply".
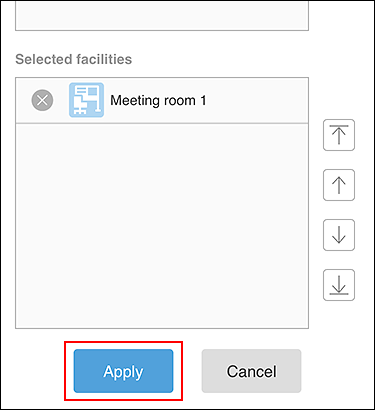 When you tap for facilities, you can cancel the selection.
If you want to change the order of facilities, tap the facility name, and then tap the arrow to the right of the selected facilities field. -
On the "New appointment" screen, set the required items such as notes and attachments, and then tap "Add".
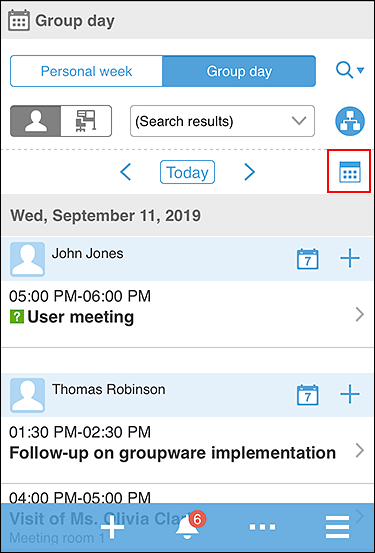
Searching the Appointments of Users and Facilities
You can search the appointments for multiple users and facilities.
-
Tap the App menu icon.
-
Tap Scheduler.
-
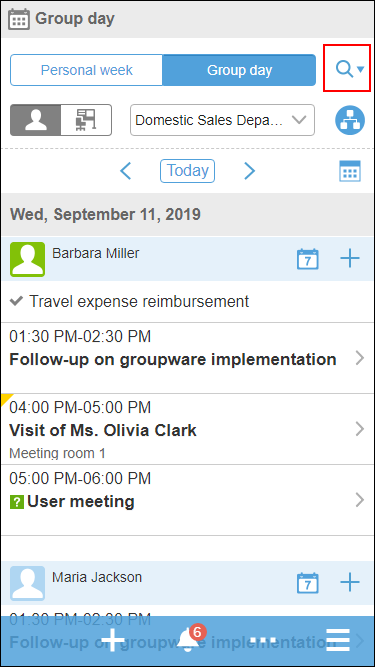
On the group day screen, search for users and facilities by tapping
 and entering keywords in the search box.
 The OR search can be performed for multiple users and facilities using multiple keywords by separating each keyword with a space.
 -
Tap the target user or facility from the search results.
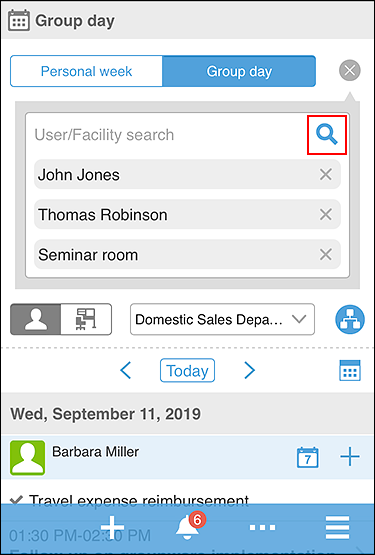
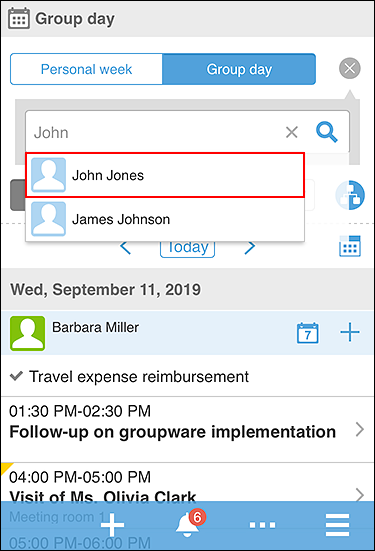 The selected users and facilities are displayed below the search box.
You can search for other users and facilities by entering keywords in the search box. -
After you have selected all the users and facilities for which you want to view appointments, tap
.
 Today's appointments for the selected users and facilities are displayed.
 -
Tap the
 and select the date of the appointment you want to display.
Checking Availability and Adding Appointments
In Garoon mobile, you can add an appointment while checking the availability of you, other users, and facilities.
The following explanation uses screens of Garoon mobile for iOS.
Checking Availability
Check the availability of you, other users, or facilities.
-
Launch Garoon mobile, and tap the
 icon at the top of the screen.
 -
Tap Check availabilities.
On the "Check Availabilities" screen, you can check your availabilities on a weekly basis.
To check availabilities on a daily basis, tap the switching icon for the calendar views and select Day.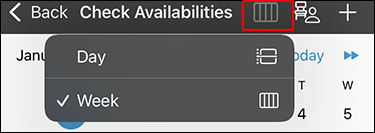
-
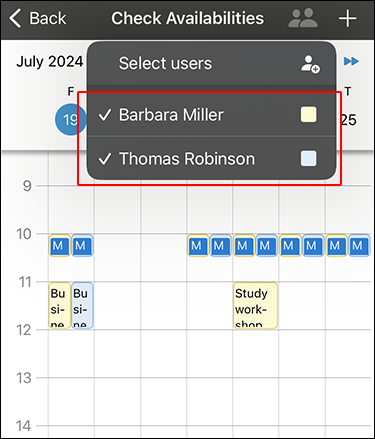
Tap
 and tap Select users.
 -
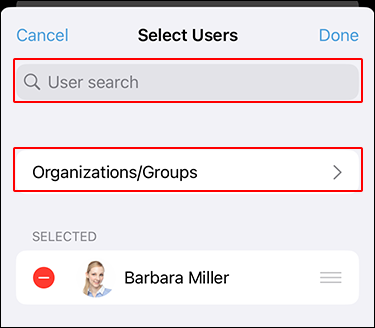
On the "Select users" screen, search for users whose available hours you want to check.
You can search users using one of the following ways:
- Search users by entering keywords in the search box.
- Search users from My Group or recently selected organizations.
Tap Organizations/Groups, and select an organization or My Group in the dropdown list that has the target user.
-
From the list of users displayed on the "Suggested" field, tap users whose available hours you want to check.
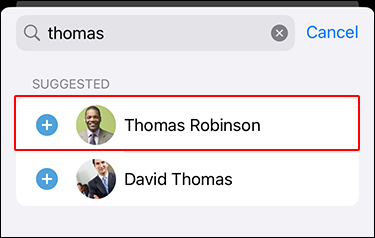 The appointments for up to 10 users can be displayed on the screen to check their availabilities.
 -
Make sure all users whose available hours you want check are displayed in the "Selected" field.
 To change the display order of users, tap and hold
 next to the user name, and drag it to any place you desire.
-
Tap Done to go back to the "Check Availabilities" screen.
-
If you also want to check the availability of the facilities, tap
and tap Select facilities. -
On the "Select facilities" screen, search for facilities whose available hours you want to check.
You can search facilities using one of the following ways:
- Search facilities by entering keywords in the search box.
- Select the facility you prefer from the facility groups.
Tap Select facility groups, and select a facility group that has the facility of your choice.
-
From the list of facilities displayed in the "Suggested" field, tap the facility whose available hours you want to check.
 Up to 10 facilities can be displayed on the screen to check their available hours.
 -
Make sure that the facilities whose available hours you want to check are displayed in the "Selected" field.
-
Tap Done to go back to the "Check Availabilities" screen.
The appointments of users and facilities you selected are displayed in a color-coded fashion.
To find the color used for displaying appointments of each user or facility, tap. You can also tap user names and facility names to show or hide their appointments.
Selecting Available Time Slots to Add Appointments
Add appointments by specifying the available time slots you checked in Checking Availability.
-
On the "Check Availabilities" screen, tap any time slot with no appointment.
The date/time you tapped is applied to the date/time of the appointment on the "New Appointment" screen.
If you tap a different time slot on the "Check Availabilities" screen, its date/time will be applied to the "New Appointment" screen.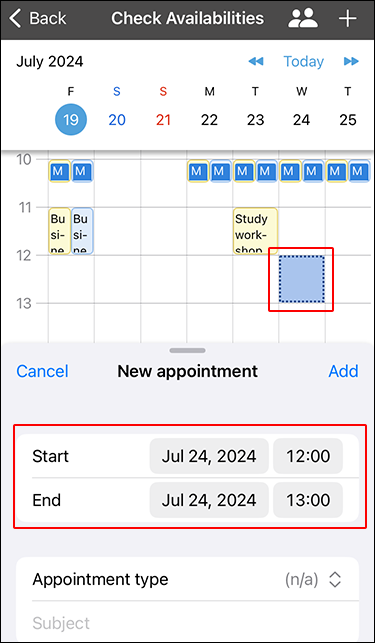
-
On the "New Appointment" screen, configure the required fields.
- Start:
Set the start date and time for the appointment. - End:
Set the end date and time for the appointment. - Appointment Type
Select the appointment type. - Title:
Set the title of the appointment. - Attendees:
Add or delete the attendees.
Tap Attendees to configure attendees for the appointments. After you configure attendees, tap New appointment to return to the "New Appointment" screen. - Facilities:
Add or delete the facilities you use.
Tap Facilities to configure facilities to use. After you configure facilities, tap New appointment to return to the "New Appointment" screen. - Notes:
Enter notes for the appointment. - Public:
Select whether to make the appointment public. By default, this appointment is public (visible) to all users.
- Start:
-
Review the settings you have set and tap Add.
Add Tentative Appointments
In Garoon mobile, you can add multiple candidate dates as tentative appointments.
The following explanation uses screens of Garoon mobile for iOS.
-
Launch Garoon mobile, and tap the
icon at the top of the screen. -
Tap Check availabilities.
-
To add other users as attendees of the tentative appointments, or use facilities, tap
.
Refer to Checking Availability, and select users to add as attendees or facilities to use.
You can select candidate dates/times while checking the appointments of other users and facilities. -
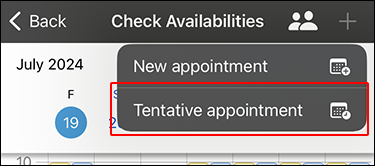
On the "Check Availabilities" screen, tap
 .
. -
Select Tentative appointment.
-
On the "Check Availabilities" screen, tap any time slot with no appointment.
The date/time you tapped is applied to the "Tentative Appointment" screen as the candidate date/time for the appointment.
To add additional candidate date/time for an appointment, tap another available time slots.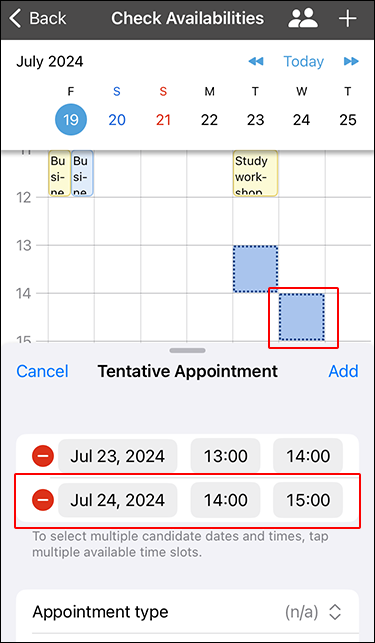
-
On the "Tentative Appointment" screen, configure the required fields.
- Appointment Type
Select the appointment type. - Title:
Set the title of the appointment. - Attendees:
Add or delete the attendees.
Tap Attendees to configure attendees for the appointments. After you configure attendees, tap Tentative appointment to return to the "Tentative Appointment" screen. - Facilities:
Add or delete the facilities you use.
Tap Facilities to configure facilities to use. After you configure facilities, tap Tentative appointment to return to the "Tentative Appointment" screen.
If the selected facility is already reserved and not available, an error message appears when adding an appointment. - Notes:
Enter notes for the appointment. - Public:
Select whether to make the appointment public. By default, this appointment is public (visible) to all users.
- Appointment Type
-
Review the settings you have set and tap Add.
Tapping the title of the tentative appointment displays its details.
By tapping Copy candidate dates and times, you can copy a list of candidate dates and times.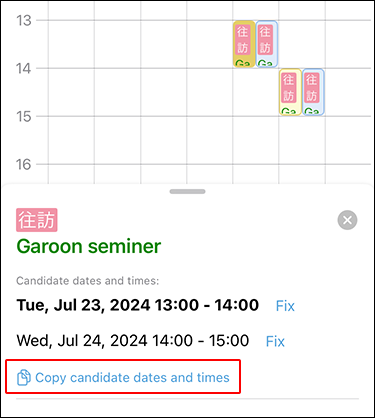
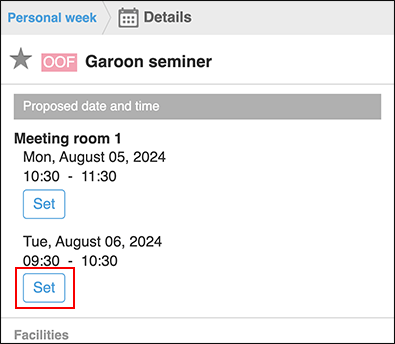
Finalizing Tentative Appointments
Fix the tentative appointments you added.
-
Tap the App menu icon.
-
Tap Scheduler.
-
On the "Personal Week" screen, tap the title of the tentative appointment.
The title of the tentative appointment is displayed in green.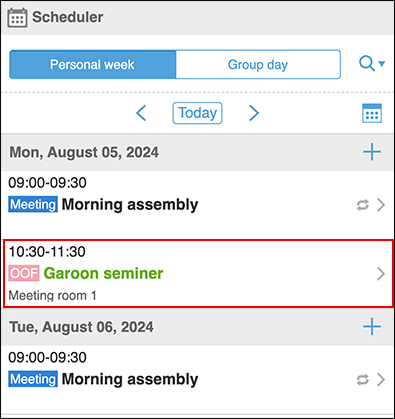
-
On the "Details" screen, click Fix for the date and time you want to fix.
When the appointment is fixed, it will be applied to the Scheduler of all attendees.
Candidate dates/times other than the fixed one are automatically deleted.