![]()
- Help Contents
- Workflow
- Applicant's Actions
Applicant's Actions
Submitting Requests
Select a request form to create request data.
- 1
On the "Workflow" screen, click "Create".
- 2
On the "Create request: Select form" screen, select a category and a request form.
- 3
On the "Create request: Fill form" screen, edit the entries, and then click "Set Route >>".
The item description may be displayed.
You can display an item’s description by clicking or "Description" if they are displayed on the screen.
- 4
On the "Create request: Set route" screen, select the processors for the request route, and then click "Confirm >>".
You cannot select "(Omitted)" for the following processors:The approver of the final route step in the approval route
All processors in all route steps
- 5
On the "Create request: Submit" screen, confirm the request, and then click "Submit".
When "(←Hide processors)" is clicked, only the route steps and types are displayed.
All processors are displayed when "(→Show all processors)" is clicked:The "Step requirement" field is highlighted only in the final step of the approval route on the "Create request: Submit" screen.
"Step Requirements in Approval Routes"
- Tip
- The route changes when route branching is set on the used request form.
Reusing Requests
You can reuse the following requests:
Requests that you submitted
Requests that were canceled by processors
Requests that were rejected by processors
In any request, you cannot reuse the route step information.
Processors are displayed in the route steps only when the initial value is set for the route step of the request form.
On the "Request details" screen, click "Reuse in new request" to create another request.
- Tip
-
You cannot reuse the request forms for which you do not have access privileges. Default values are applied when you do not have access privileges to individual entries.
When you reuse a modified request form, the latest request form is applied.
Confirming Your Request
You can confirm requests that you submitted.
On the "Workflow (Recent)" screen or the "Workflow (Sent items)" screen, click the subject of a request.
Confirming Requests That Are Sent Back
The requests that are sent back by the processor to the applicant are displayed under the Unprocessed list on the "Workflow (Recent)" screen. The status of the request is displayed as "In progress".
Select the request that is sent back to confirm the request contents.
How to Reapply Requests That Are Sent Back
Select the request that was sent back, then click "Reapply".
You can edit the entries as desired and reapply.
- Tip
-
Reapplied requests are processed as regular requests.
A reapplied request uses the request form from the original submission, even when the request form is modified prior to reapplication.
Confirming Rejected Requests
Rejected requests are displayed under the Result list on the "Workflow (Recent)" screen, the "Workflow (Inbox)" screen, and the "Workflow (Sent items)" screen. The status of the request is displayed as "Rejected".
Click the rejected request to confirm the request contents.
How to Reapply Rejected Requests
Click the rejected request, then click "Reuse in new request".
You can edit the entries as desired and reapply.
Changing Request Routes
You can change request routes when anyone who is appointed as a processor is absent.
Only the request routes of unprocessed request can be changed.
The system administrator can prohibit users from changing request routes.
- 1
On the "Workflow (Sent items)" screen, select the request to change the request route.
- 2
On the "Request details" screen, click the route steps to be changed.
- 3
On the "Route step details" screen, click "Change".
- 4
On the "Change route step" screen, select the processor to remove, and then click "Remove→".
- 5
Select a new processor, click "Add", then click "Save".
You cannot select "(Omitted)" for the final approver.
You can confirm the edited form route on the "Request details" screen.
Confirming Route History
You can confirm the edit history of form routes.
Click "Route history" on the "Request details" screen.
Withdrawing Requests
You can withdraw the request before it is processed by the processors. You cannot withdraw requests that are already in process.
You can only withdraw requests that are already in process.
- 1
Select the request to withdraw on the "Workflow (Sent items)" screen.
- 2
On the "Request details" screen, click "Withdraw request".
- 3
Enter a comment, then click "Withdraw".
The withdrawn request is saved under the Draft folder.
How to Reapply Withdrawn Requests
Display the "Request details" screen of the withdrawn request under the Draft folder, and then click "Edit draft".
You can edit the entries as desired and reapply.
- Tip
- When you try to reuse a draft request with a modified request form, then the latest request form is applied when editing the draft request.
Canceling Requests
You can cancel requests that are already in process. However, you cannot cancel requests that are already approved by the final approver.
When you want to cancel an unprocessed request, you must withdraw the request.
- 1
Select the request to cancel on the "Workflow (Sent items)" screen.
- 2
Click "Cancel" request on the "Request details" screen.
- 3
Enter a comment, then click "Cancel request".
- Tip
-
When you click "Acknowledge" on the "Confirm cancelled request" screen, the canceled request is removed from the list of unprocessed requests.
The processor who already received the notification of the request can still view the canceled request.
The processors who have not received the notification cannot view the canceled request.
How to resubmit canceled requests
Click the "Sent items" folder, select the canceled request, and then click "Reuse in new request" on the "Request details" screen.
You can reedit the entries as desired and resubmit.
- Tip
- When you reuse a modified request form, the latest request form is applied.
Submitting Requests as a Proxy Applicant
The user appointed as a proxy applicant can submit a request on behalf of the delegator (original applicant).
The proxy applicant can use the request forms for which the delegator has the access rights.
- Tip
-
Both the proxy applicant and the delegator can withdraw and cancel the request that is submitted by the proxy applicant.
The submitted request by a proxy applicant is processed as if the request is submitted by the original applicant.
- 1
Click "Create as Proxy" on the "Workflow" screen.
- 2
On the "Select delegator" screen, select the delegator, then click "Select form >>".
- 3
On the "Create proxy request: Select form" screen, select a category and a request form.
- 4
On the "Create proxy request: Fill form" screen, edit the entries as desired, then click "Set route >>".
You can display an item's description by clicking or "Description" if they are displayed.- 5
On the "Create proxy request: Set route" screen, select the processors for the request route, and then click "Confirm >>".
You cannot select "(Omitted)" for the following processors:The approver of the final route step in the approval route
All processors in all route steps
The system administrator can prohibit applicants from changing processors who were appointed as the initial processors.
- 6
On the "Create proxy request: Submit" screen, confirm the request contents, then click "Create proxy request".
When "(←Hide processors)" is clicked, only the route steps and types are displayed.
All processors are displayed when "(→Show all processors)" is clicked.The "Step requirement" field is highlighted only in the final step of the approval route on the "Create proxy request: Submit" screen.
"Processing Requests: Step Requirements in Approval Routes"
- Tip
-
The submitted data is saved in the Sent items list of both the proxy applicant and the delegator.
The route changes when route branching is set on the used request form.
Displaying Proxy Applicants
The user name of the delegator is displayed in the applicant column of the request submitted by the proxy applicant.
The user name of the proxy applicant is displayed to the right of the delegator's name.
Workflow of Proxy Requests
You can view, withdraw, and cancel submitted request on the Sent items list of the delegator.
When the proxy request is processed, the result is notified to both the proxy applicant and the delegator.
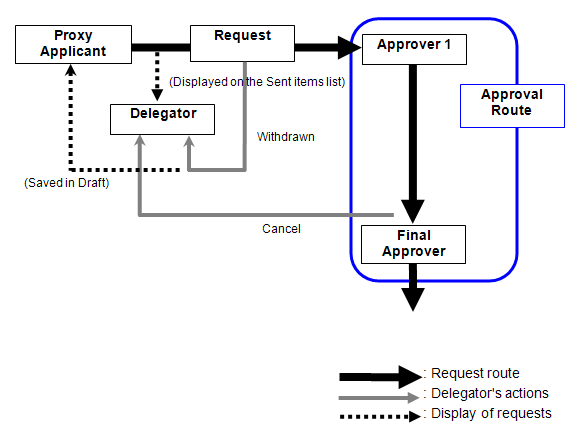
Withdrawing Proxy Requests
Both the proxy applicant and the delegator can withdraw the submitted proxy requests.
When the request is withdrawn, the notification is removed from the Sent items list of both the proxy applicant and the delegator.
The withdrawn request is saved under the Draft folder of the proxy applicant.
The delegators cannot view the request that are withdrawn by the proxy applicant.
Canceling Proxy Requests
Both the proxy applicant and the delegator can cancel the submitted proxy requests.
Submitting Proxy Requests by Reusing Requests
Proxy applicant can submit a proxy request by reusing the following requests:
Submitted proxy requests
Canceled proxy requests
Rejected proxy requests
Requests that are canceled by the delegator
Requests that are withdrawn by the delegator
Processors are displayed in the route steps only when the initial value is set for the route step of the request form.
In any requests, you cannot reuse the processors who are appointed as the route steps.
On the "Request details" screen, click "Reuse in new request" to create another request.
- Tip
-
When a proxy applicant is changed, the request cannot be reused as the proxy request of the delegator.
You cannot reuse the request forms for which you do not have access privileges. Default values are applied when you do not have access privileges to individual entries.
When you reuse a modified request form, the latest request form is applied.
![]()
All brand names and product names appearing on this site are registered trademarks or trademarks of their respective holders. Copyright (C) Cybozu