Importing Record Data from a File into an App
You can add new records or update existing records by importing data from a file into an app.
You can also add new rows or update existing rows of tables in records.
This article explains how to import file data into an existing app, along with points to keep in mind when importing file data.
Points to note before importing a file
- Depending on the field types used and how the field settings are configured, there may be cases where a field does not accept data registration/update via file import.
Check if any fields or record information cannot have data registered or updated
Check for records and fields you cannot view or edit - To import data from a file, you need to be granted the "Import from file" permission in the Permissions for App settings.
Additionally, to import data into Created by, Created datetime, Updated by, and/or Updated datetime fields when creating new records via file import, you also need to be granted the "Manage app" permission.
Configuring permissions for apps - It is recommended that you create a backup of existing records by exporting them to a file before importing data via file import. For information on exporting data to a file, refer to the following page.
Exporting data to a file - While data is being imported from a file, you may not be able to add or update records, either in kintone or via API.
Key points of the "Import from file" operation
When importing data from a file, you need to specify which field to import data into by mapping the correspondence between columns in the file and fields in the app.
If you want to update existing records, you also need to specify which field will be used as the Key to bulk update.
This section explains key points of these two settings.
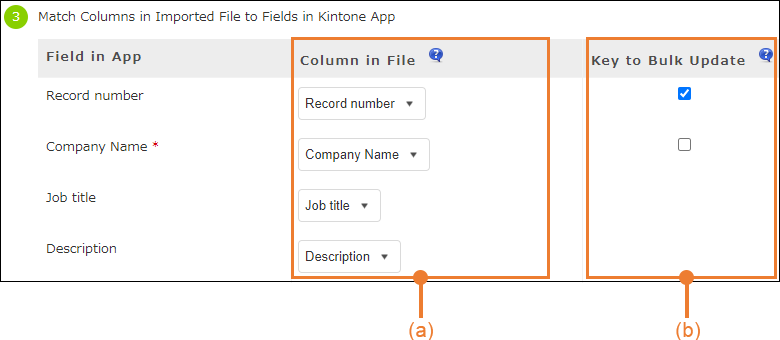
(a) Key points for specifying "Column in file"
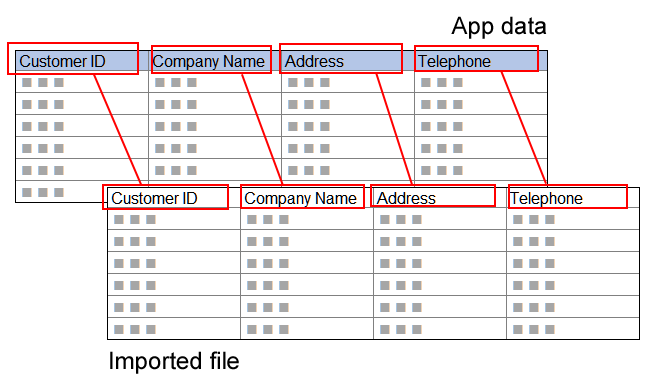
In the Column in file section on the Import from file screen, specify which field to import data into by mapping the correspondence between fields in the app and columns in the file.
-
If a field into which you want to import file data is not displayed under Field in app, it means the field does not accept data registration/update via file import or you do not have permission to view or edit the field.
For example, fields whose values are calculated or retrieved based on the values of other fields (e.g., fields that have formulas set) do not appear under Field in app. The values of these fields will be re-calculated or retrieved again when file data is imported.
For information on such fields, refer to the following page.
Checking the destination app for file import -
When creating new records via file import, you need to specify corresponding file columns for the app's required fields (fields marked with "*").
Also, if you are updating existing records with data that does not include values for some of the app's required fields, you still need to specify corresponding file columns for the required fields. -
If you do not want to register or update values for some fields, select (None) for these fields.
- In records that are newly added via file import, the field for which (None) is selected are left empty or the default value is input (if a default value is set for the field).
- In existing records whose values are updated via file import, the value for the field for which (None) is selected is not changed from the value before the file import.
Especially when you are updating existing records, make sure to select (None) for fields whose values you do not want to update to prevent existing record data from being updated with old data.
-
If you want to update table data in existing records via file import, specify the corresponding file columns for all of the fields in the table that are displayed under Field in app. You must also specify the corresponding file columns for fields whose data has not been modified in the file so that these fields are also included in the scope of file import.
(b) Key points for specifying "Key to bulk update"
When updating existing records, specify which field will be used as the Key to bulk update.
The field set as the Key to bulk update will be used for determining which file data will be used to update each record. The field set as Key to bulk update has to be one that does not accept duplicate values across multiple records. Record numbers and order numbers are the examples of the fields that are suitable for Key to bulk update.
When you set a field as Key to bulk update and carry out the Import from file operation, values of the field set as the key to bulk update are compared with the values in the corresponding file column.
- When a value in the file column matches a value of the field set as "Key to bulk update"
The data of the record with the matching value is replaced with the data of the file row that contains the value. - When a value in the file column does not match any values of the field set as "Key to bulk update"
The data of the file row that contains the value is added as a new record.

Note that if the import file contains the same value more than once in the column specified for Key to bulk update, the last row that contains the value will be reflected in the relevant record.
The following are the fields that can be set as Key to bulk update:
- Record number
- Text
- Number
- Date
- Date and time
- Link
Steps to import a file
-
Click the Options icon at the upper right of the View screen, then click Import from File.
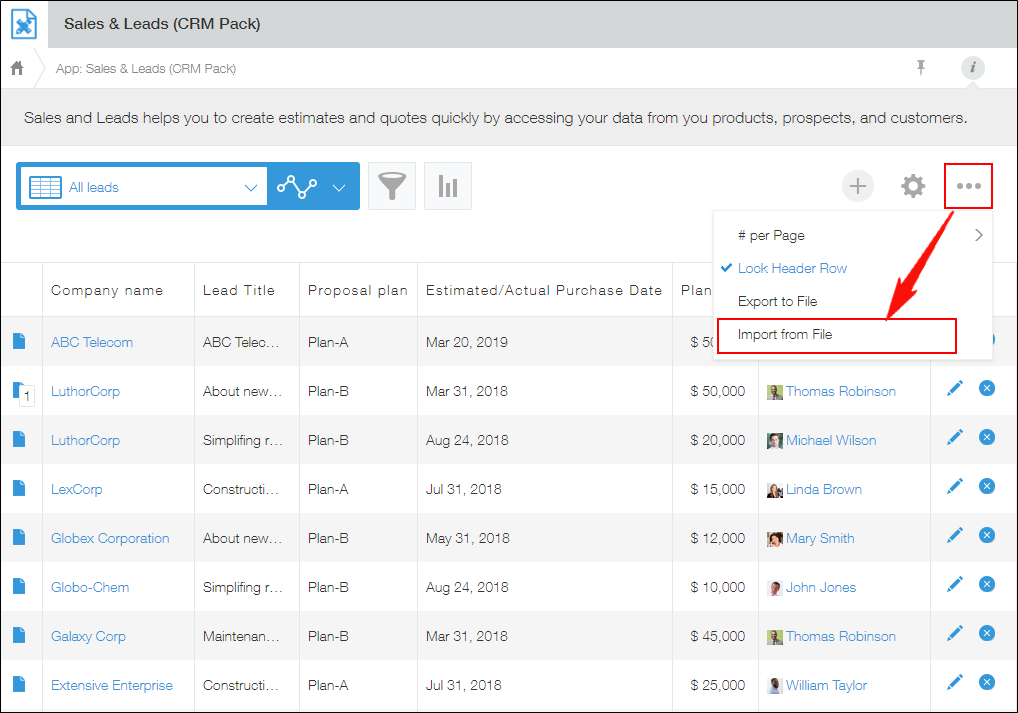 If Import from File is not displayed, you need to be granted the "Import from file" permission in the Permissions for app settings.
Configuring permissions for apps -
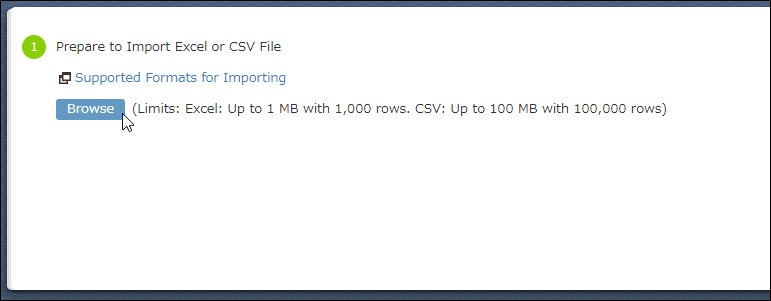
Click Browse and select a file to import.
-
Select one of the radio buttons under Select data scope.
If your file has column names in the first row, select First row is header. Depending on the content of your file, First row is header may be automatically selected.
 -
Check that the content of your file is correctly displayed in the Preview section.
 The Character encoding and Delimiter drop-down lists are displayed only when you are importing a CSV file.
- If characters in the file are garbled, select a different option from the Character encoding drop-down list.
- If the file data is not separated into columns correctly, select a different option from the Delimiter drop-down list.
-
Set the corresponding file columns for the app's fields to specify which field to import the column data into.
Reference: (a) Key points for specifying "Column in file"
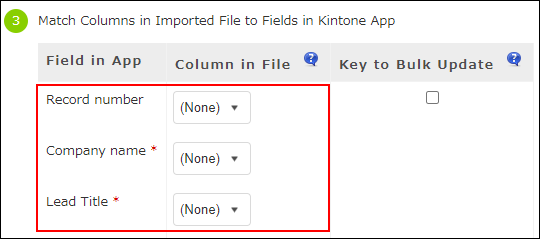 If the file has column names in the first row, kintone automatically looks for matches between the column names and the app's field names and sets columns in the Column in file section accordingly.
- If a field into which you want to import file data is not displayed, it means the field does not accept data registration/update via file import or you do not have permission to view or edit the field.
For information on such fields, refer to the following page.
Checking the destination app for file import - When creating new records via file import, you need to specify corresponding file columns for the app's required fields (fields marked with "*").
- If you do not want to register or update values for some fields, select (None) for these fields.
- In records that are newly added via file import, the field for which (None) is selected are left empty or the default value is input (if a default value is set for the field).
- In existing records whose values are updated via file import, the value for the field for which (None) is selected is not changed from the value before the file import.
- Fields placed in a table are displayed in the following format: "Table name > Field name"
When updating existing records, specify corresponding file columns for all of the fields in the table.
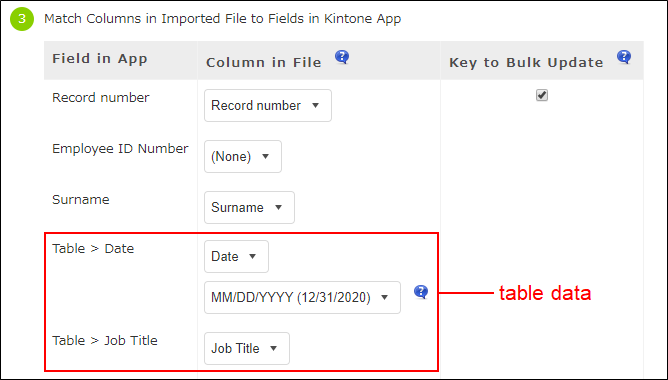
- If a field into which you want to import file data is not displayed, it means the field does not accept data registration/update via file import or you do not have permission to view or edit the field.
-
When updating existing records, select the Key to bulk update checkbox.
Reference: (b) Key points for specifying "Key to bulk update"
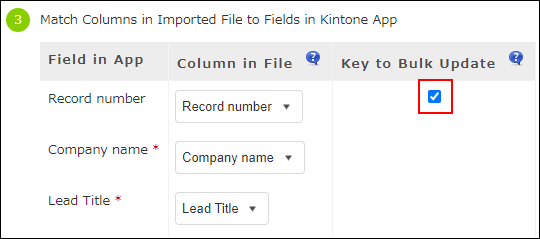 The following are the fields that can be set as Key to bulk update:
- Record number
- Text
- Number
- Date
- Date and time
- Link
-
If you want to import file data into the Created by, Created datetime, Updated by, and Updated datetime fields of the records to be newly added, specify the corresponding file columns for the fields displayed in the Record creation/update information section.
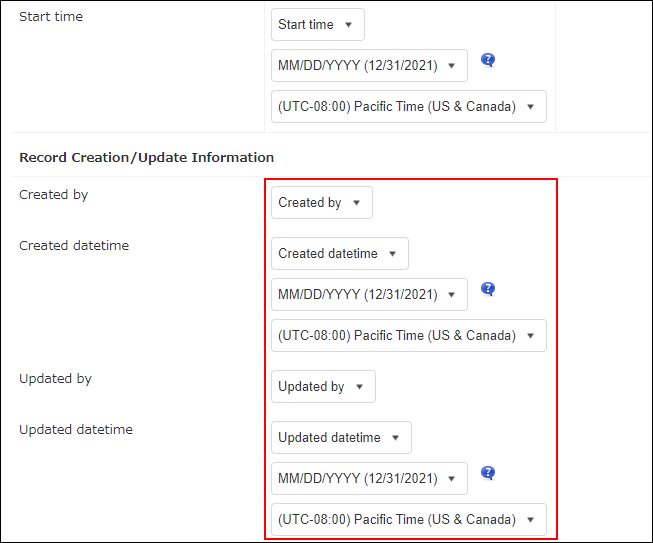
- If fields are not displayed in the Record creation/update information section, you need to be granted the "Manage app" permission in the Permissions for app settings.
Configuring permissions for apps - If you select (None) for these fields, the user who carries out the Import from file operation is registered in the Created by and Updated by fields of newly added records, and the date and time of the operation is registered in the Created datetime and Updated datetime fields of the records.
- If fields are not displayed in the Record creation/update information section, you need to be granted the "Manage app" permission in the Permissions for app settings.
-
Select how you want file import errors to be handled. For details on the options for handling file import errors, refer to the following page.
Options for handling errors during file import -
Click Import on the upper left side of the screen.

When the file import starts, you are automatically navigated to the app's View screen.
 A message is displayed at the top of the View screen, showing you the progress and result of the file import.
Clicking the link in the message navigates you to the Imported files screen. On the Imported files screen, you can check the progress of the Import from file operation you have performed and details of any errors that occur.
Checking the status of file import
If the file import fails, refer to the following page for solutions.
What to do if adding/updating records in bulk failed
