Lookup
Placing a Lookup field on your app form lets you reference and retrieve (copy) record data from another app. This removes the need to enter the same data multiple times, which helps to prevent input errors and reduces the time required for data entry.
For example, suppose you place a Lookup field in the "Lead Management" app and then specify the "Customer Management" app as a reference source app. Doing so lets you retrieve data from the "Customer Management" app when adding records in the "Lead Management" app.

"Lookup" field settings

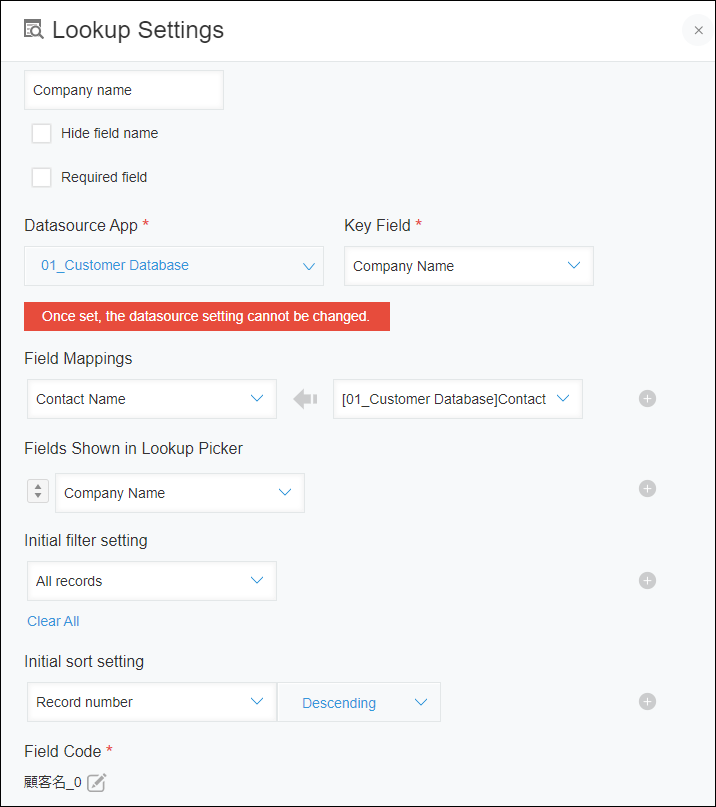
Name
Use this input field to specify the name that will be displayed for the Lookup field.
Hide field name
Selecting the Hide field name checkbox hides the field name on the following screens.
- The New record screen
- The Edit record screen
- The Record details screen
- The screen for printing a record
- The Form settings screen
Required field
Select this option to make retrieving a value using the Lookup field mandatory.
Datasource app
Select an app to be referenced.
You can search for an app in the search box that appears when you click Select an app.
Once you select an app and save the form, this setting cannot be changed.
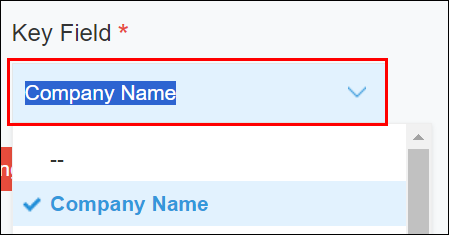
Key field
The key field is the field that connects the referencing app and the datasource app.
Select a field from the drop-down list. You can also enter text to search for a field.

You can specify any of the following fields as a key field.
- Text
- Number
- Calculated
- Link
- Lookup
- Record number
Once you select an app and save the form, this setting cannot be changed.
Field mappings
Set the fields to be used for retrieving data from the datasource app.
When you select a record to reference on the New record screen or the Edit record screen, the relevant record in the datasource app will be referenced and its data will be automatically retrieved.

Specify fields from the app you currently have open on the left side, and specify fields from the datasource app on the right side.
If you want to retrieve data from multiple fields, add more fields by clicking the Add icon (the plus sign-shaped icon) to the right of a field mapping.
To reduce the number of fields for retrieving data, remove field mappings by clicking the Delete icon (the minus sign-shaped icon) to their right.

For information on the types of fields that can be specified, refer to the following page.
Fields that can be specified for "Field mappings"
Fields shown in lookup picker
Select fields to display on the dialog that appears when Lookup is clicked on the New record screen or the Edit record screen.

If you want to display multiple fields, add more fields by clicking the Add icon (the plus sign-shaped icon) on the right.
To reduce the number of fields displayed, remove fields by clicking the Delete icon (the minus sign-shaped icon) on the right.
Change the order of a field by dragging and dropping the arrow icon to the left of it.
Initial filter setting
Configure this setting if you want to filter in advance the records displayed on the dialog that appears when Lookup is clicked on the New record screen or the Edit record screen.
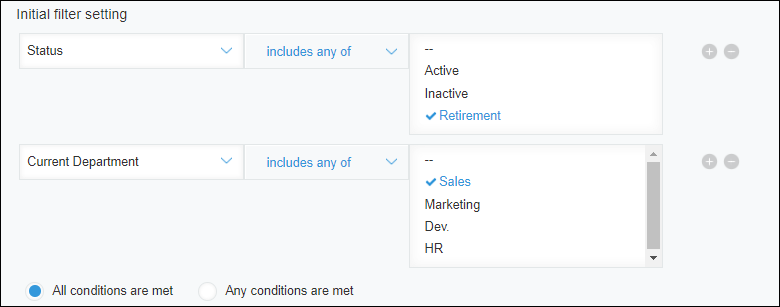
For example, if you have an app that is used by members of your sales department and want to retrieve employee names from an employee directory app, you could configure the following settings.
- Filter to not show records where the "Employment Status" field's value is "Retired"
- Filter to only display records where the "Department" field's value is "Sales Department"

If you want to set multiple filter conditions, add more by clicking the Add icon (the plus sign-shaped icon) on the right.
To reduce the number of filter conditions, click the Delete icon (the minus sign-shaped icon) on the right.
If you specify multiple filter conditions, select either All conditions are met or Any conditions are met.
To clear all of the set filter criteria, click Clear all.
Initial sort setting
Specify the order in which to display fields on the dialog that appears when Lookup is clicked on the New record screen or the Edit record screen.
For information on the fields and items that can be specified, refer to the following page.
Which fields and items can be used for "Sort by"?
Field code
The character string used for specifying the field in APIs.
Configuring and using "Lookup" fields
For details on how to configure and use a Lookup field, refer to the following pages.
Usage examples
Use a Lookup field when you have an app for registering and managing data, and you want to copy that app's data to use in another app.
For example, a Lookup field can be used in the following cases.
- If you have a lead management app, you can place a Lookup field in it to retrieve company information from a customer management app.
- If you have an employee assessment app, you can place a Lookup field in it to retrieve employee information from an employee directory app.
