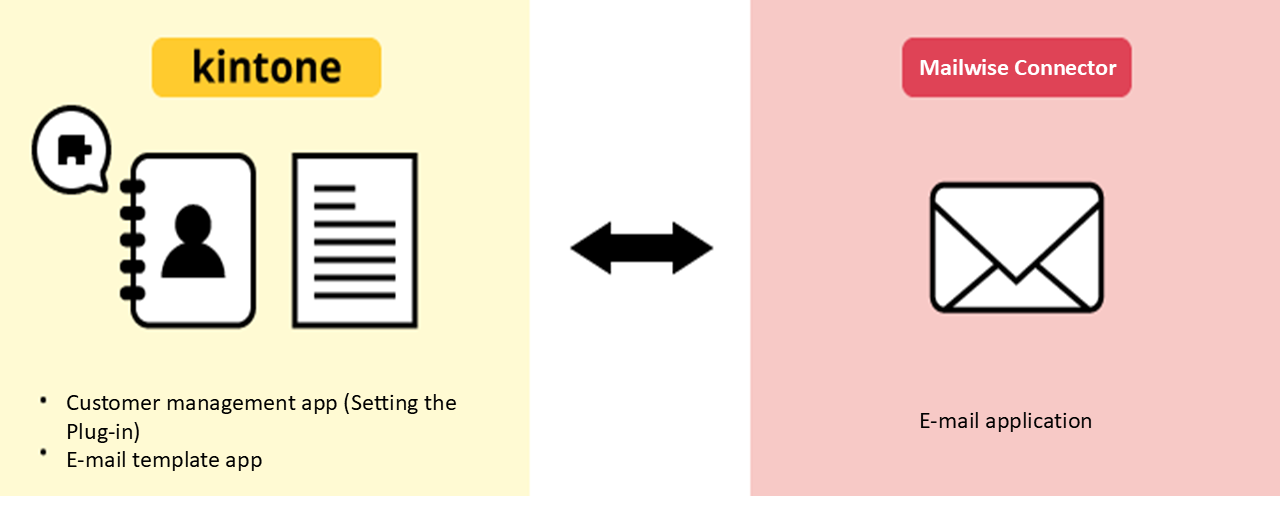
Integrating Mailwise with kintone
By integrating Mailwise with kintone, you can send out and manage emails based on app information.
For example, if you have a customer information management app in kintone, you can use Mailwise integration features to do the following.
- Send out multiple emails at once to customers filtered in your app
- Use your app to manage email templates for sending out emails to multiple users at once
- Populate email templates with customer information registered in your app
- Use your app to check each of your customer's history of emails sent and received in Mailwise
Requirements for Mailwise integration
To integrate Mailwise with kintone, the following conditions must be met.
- You must be using kintone and Mailwise in the same domain.
If you are not yet using both kintone and Mailwise, sign up for a plan or free trial as needed. - You must be using kintone with either a free trial or a kintone license plan that allows the use of plug-ins.
If your kintone license plan does not allow the use of plug-ins, you will not be able to use Mailwise integration. However, Mailwise can be integrated with kintone regardless of which Mailwise license plan you are using.
For details on which license plans support Mailwise integration, refer to the product website below.
Pricing and license plans (Only available in Japanese)
Requirements for using Mailwise integration features
To use Mailwise integrated with kintone, the following conditions need to be met.
-
Users need to be able to use both kintone and Mailwise.
If any users who are to send out emails are not yet able to use both kintone and Mailwise, they need to be allowed to use both services by a cybozu.com administrator.
For information on how to allow the use of a service, refer to the following page.
Service availability -
You must be using kintone on a PC.
Mailwise integration features cannot be used when using kintone on a smartphone.
Integrating Mailwise with kintone
This section explains how to set up Mailwise integration using customer information and email templates managed in a kintone app.
To complete the setup, follow the steps below.
Step 1: Prepare your apps
Step 2: Install the Mailwise Connector plug-in in kintone
Step 3: Add the plug-in to your customer information management app and configure its settings
Step 1: Prepare your apps
Prepare the following two apps.
- A customer information management app
- An email template management app
Preparing the customer information management app
First, prepare an app for managing customer information (e.g., customer company names and email addresses).
Place fields for registering customer information on the app form.
To use Mailwise integration features, place the following fields on the app form.
- A field for registering an email address
Use a Link field (with its type set to Email address) or a Text field. - A field for displaying email history
Use a Blank space field. In the field's settings, specify an element ID of your choosing. You will use this element ID when setting up the Mailwise Connector plug-in.
Once you've finished creating the app form, register customer information in the app.
Preparing the email template management app
Next, prepare an app for managing email templates. Each template will be managed as a separate record.
Place fields for entering an email subject and body text on the app form.
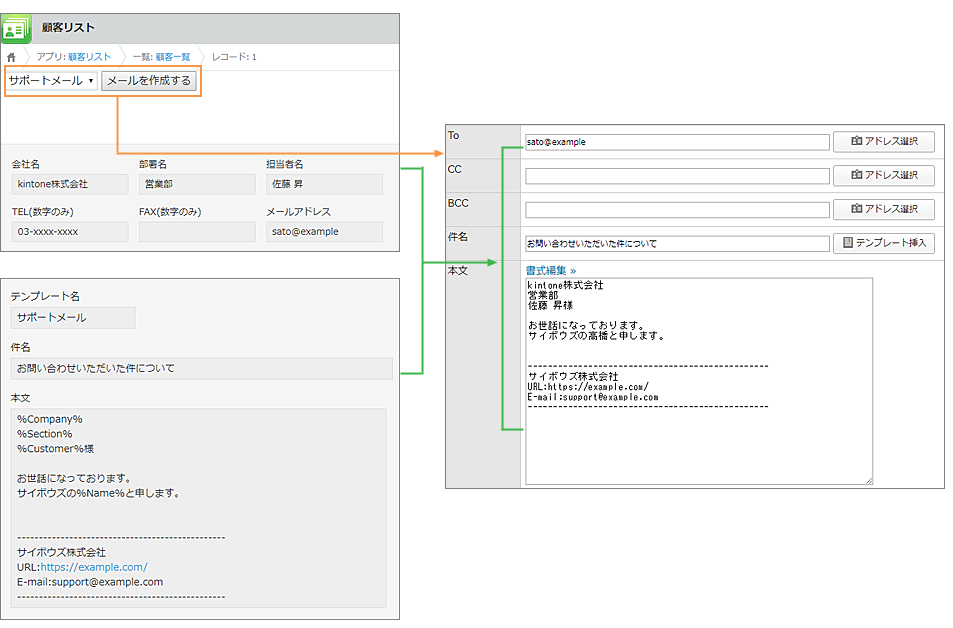
- A field for entering a template name
Use a Text field. - A field for entering an email subject
Use a Text field. - A field for entering the body text of an email
Use one of the following fields.- A Text field
- A Text area field
- A Rich text field
Inserting field values in the body text of an email
Use variables to specify where you want field values to be inserted in the email's body text.
For the variables, enter the field codes of the fields you want to use enclosed in half-width percent (%) symbols.
Example: If the field code of the field you want to use is "Company", enter "%Company%".
The following fields can be used to insert values in the body text of an email.
- Text fields
- Number fields
- Radio button fields
- Link fields
- Lookup fields
- Drop-down fields
Step 2: Install the Mailwise Connector plug-in in kintone
A kintone administrator needs to install the Mailwise Connector plug-in in kintone administration.
For details, refer to the following page.
Adding plug-ins from the Plug-in marketplace
Step 3: Add the plug-in to your customer information management app and configure its settings
In your customer information management app, add the Mailwise Connector plug-in and configure its settings.
Adding the Mailwise Connector plug-in
-
Click the App settings icon (the gear-shaped icon) at the upper right of the View screen.

-
Select the App settings tab on the App settings screen, then click Plug-ins under Customization and integration.
-
On the Plug-ins screen, click Add plug-in.
-
On the Add plug-in screen, select the checkbox for the Mailwise Connector plug-in, then click Add at the bottom right of the screen.
-
Click App settings in the message displayed at the top of the screen, or click Back to app settings at the bottom left of the screen.
Next, configure the settings for the Mailwise Connector plug-in.
Configuring the settings for the Mailwise Connector plug-in
-
Select the App settings tab on the App settings screen, then click Plug-ins under Customization and integration.
-
Click the Settings icon to the right of Mailwise Connector.
-
On the Plug-in settings screen, configure the settings.
-
Check the settings and click Save.
-
Go back to the App settings screen and click Update app at the upper right of the screen.
-
On the confirmation dialog, click Update app.
The settings of the plug-in will be applied to the app.
Plug-in settings
This section describes the items on the Plug-in settings screen.
-
Sending Type
Select the checkbox for the sending type you want to use.- Individual sending:
Send emails to customers individually. - Bulk sending:
Send emails to multiple customers at once.
- Individual sending:
-
E-mail Space
Select the Mailwise email space to use for sending emails. You can select from the email spaces that are available to you. -
E-mail Application
Select the Mailwise email application you want to use for sending emails. You can select from the email applications available to you in the email space selected under E-mail Space. -
To Field
Select a field to use for inserting email addresses into the To field of emails. -
CC Field for Individual Sending
Select a field to use for inserting email addresses into the CC field of emails. -
BCC Field for Individual Sending
Select a field to use for inserting email addresses into the BCC field of emails. -
Template
To use an email template managed in your app, select the Use kintone app as a template checkbox. -
Template App
This item is displayed when the Use kintone app as a template checkbox is selected.
Select the app that you use to manage email templates. -
Template Name Field
This item is displayed when the Use kintone app as a template checkbox is selected.
Select the field used for entering a template name in your email template management app. -
Subject Field
This item is displayed when the Use kintone app as a template checkbox is selected.
Select the field that is used for entering an email subject in your email template management app. -
Body Field
This item is displayed when the Use kintone app as a template checkbox is selected.
Select the field for entering email body text in your email template management app. -
Blank Space Field used for History
To display customers' Mailwise email history on the Record details screen, select the element ID of a Blank space field.
Using Mailwise integration features
This section explains how to send emails to customers and check customer email history from a kintone app with Mailwise integrated.
Selecting customers from your app and sending emails individually
Follow the steps below to select a customer from your customer information management app and send them an email individually.
-
Open the Record details screen of the record for the customer to whom you want to send an email.
-
Select an email template from the drop-down list, then click Compose E-mail.
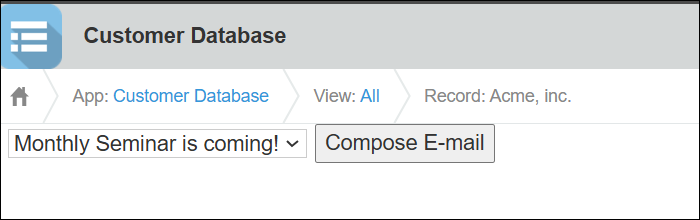 You will be taken to the メールの作成 (Compose email) screen in Mailwise. The email recipient field and body text will be automatically entered according to the email template you selected.
 -
On the メールの作成 (Compose email) screen, modify the content of the email as needed, then click 送信する (Send).
-
On the メールの送信 (Send email) screen, confirm the content of your email, then click 送信する (Send).
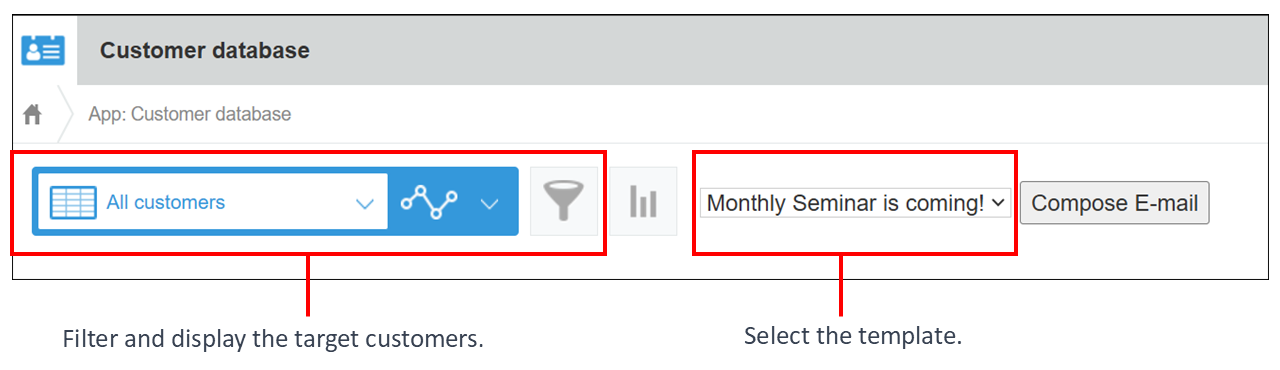
Filtering customers in your app and sending out multiple emails at once
Follow the steps below to filter customers in your customer information management app and send out multiple emails at once.
-
On the View screen, filter the records of the customers to whom you want to send emails.
-
Select an email template from the drop-down list, then click Compose E-mail.
-
Click OK on the confirmation screen.
You'll be taken to the 配信確認 (Delivery confirmation) screen in Mailwise. The email recipient field and body text will be automatically entered according to the email template you selected. -
On the 配信確認 (Delivery confirmation) screen, modify the content of the email as needed, then click 送信する (Send).
-
Click OK on the confirmation screen.
The 配信実行 (Execute delivery) screen will appear. Confirm the details of your sent emails.
Confirming the email history of customers in your app
If you have specified a field under Blank Space Field used for History in the Mailwise Connector plug-in settings, email histories will be displayed in your customer information records.
If there is phone call or visitation history associated with a customer's email address, it will also be displayed.
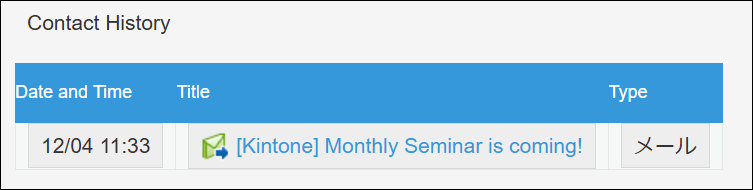
The following items are displayed in a customer's email history.
- Date and time:
Shows the date and time when an email was delivered or received. Dates from the current year are displayed with the year omitted. - Title:
Shows the email title. Clicking the title will bring up the email details screen in Mailwise. - Type:
Displays one of the following.- Name of the email app where the email is saved
- Bulk sending