Installing IIS 10.0
This section describes how to install IIS 10.0 on Windows Server 2016, Windows Server 2019, or Windows Server 2022.
IIS 10.0 is the default version that shipped with the operating systems mentioned above.
Items You Need to Confirm before Installation
Before installing IIS 10.0, confirm the following:
-
User Rights
You need to log in to the server where you want to install IIS 10.0 as the following users.- On Windows:
Users who have Administrator rights on the server where IIS will be installed.
- On Windows:
-
Confirming Web Servers
If you have any other Web server software running on the same server, confirm that all of them are stopped.
Installing IIS10.0
This section describes how to install IIS 10.0.
-
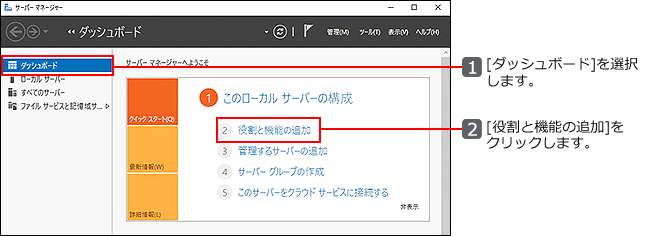
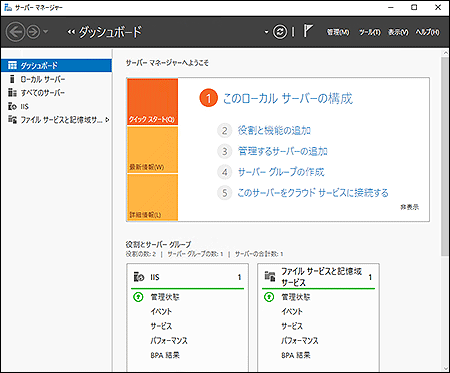
Start Server Manager.
Server Manager is usually displayed automatically when you start the server.
If Server Manager is not displayed, start Server Manager from the Start menu. -
Select Dashboards from the left pane, and then click Add roles and features.
-
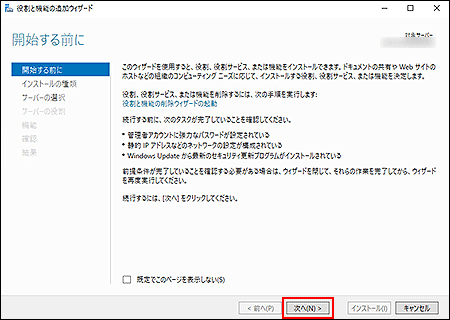
Confirm the tasks in the "Before you begin" screen, and then click Next.
-
On the "Select Installation Type" screen, select the desired installation type, and then click Next.
This section explains the scenario when "Role-based or feature-based installation" is selected.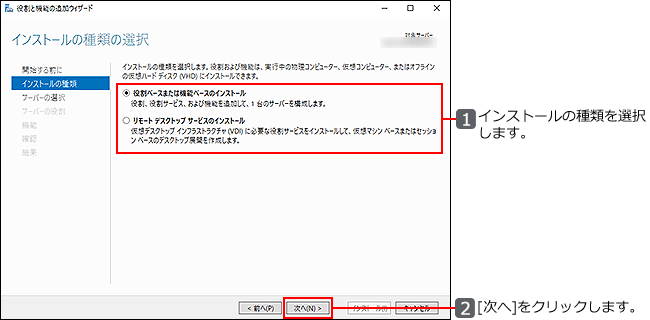
-
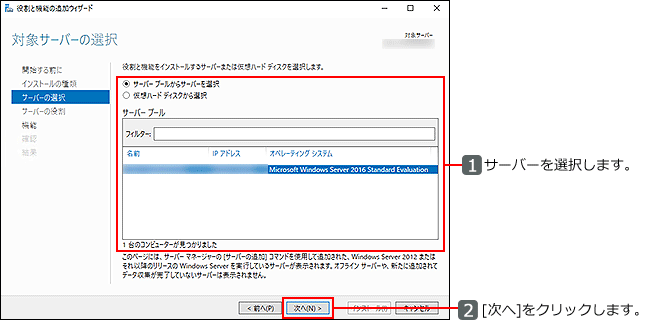
On the "Select destination server" screen, select the server on which to install roles and features, and then click Next.
This section explains the scenario when "Select a server from the server pool" is selected.
-
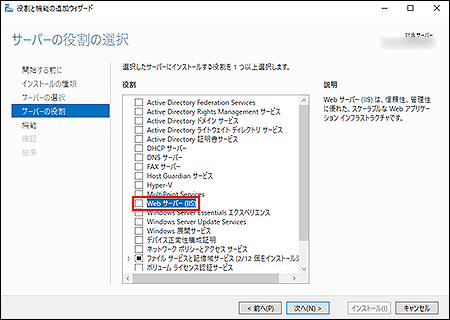
On the "Select server roles" screen, select the "Web Server (IIS)" check box.
-
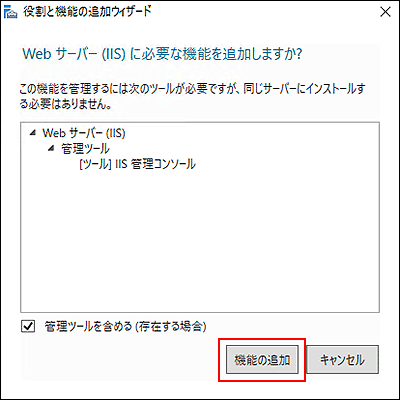
On the "Add Roles and Features Wizard" screen, click Add Features.
-
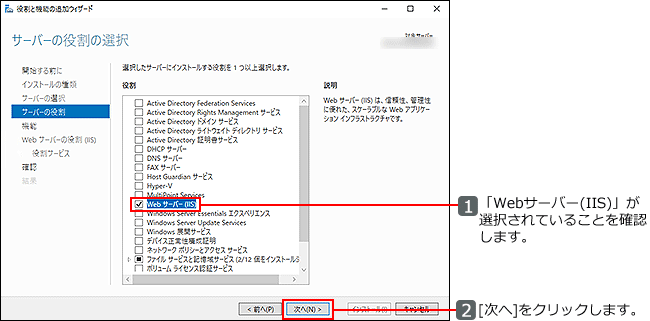
Confirm that "Web Server (IIS)" is selected, and then click Next.
-
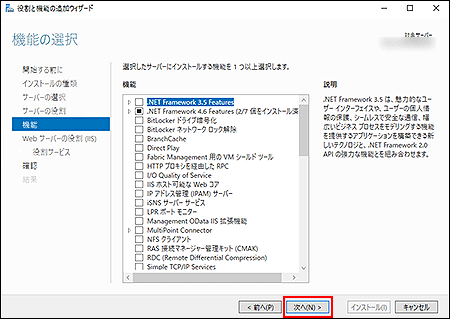
On the "Select features" screen, click Next.
-
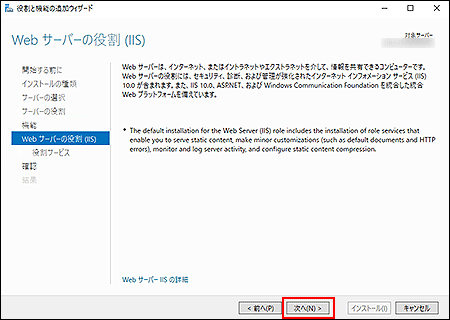
On the "Web Server Role (IIS)" screen, confirm the descriptions, and then click Next.
-
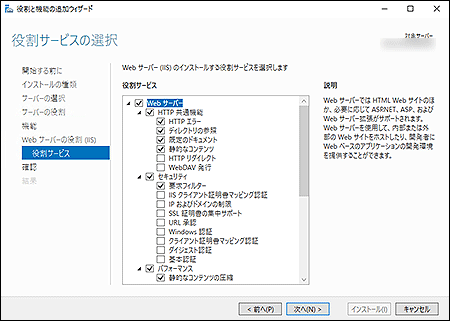
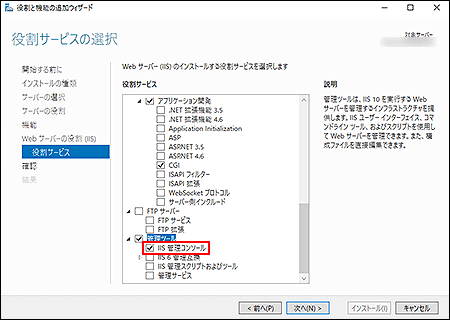
On the "Select role services" screen, click
 to the left of "Web Server" to expand the tree view.
-
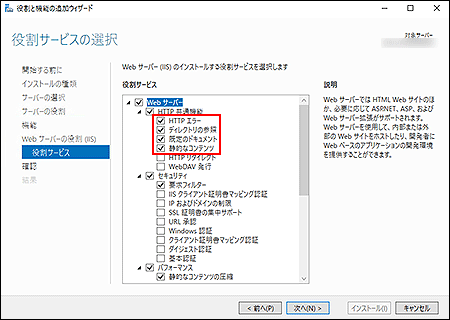
Click
to the left of "Common HTTP Features" to expand the tree view, and then select the following items:- HTTP Errors
- Directory Browsing
- Default Document
- Static Content
-
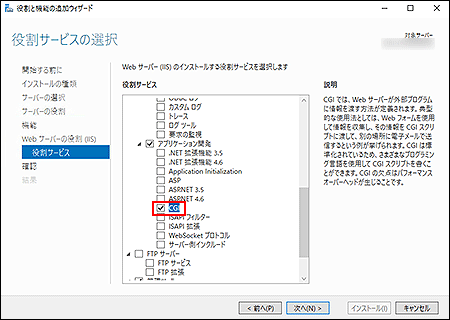
Click
to the left of "Application Development", expand the tree view, and then select "CGI".
-
Click
to the left of "Management Tools", expand the tree view, and then select "IIS Management Console".
-
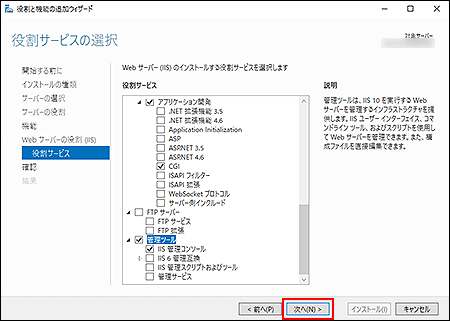
Confirm the settings you set in step 12 to step 14, and then click "Next".
-
Confirm the items to be installed, and then click Install.
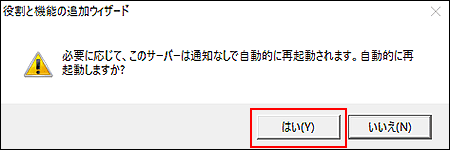
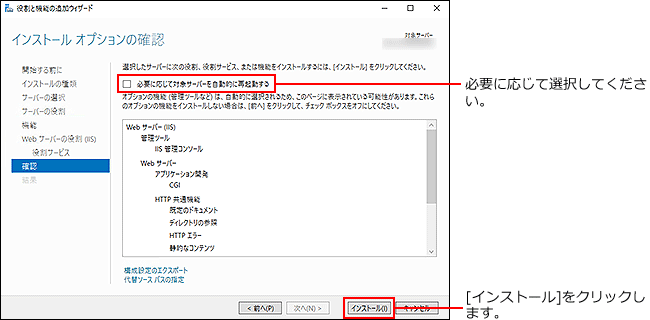 If you enable "Restart the destination server automatically if required", the following message is displayed:
In this case, click Yes.
-
When the installation is completed, click Close.
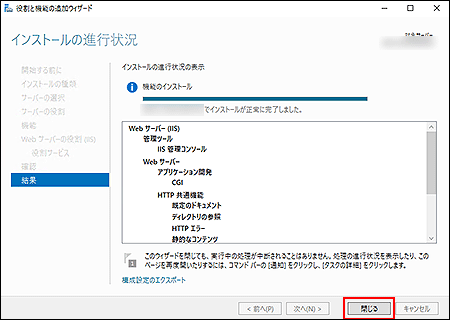 If you enabled "Restart the destination server automatically if required" in step 16, the server may restart.
 -
Start your Web browser on the server where IIS 10.0 is installed.
-
Access "http://localhost/" and confirm that it works correctly.
If IIS 10.0 page is displayed, the installation of IIS 10.0 has completed successfully.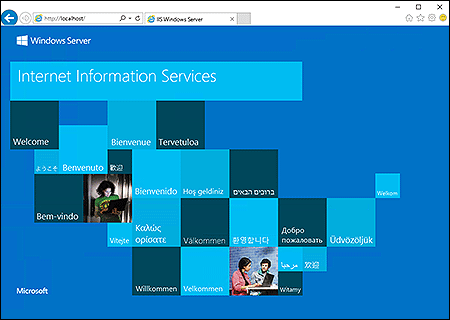
Setting Access Permissions
According to the product you are using, create required folders and set access permissions.
| Product | Folders to create1 |
|---|---|
| Office 10 | C:\inetpub\scripts |
| C:\cybozu\office | |
| Other Cybozu Products | C:\inetpub\scripts |
Setting Access Permissions for "C:\inetpub\scripts"
Regardless of the product you are using, you need to create the "scripts" folder.
-
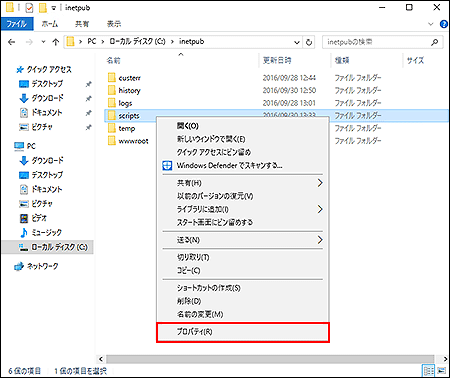
Open C:\inetpub folder by using Windows Explorer.
-
Create a "scripts" folder (or any folder that you want to use).
- Example:
C:\inetpub\scripts
- Example:
-
Right-click the "scripts" folder and select Properties.
-
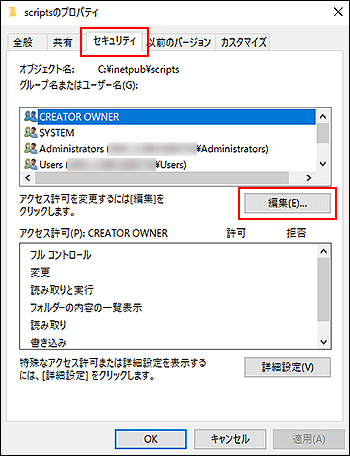
On the "scripts Properties" screen, select the "Security" tab, and then confirm whether "Everyone" is displayed or not in the "Group or user names:" section.
- When "Everyone" exists:
Select "Everyone" in the "Group or user names:" section, and then confirm whether "Allow" is selected for "Full control" in the "Permissions for Everyone" section.
If "Allow" is not selected, proceed to step 8.
If "Allow" is selected, proceed to step 9. - When "Everyone" does not exist:
Proceed to Step 5.
- When "Everyone" exists:
-
On the "scripts Properties" screen, select the "Security" tab, and then click Edit.
-
On the "Permissions for scripts" screen, click Add.

-
On the "Select Users or Groups" screen, type "Everyone" and click OK.
You can also search for and enter "Everyone" by clicking Advanced.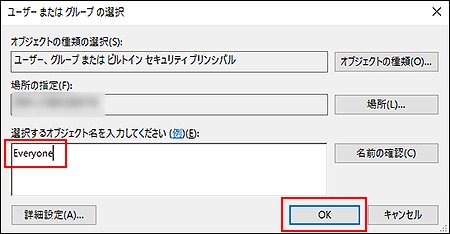
-
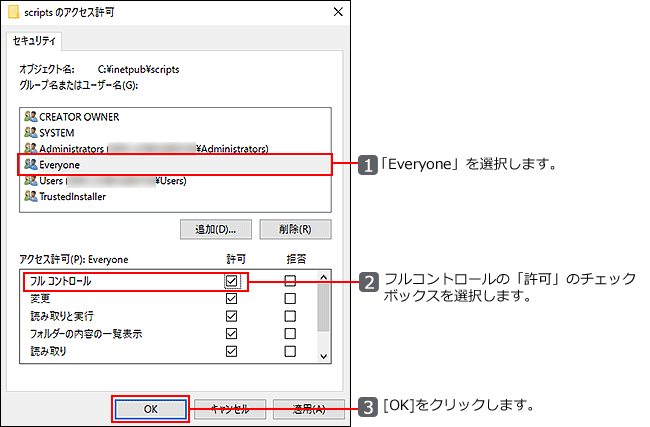
On the "Permissions for scripts" screen, select "Everyone" and select "Allow" for "Full Control", and then click OK.
-
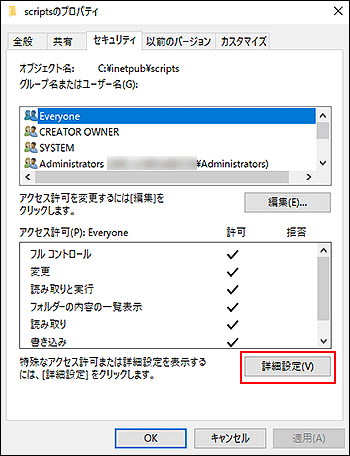
Click Advanced on the "scripts Properties" screen.
-
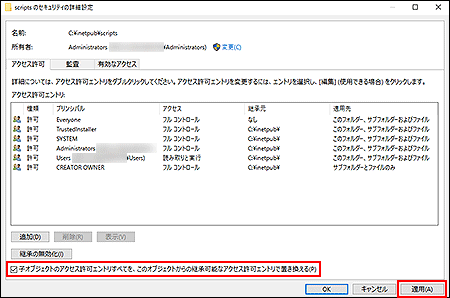
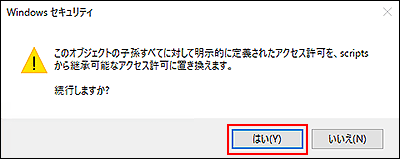
On the "Advanced Security Settings for scripts" screen, select the check box for "Replace all child object permission entries with inheritable permission entries from this object", and then click Apply.
-
Click Yes on the "Windows Security" screen.
-
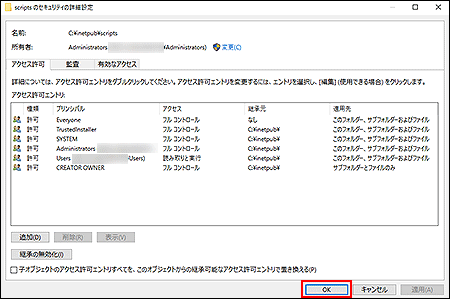
Click OK on the "Advanced Security Settings for scripts" screen.
-
Click OK on the "scripts Properties" screen.

Setting Access Permissions for "C:\Cybozu\Office"
This step is required for a new installation of Cybozu Office 10 or later.
For the operation image of the following steps, refer to "Setting Access Permissions for "C:\inetpub\scripts".
-
Open C:\cybozu folder by using Windows Explorer.
-
According to the product you are using, create an "office" folder.
- Example:
C:\cybozu\office
- Example:
-
Right-click the folder that you created in step 2, and select Properties.
-
On the "Folder Properties" screen, select the "Security" tab, and then confirm whether "Everyone" is displayed or not in the "Group or user names:" section.
- When "Everyone" exists:
Select "Everyone" in the "Group or user names:" section, and then confirm whether "Allow" is selected for "Full control" in the "Permissions for Everyone" section.
If "Allow" is not selected, proceed to step 8.
If "Allow" is selected, proceed to step 9. - When "Everyone" does not exist:
Proceed to Step 5.
- When "Everyone" exists:
-
On the "Folder Properties" screen, select the "Security" tab, and then click Edit.
-
On the "Permissions for Folder", click Add.
-
On the "Select Users or Groups" screen, type "Everyone" and click OK.
You can also search for and enter "Everyone" by clicking Advanced. -
On the "Permissions for Folder" screen, select "Everyone" and select "Allow" for "Full Control", and then click OK.
-
Click Advanced on the "Folder Properties" screen.
-
On the "Advanced Security Settings for Folder" screen, select the check box for "Replace all child object permission entries with inheritable permission entries from this object", and then click Apply.
-
Click Yes on the "Windows Security" screen.
-
Click OK on the "Advanced Security Settings for Folder" screen.
-
Click OK on the "Folder Properties" screen.
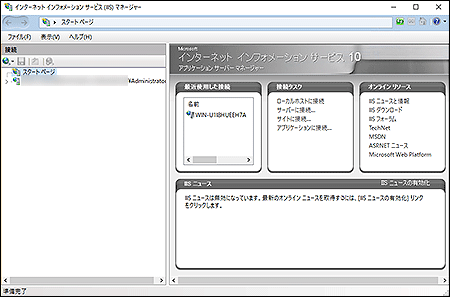
Displaying IIS Manager
This section describes how to display Internet Information Services (IIS) Manager.
-
Start Server Manager.
Server Manager is usually displayed automatically when you start the server.
If Server Manager is not displayed, start Server Manager from the Start menu. -
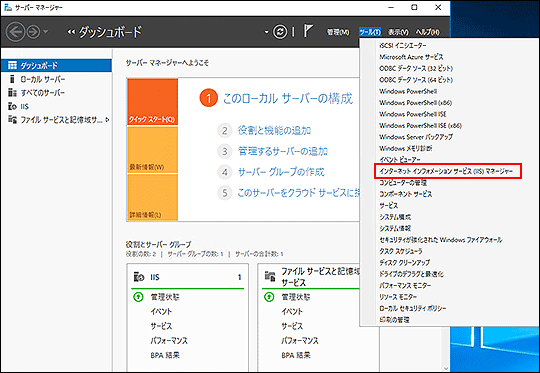
Click Tools on the upper-right of the screen, and then click Internet Information Services (IIS) Manager.
-
Confirm that the Internet Information Services (IIS) Manager is displayed.
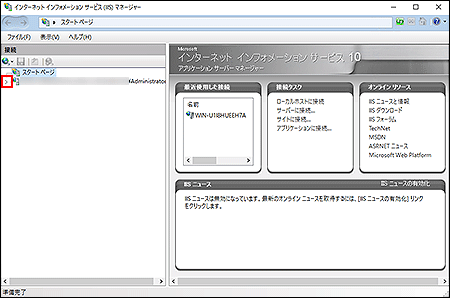
Creating a Virtual Directory
This section describes how to create a virtual directory.
This section explains the scenario when C:\inetpub\scripts is set as a virtual directory.
-
Display Internet Information Services (IIS) Manager.
Displaying IIS Manager -
In the left pane, click
 to the left of "server name", and click
to the left of "Web sites" to expand the tree view.
to the left of "server name", and click
to the left of "Web sites" to expand the tree view.
-
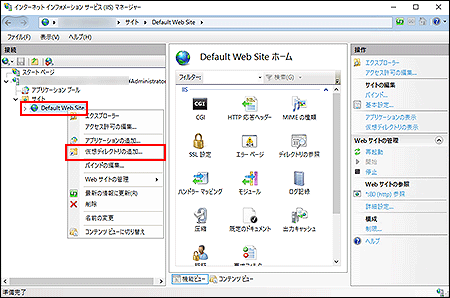
In the left pane, right-click Default Web Site, and then click Add Virtual Directory.
-
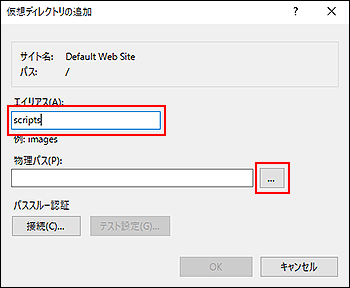
On the "Add Virtual Directory" screen, type "scripts" in the "Alias:" section, and then click ... in the "Physical path:" section.
-
On the "Browse For Folder" screen, select "scripts", and then click OK.
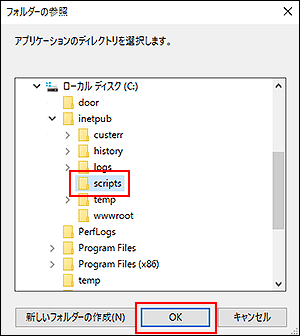
-
On the "Add Virtual Directory" screen, click OK.

-
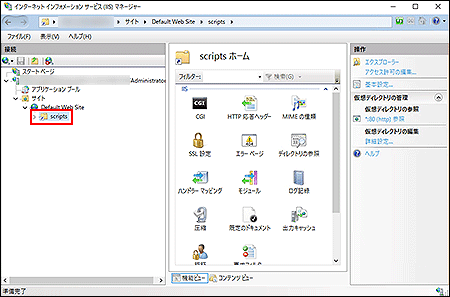
Confirm that "scripts" has been added in "Internet Information Services (IIS) Manager".
Configuring ISAPI and CGI Restrictions
This section describes how to configure ISAPI and CGI restrictions.
-
Display Internet Information Services (IIS) Manager.
Displaying IIS Manager -
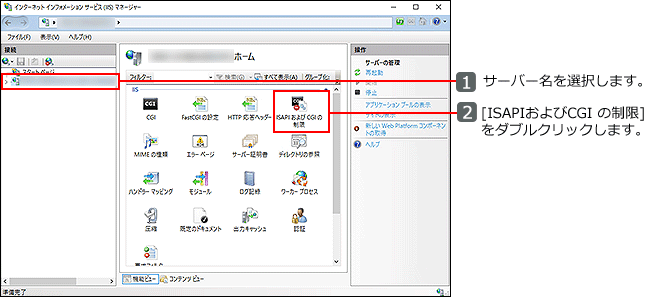
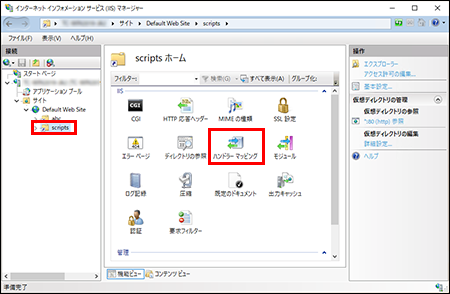
In the left pane, select the server name, and then double-click ISAPI and CGI Restrictions.
-
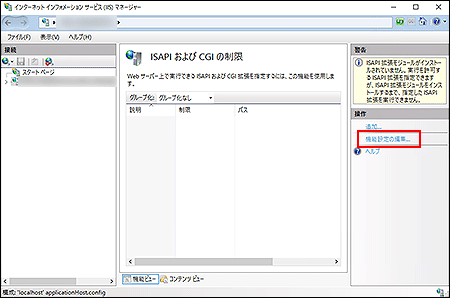
Click Edit Feature Settings.
-
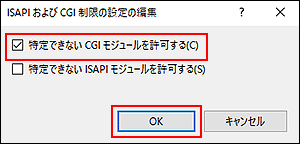
Select the "Allow unspecified CGI modules" check box, and click OK.
Configuring Handler Mappings
This section describes how to configure handler mappings.
-
Display Internet Information Services (IIS) Manager.
Displaying IIS Manager -
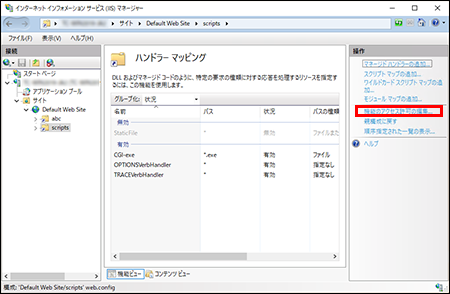
In the left pane, select "scripts" as the virtual directory, and then double-click Handler Mappings.
-
In the right pane, click Edit Feature Permissions.
-
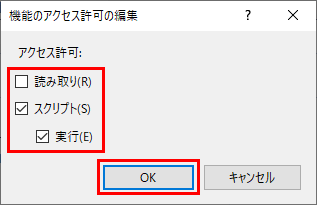
Clear the "Read" check box, and select "Execute", and then click OK.
Confirming or Changing the Path of the Document Root
This section describes how to confirm or change the path of the document root.
-
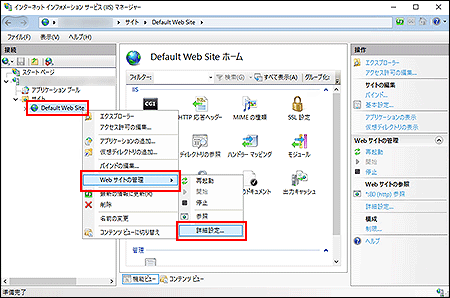
Display Internet Information Services (IIS) Manager.
Displaying IIS Manager -
In the left pane, right-click Default Web Site, click Manage Web Site, and then click Advanced Settings.
-
Confirm the "Physical Path" section.
"%SystemDrive%" usually refers to the C drive.
Only when you need to change the path of the document root from the default setting, proceed to step 4.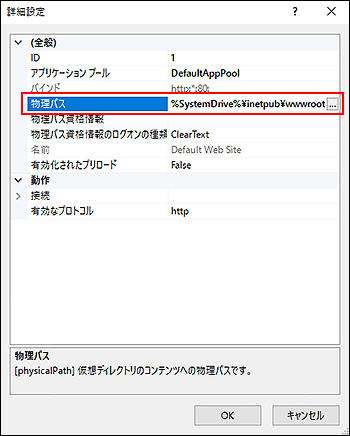
-
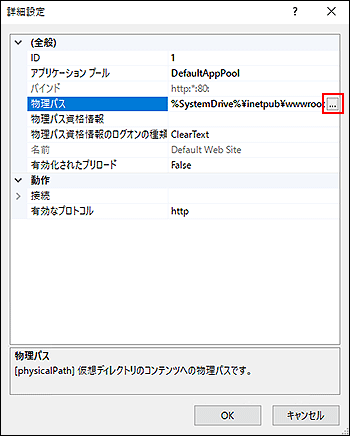
If you need to change the path of the document root from the default setting, select the "Physical Path" section, and then click ... .
-
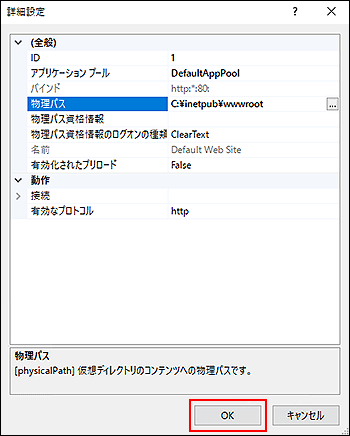
On the "Browse For Folder" screen, select the desired folder, and then click OK.

-
Click OK on the "Advanced Settings" screen.
-
Close Internet Information Services (IIS) Manager.
Notes When Using Garoon
In Garoon 6 or Garoon 5 in the IIS 10.0 environment, the following symptoms have been confirmed.
For details on how to deal with the symptoms, refer to the following FAQ:
-
Garoon 6:
- Cannot upload files of 30 MB or larger.
FAQ: Cannot upload files of 30 MB or larger. - Cannot download files properly.
FAQ: Cannot download files that contain a half-width space or "+" in the file name. - On the System Administration screen, the log is not output to the server OS even if "System Log" is selected as the log output destination.
FAQ: Event log is not output even if "System Log" in the "System administration" is selected as the log output destination.
- Cannot upload files of 30 MB or larger.
-
Garoon 5:
- Cannot upload files of 30 MB or larger.
FAQ: Cannot upload files of 30 MB or larger. - Cannot download files properly.
FAQ: Cannot download files that contain a half-width space or "+" in the file name. - On the System Administration screen, the log is not output to the server OS even if "System Log" is selected as the log output destination.
FAQ: Event log is not output even if "System Log" in the "System administration" is selected as the log output destination.
- Cannot upload files of 30 MB or larger.
Notes When Using Cybozu Office 10
In Cybozu Office 10 in IIS 10.0 environment, the following symptoms have been confirmed. For details on how to deal with the symptoms, refer to the following FAQ:
- Cannot upload files of 30 MB or larger.
FAQ: Cannot upload files of 30 MB or larger. - Cannot download files properly.
FAQ: Cannot download files that contain a half-width space or "+" in the file name.