- Help Contents
- Getting Started
Getting Started
Logging In
This section describes how to access Garoon using a Web browser.
This section assumes that Garoon has been installed in the default directory.
Steps:
- 1
Access the following URL in a Web browser:
Windows servers:
http://(server's IP address or host name)/scripts/cbgrn/grn.exeLinux servers:
http://(server's IP address or host name)/cgi-bin/cbgrn/grn.cgi
- 2
Enter your login name and password, and click "Login".
If your password has expired, you are prompted to enter a new password.
- Tip
- Contact your system administrator to obtain your login name and password.
Supported Web Browsers
Information on supported Web browsers can be found on our website.
https://faq.cybozu.info/alphascope/cybozu/web/garoon4/Detail.aspx?id=2515
This website is currently available only in Japanese.
- Tip
-
Information on setting up your Web browser can be found on our website.
Setting Up Your Web Browsers:
https://jp.cybozu.help/en/settings/browser/webbrowser.htmlThe following message may appear if you have logged in using an unsupported Web browser:
"Your Web browser is not supported. Some functions may not work correctly."
This message will be displayed for approximately five seconds.
Logging Out
Click your user name displayed in the upper right corner, and click "Logout".
Display Overview
This section describes how to use the main Garoon screen.
Applications
The default application names for Garoon are as follows:
| Icon | Application name (default) | Icon | Application name (default) |
|---|---|---|---|
| Portal | Space | ||
| Bookmarks | Scheduler | ||
| Messages | Bulletin Board | ||
| Cabinet | Memo | ||
| Phone Messages | Timesheet | ||
| To-Do List | Address Book | ||
| Workflow | |||
| MultiReport | RSS Reader | ||
 |
Presence indicators | Favorite | |
 |
Like | Notifications |
- Tip
-
Depending on the settings chosen by the system administrator or the user's language settings, the displayed application names may differ from those used in this help.
This help uses the default application names in all descriptions.
Top Page
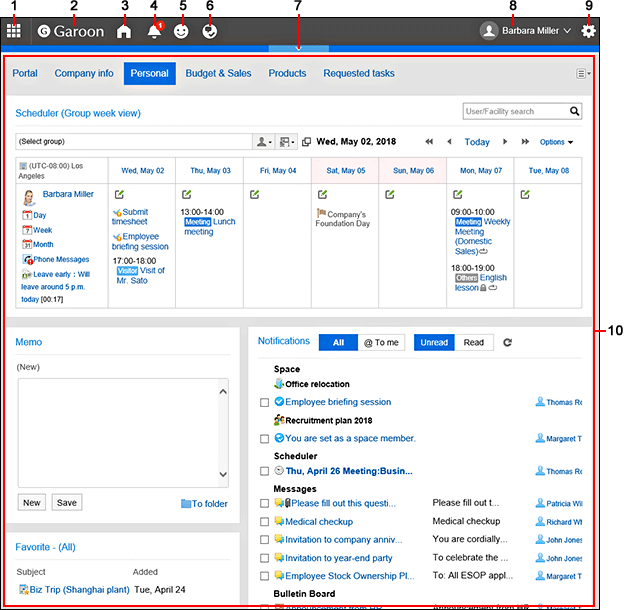
The top page is the screen displayed after the user logs in. If a portal is set up, the portal is displayed.
Top Page:

Parts
The parts displayed on the top page vary depending on the settings chosen by the system administrator or the user's personal settings.
| No. | Part | Description |
|---|---|---|
| 1 | Apps | This drop-down list allows users to navigate Garoon applications. |
| 2 | Logo | Displays the top page.The system administrator can set the logo. |
| 3 | Top page | Click this icon to display the top page of Garoon. |
| 4 | Updates | Next to the bell icon, the number of all unread notifications is displayed. When the bell icon is clicked, notifications for each application are displayed in the drop-down list. Not only notifications are categorized by unread and read, but also "All" and "@ To me" tabs can be used to filter notifications in the drop-down list. |
| 5 | Responses | Click to display a list of responses to your comments from users. |
| 6 | My spaces | Displays a list of spaces that you are a member of. |
| 7 | Application menu | This menu allows users to navigate Garoon applications.
|
| 8 | User name | Displays your user profile in your personal settings. |
| Edit | Displays your user profile in your personal settings. | |
| Language & Time zone | Changes the display language and the time zone. | |
| Change password | Changes your login password for Garoon. | |
| Change password | Changes your login password for Garoon. | |
| Change password | Changes your personal settings. | |
| Change password | Displays Garoon online help in a new tab or window when clicked. | |
| Logout | Logs out from Garoon. | |
| 9 | Garoon settings | Displays the system administration screen for Garoon when clicked. This item is displayed only for the users who have administrative privileges for Garoon. |
| Administrator help | This item is displayed only for the users who have administrative privileges for Garoon. Displays administrator help in a new window. |
|
| 10 | User area | This area is used for adding new appointments, checking updates, and so on. |
User icons
| Icon | Description |
|---|---|
 |
A user other than the current user |
 |
The current user |
 |
An inactive user or a removed user |
Display language
The priority of display languages is given in the following order:
If the system administrator has specified the language of the user: The system administrator's language setting is used.
If the system administrator has not specified the language of the user: The Web browser's language setting is used.
Garoon will use the Web browser language setting if the browser is set to one of the following:Japanese
English
Simplified Chinese
The web browser's language settings are not supported in Garoon:
Garoon defaults to the language setting specified during installation.
The display language can be overridden in your personal settings.
"Setting Up Locale"
User Name Display Options
User names can be displayed in one of the following patterns:
User name
User name (English name)
User name; priority organization
User name (English name); priority organization
User name display options can be modified in your personal settings.
"Configuring Display and Input Entries"
The system administrator can configure to hide information after the user name, or to display only the English name.
Displaying List
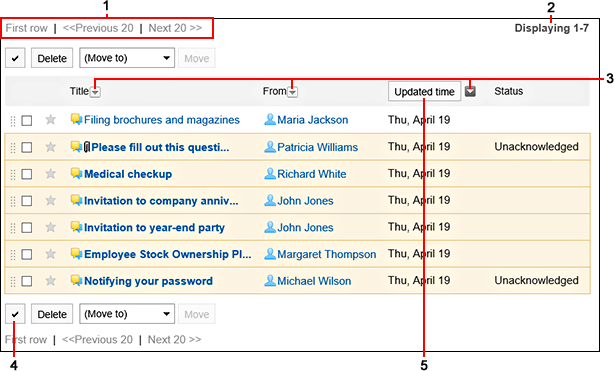
By selecting list items, you can delete, move, or sort several items at once. You can set the number of items displayed in a list in your Personal settings.
Messages screen:

Parts
| No. | Part | Description |
|---|---|---|
| 1 | Navigational links | These links become active if there are more items than the items per page limit. |
| 2 | Items per page limit | Indicates the maximum number of items per page. |
| 3 |  |
Sorts in descending order. |
 |
The list is sorted in descending order. When clicked, the list is sorted in ascending order. | |
 |
The list is sorted in ascending order. When clicked, the list is sorted in descending order. | |
| 4 | Select all | Selects all visible items in the list. This does not select items that are in other pages. Clicking "Select all" the second time clears the selection. |
| 5 | Sort buttons | In Messages and E-mail, you can sort items using the sort button. The button toggles when clicked. Messages: Updated time or Created time E-mails: "Sent" or "Received" |

