![]()
- Help Contents
- Personal settings
- Configuring Display Contents
Configuring Display Contents
- Setting Up Display and Input Entries
- Setting Up Screen Design
- Setting Up Header and Footer
- Setting Up Drop-Down Lists
Setting Up Display and Input Entries
- 1
On the "Personal settings" screen, click "Common settings" > "Screen", then click "General settings".
- 2
On the "General settings" screen, edit the entries as desired, then click "Save".
Options Available in the General Settings:
| Entry | Description |
|---|---|
| Maximum number of items per screen | Indicates the number of items displayed on the Messages and the Bulletin Board screens. |
| Maximum number of comments on Comment List | Indicates the number of comments displayed on the list. |
| Display width for titles | Indicates the width for displaying titles. It is set in the number of half-width characters. |
| Width of body texts and comments fields | Field width for the text body or comments. It is set in the number of half-width characters. |
| Width for From/To column | Field width for displaying senders or recipients. It is set in the number of half-width characters. |
| E-mail address link1 | Selects the application that starts when you click the address link of e-mail from the following:
|
| Image file (gif, jpeg, etc.) | Displays images attached to messages or topics together with the text body. The corresponding extensions of files are as follows:
|
| Character encoding for file output | Selects a character encoding to export messages, topics, and notes to a file. If you select "Select when exporting", you can select a character encoding when you are exporting to a file. |
| Information to display after Names2 | You can select items to display next to user names.
|
| Profile pictures | A picture stored in the user profile is used as an icon to identify users in applications such as Phone Messages and User list. |
| Width for body entry field | Indicates the entry field width for the text body. It is set in the number of half-width characters. This setting is not applied to the text body of e-mails. |
| Height for body entry field | Indicates the entry field height for the text body. It is set in the number of rows. This setting is not applied to the text body of e-mails. |
1: No Web mailer software is displayed depending on the system administrator setting.
2: The information inside the parentheses is not displayed depending on the system administrator setting.
See the following section in regard to user name display:
"User Name Display Options"
3: The system administrator can prohibit selection of English name.
Display example:
When you configure the "General settings" screen, the settings are reflected on the following parts:
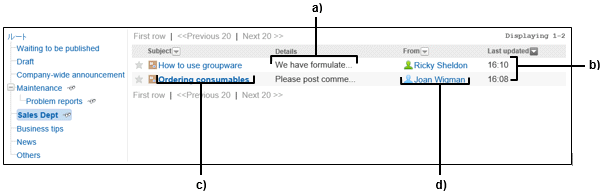
a): The width of body texts and comments field setting is reflected here.
b): The maximum number of items per screen setting is reflected here.
c): The display width for titles is reflected here.
d): The width for From/To column setting is reflected here.
- Tip
-
When a user has the administration rights to the basic system, the settings will reflect on the number of displayed items or width of entry fields on the system administration screen.
Depending on Web browser or character encoding settings, the number of characters that are set on the "General settings" screen may differ from the number of characters actually displayed.
Setting Up Screen Design
You can configure the design and background color of the screen.
- 1
On the "Personal settings" screen, click "Common settings" > "Screen", then click "Design settings".
- 2
Select a design on the "Design settings" screen, then click "Save".
Setting Up Header and Footer
You can select whether to display the application menu or the "App menu" drop-down list on the header of the screen.
The system administrator can disable this function.
- 1
On the "Personal settings" screen, click "Common settings" > "Screen", then click "Header and footer settings".
- 2
On the "Header and footer setting" screen, edit the entries as desired, then click "Save".
The following entry fields are available:Show application menu:
Select the check box to display the application menu in the header of the screen.Application menu type:
Displays the menu in one of the following formats:Display both the icons and the subject of each applications.
Display only the subject of each applications.
Show app menu:
Select the check box to display the "App menu" drop down-list in the header of the screen.
Setting Up Drop-Down Lists
A drop-down list is used to select organizations or users.
You can select whether to display the following items in a drop-down list:
Often-used organizations
These are organizations that you added to often-used Organization.Often-used facility groups
These are facility groups that you added to often-used facility groups.Recent items
These are users, facility groups, and facilities that the user recently selected.Display location of My groups
The system administrator can disable this function.
- Tip
- When you click on another tab without saving the settings on the tab that you were on, the changes are discarded.
Setting up Often-used Organization
- 1
On the "Personal settings" screen, click "Common settings" > "Screen", then click "Drop-down list settings".
- 2
Click the "Often-used Organization" tab on the "Drop-down list settings" screen.
- 3
Select organizations that you want to add, then click "Add".
- 4
Click "Save".
Setting up Often-used Facility Groups
- 1
On the "Personal settings" screen, click "Common settings" > "Screen", then click "Drop-down list settings".
- 2
Click the "Often-used facility groups" tab on the "Drop-down list settings" screen.
- 3
Select facility group that you want to add and click "Add".
- 4
Click "Save".
Editing the Display Contents of Recent Items
- 1
On the "Personal settings" screen, click "Common settings" > "Screen", then click "Drop-down list settings".
- 2
Click the "Recent items" tab on the "Drop-down list" screen.
- 3
Edit the entries as desired, then click "Save".
The following entry fields are available:Results per item:
Select the number of items that are displayed on the Drop-down list menu.Clear history:
You can clear the history of selected items. You cannot recover the cleared history.
Setting Up the Display Location of My Group
You can select to display the My group items either before the Often-used Organization, or after.
- 1
On the "Personal settings" screen, click "Common settings" > "Screen", then click "Drop-down list settings".
- 2
Click the "My group" tab on the "Drop-down list settings" screen.
- 3
Select the display location that you want, then click "Save".
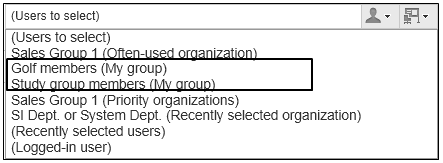
Display example:
When My group is displayed in front of Often-used organizations
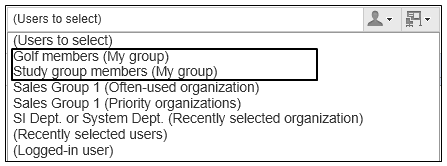
When My group is displayed after often used organizations
![]()
All brand names and product names appearing on this site are registered trademarks or trademarks of their respective holders. Copyright (C) Cybozu